Summary of PWM Fan controller
The author built a custom, quiet fan controller for an office server rack to prevent overheating while maintaining low noise levels. The project utilizes an Arduino Uno to manage two PWM-controlled fans and includes features like data logging via an SD card and a custom display. This DIY approach allows for precise speed tweaking compared to off-the-shelf solutions.
Parts used in the Custom Fan Controller:
- Arduino Uno revision 3 board with ATmega328P chip
- Two Noctua 80cm NF-A8 PWM fans
- SD card for recording values
- Custom display with custom characters
- Power wire (12V supply compatible)
- Sensor wires
- PWM signal wire
Recently I had the problem some expensive components did overheat in my server rack. The ventilation was not optimal and I had to install additional fans. Because this rack is in my office and I like a quiet working place, the ventilation had to be as quiet as possible.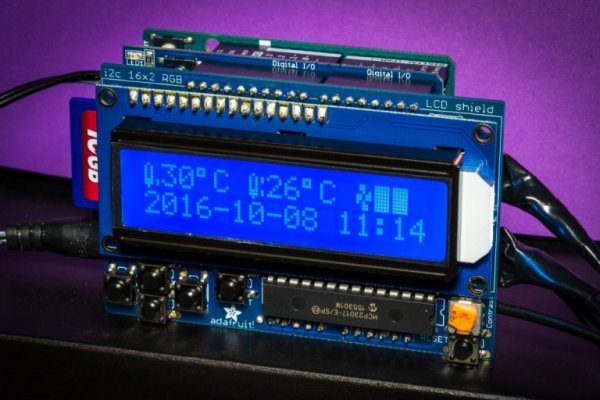
First I thought about buying a off-the-shelf product, but then I realised: If this controller does not work as I expect and the fans will spin too fast/loud, this will drive me crazy over time. So I decided to build a own fan controller. A very simple one, where I can write own code and tweak it until it runs as I like.
This project page describes how I built this particular controller. It is not meant you really reproduce this same controller exactly as shown, but maybe understand some basic principles to build your own controller.
For the start, here a photo of the final controller, without the case. You can see the display, with custom characters, the power wire on the left, two sensor wires on the right and one wire for where the fans and the PWM signal is connected. You can also see the SD card on the left side, where all values are recoded.
Used Parts
- Arduino Uno
I am using an original Arduino Uno revision 3 board with theATmega328Pchip on it. I have chosen this board because it can be powered with a 12V power supply which is required for the fans. Also I had already the two shields, which were only compatible with the Arduino Uno. - 2× PWM Controlled PC Fan
For my setup I use two very quiet Noctua 80cm NF-A8 PWM fans. They are very powerful but almost make no audible noise. They especially keep that quite over their lifetime. Using the PWM input I can control the speed of the fans very precisely.
For more detail: PWM Fan controller
- Why did the author decide to build their own fan controller?
The author chose to build one because off-the-shelf products might not meet specific quietness requirements, and a custom solution allows writing code to tweak performance precisely. - What power supply is required for the fans and the Arduino board?
A 12V power supply is required, which is why the original Arduino Uno revision 3 was selected as it can be powered by this voltage. - Which specific fans were used in this project?
The project uses two very quiet Noctua 80cm NF-A8 PWM fans that are powerful yet produce almost no audible noise. - How is the fan speed controlled in this setup?
Fan speed is controlled precisely using the PWM input on the fans, managed by the Arduino code. - Where are the recorded values stored in this controller?
All values are recorded on an SD card located on the left side of the controller. - What components are visible on the final controller without the case?
The visible components include the display with custom characters, the power wire, two sensor wires, one wire for fans and PWM signals, and the SD card. - Can this project be reproduced exactly as shown?
The page states it is not meant for exact reproduction but rather to help users understand basic principles to build their own controller.