Summary of WiFi RFID Reader
This article details the foundational setup for a 13.56 MHz RFID reader using an ESP8266 WiFi SoC. It covers installing Arduino IDE, configuring board managers, and wiring the MFRC522 module to the ESP-12 via SPI. The guide provides C++ code to initialize the reader and output tag UIDs to the serial monitor, serving as a base for future projects involving databases or web interfaces.
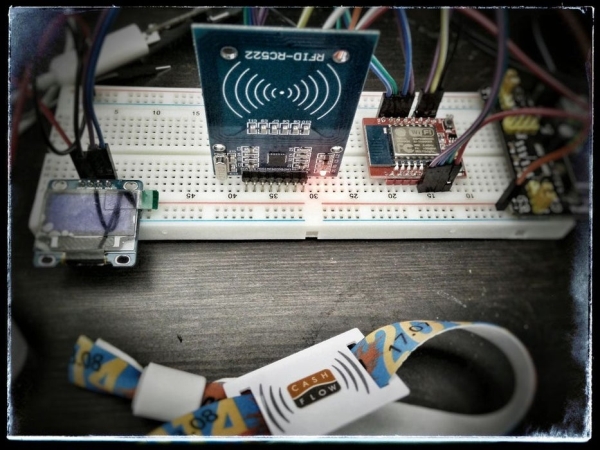
Parts used in the WiFi RFID Reader:
- ESP8266 WiFi SoC (ESP-12)
- MFRC522 RFID Module
- Arduino IDE 1.6.4 or 1.6.5
- RFID library by Miguel Balboa
- SPI connection wires
The main idea was to read in 13.56 MHz RFID (tags / tokes / stickers / wristbands / cards) by a magic box and post the RFID UID to a local database by WiFi network.
This instructable builds the base of the whole system – the first working RFID reader on ESP8266 WiFi SoC. (many thanks to nikxha from the ESP8266 forum for the initial help)
Step 1: Requirements
You have to install the Arduino IDE 1.6.4. or 1.6.5.
- Arduino > Preferences > “Additional Boards Manager URLs:” and add: http://arduino.esp8266.com/package_esp8266com_index.json
- Arduino > Tools > Board > Boards Manager > type in ESP8266 and install the board
- download MFRC522 module (see Libraries) and copy folder to Arduino library path
Libraries
- RFID library by Miguel Balboa
Step 2: Wiring RFID RC522 Module
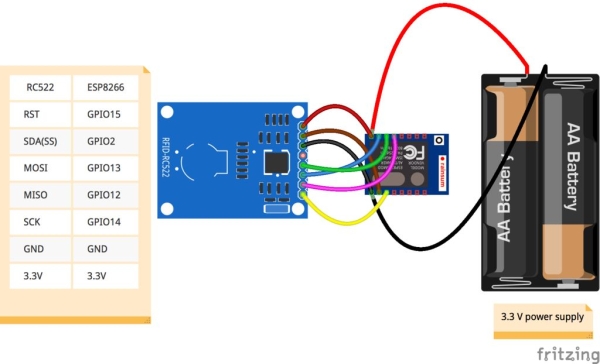
wiring the MFRC522 to ESP8266 (ESP-12)
(please use wiring below instead of diagram above)
RST     = GPIO05 (free GPIO)
SS      = GPIO4  (free GPIO)
MOSI    = GPIO13 (HW SPI)
MISO    = GPIO12 (HW SPI)
SCK     = GPIO14 (HW SPI)
GND     = GND
3.3V    = 3.3V
Step 3: Software
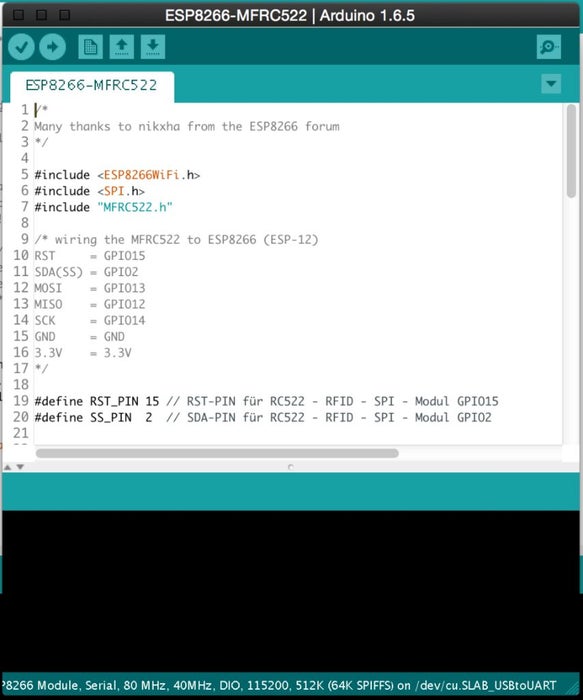
define RFID module
#include "MFRC522.h"
#define RST_PIN 15 // RST-PIN for RC522 - RFID - SPI - Modul GPIO15
#define SS_PIN  2  // SDA-PIN for RC522 - RFID - SPI - Modul GPIO2
MFRC522 mfrc522(SS_PIN, RST_PIN);   // Create MFRC522 instance
Initialize RFID module
void setup() {
  Serial.begin(9600);    // Initialize serial communications
  SPI.begin();           // Init SPI bus
  mfrc522.PCD_Init();    // Init MFRC522
}
Read RFID tag
void loop() {
  // Look for new cards
  if ( ! mfrc522.PICC_IsNewCardPresent()) {
    delay(50);
    return;
  }
  // Select one of the cards
  if ( ! mfrc522.PICC_ReadCardSerial()) {
    delay(50);
    return;
  }
  // Show some details of the PICC (that is: the tag/card)
  Serial.print(F("Card UID:"));
  dump_byte_array(mfrc522.uid.uidByte, mfrc522.uid.size);
  Serial.println();
}

// Helper routine to dump a byte array as hex values to Serial
void dump_byte_array(byte *buffer, byte bufferSize) {
  for (byte i = 0; i < bufferSize; i++) {
    Serial.print(buffer[i] < 0x10 ? " 0" : " ");
    Serial.print(buffer[i], HEX);
  }
}
Step 4: Final Steps …

As I wrote at the beginn of this short instructable, this is just the base.
But you can make many funny projects by using this hard and software.
For my next project I’m using not only the RFID module (SPI), I will use a small OLED display (I2C), and toggle button.
The boxes are fully self configurable by one master RFID card.
There is also a webinterface to manage all boxes and add some topics, tags and description.
If I’m finished the project, I will upload it to instructables – so stay tuned.
There will be also a link here to the new tutorial.
Source: WiFi RFID Reader
- How do I install the ESP8266 board in Arduino IDE?
Add http://arduino.esp8266.com/package_esp8266com_index.json to Additional Boards Manager URLs, then install ESP8266 via Tools > Board > Boards Manager. - Which pins connect RST and SS on the MFRC522 to the ESP-12?
RST connects to GPIO05 and SS connects to GPIO4. - What is the correct wiring for the HW SPI pins?
MOSI connects to GPIO13, MISO to GPIO12, and SCK to GPIO14. - Does the provided code initialize the SPI bus?
Yes, the setup function includes the line SPI.begin() to initialize the SPI bus. - What library is required for this project?
The project requires the RFID library by Miguel Balboa. - Can the system read different types of RFID tags?
Yes, it reads 13.56 MHz RFID tags, tokens, stickers, wristbands, and cards. - Where does the RFID UID get printed in the initial code?
The UID is printed to the Serial monitor using Serial.print and dump_byte_array. - What are the plans for the next project phase?
The author plans to add an OLED display, toggle button, and a web interface for management.