Introduction
“The sound and experience of drums…
Any time, anywhere,
with any object.”
-Project Soundbyte
It’s Friday night and you’re hanging with your friends at home. There are no parties tonight and you have seen everything on Netflix already – you’re bored out of your minds. One of your friends pulls out his portable roll up piano keyboard, starts making random songs out of boredom. “Let’s make the next big hit, guys!” You all get excited. One of your friends sings along, making the lyrics as she goes. It’s starting to sound like a real song, but it’s missing a beat. You have the perfect idea of the drumbeat that should go along with the song, but all you have around you is two pencils. Luckily, with Drums Anywhere, you have all you need to drop the beat for your song!
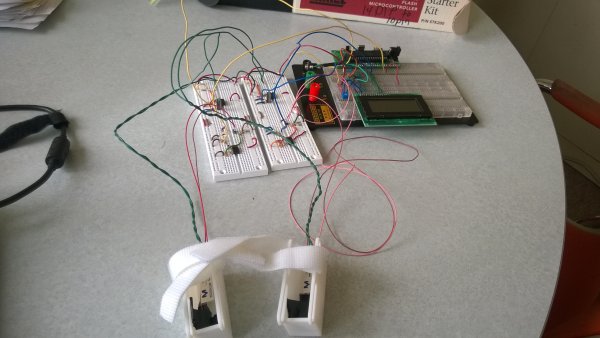
Drums Anywhere is the simplest solution to making a great drum beat at short notice. Using two simple 3D-printed boxes that you can attach to any stick-like object, you can strike any surface to instantly output the sound of drums through your speakers. Using a clap sound for one box, and a snare drum sound for the other, Drums Anywhere can output the drum sound you want, even with accurate amplitude corresponding to the force of the hit!!
This is an all-new design that costs a fraction of what a drum machine costs, and brings an intuitive and extensible design to what was once a bulky and static set up. Drums Anywhere uses an ATMega1284P Microcontroller and a variety of sensors and hardware to accomplish its purpose, and puts a spotlight on new, accessible technologies such as 3D-printing. This is the first revision of Drums Anywhere, and there is plenty of opportunity to extend this design to include more features, such as more sensors, more drum voices, and perhaps a wireless design.
High-Level Design
Overview
The project stemmed from a desire to make real drum sounds more accessible to all. Drums sets and drum machines are immensely expensive, and usually out of the price range for a music enthusiast who simply enjoys creating drum beats at short notice. Our project brings together analog circuitry and filters with digital concepts, such as hardware timing, interrupts, and a user-friendly interface. We made a concerted effort to use as inexpensive parts as possible to make this system accessible to all. The system is as simple as possible: the user simply has to plug in speakers, turn on the system, and start drumming.
Logical Structure Block Diagram
The logical structure of our system is shown below: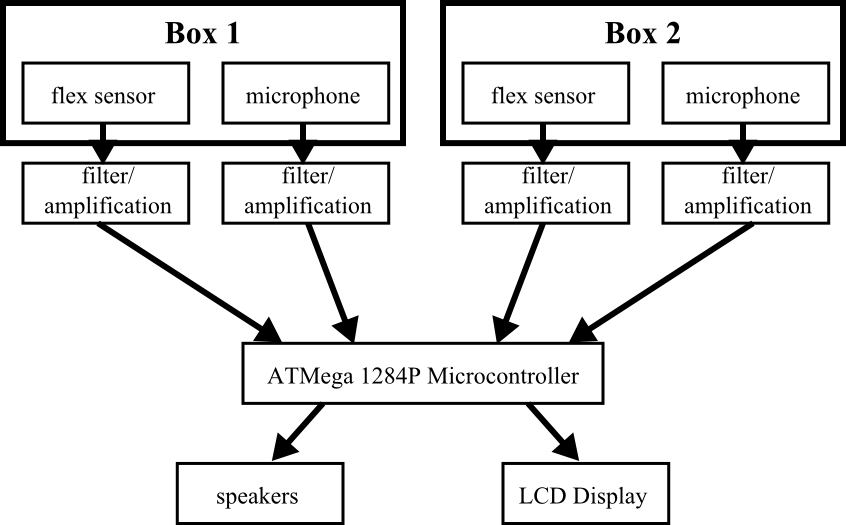
Hardware/Software Tradeoffs
One of the biggest considerations we made during this project was how much we wanted to balance using cheaper hardware and compensating using the software. We also encountered some tradeoffs when choosing what types of hardware to use. Since our primary aim with this project was to make the system as cheap as possible, we wanted to offload as much of the complexity of the system to the software as possible. We debated using hardware that would simplify our software component, or using a more complex hardware component that would also complicate our software, but for a lower cost. We elected for the latter option, as it added versatility to our design and the use of our project while still remaining well within the computational power of our microcontroller. This tradeoff, while requiring more complex hardware, also made our system more robust. This will be explained further in the Hardware section.
The ATMega 1284P microcontroller has more than enough timing and computing power to keep up with the system to make the drums real. We are able to program the microcontroller such that our system is robust and does not trigger multiple plays with one single hit. This is through knowledge of human abilities to repeat a hit to keep our system from unrealistically playing multiple hits in an unacceptable timeframe. This was a tradeoff of using the hardware we used, as the likelihood of accidentally triggering unrealistic intervals for drums was greatly increased. We had to add extra complexity using timers to mitigate this issue, but the complexity was still well within the abilities of the microcontroller.
User Interface
The user interface was one of the most important components of this project. We wanted to make our system as similar to a drum kit as possible: The user simply has to sit down, grab the sticks, and create the beat. When the user powers on the device, some initial setup occurs within the microcontroller, but this takes no more than 5 seconds. The system uses an industry-standard stereo audio plug, making it easy for the user to plug in any speakers they have, or even headphones if they want to practice alone. Once the user has plugged in some form of speakers, they can attach the boxes to whatever object they have around, including their hands if necessary, turn the system on, and start playing. The system is capable of running from a 9V battery, making this system extremely portable.
The LCD serves very little functional purpose in this revision of the system, only showing the name of the system, the two voices corresponding to each box, and the microcontroller’s amplitude reading from the Analog-to-Digital converter corresponding to the most recent hit. However, it does give the user familiarity with the system, especially if it is their first time.
Standards
Our project does not use very many industry standards, as very few are required to run this system. The main standard we use is the WAV audio standard to store our audio bitstream. The WAV standard is a Microsoft/IBM file format that encodes audio as a stream of bits. We use 8-bit 22kHz files in this project. All interrupts are asynchronous, and the bitstreams are stored in program memory, so no communication protocols are necessary. We use a standard 3.5mm TRS connector for stereo audio output to any computer speakers or headphones.
Copyrights/Intellectual Property
In order to convert our sound files to a series of 8-bit values readable by the microcontroller, we made use of Guilherme (William) Kalfelz’s (Wusik) WAV2Code program, available here. Wusik’s program takes in all .wav files in a folder and outputs a header file with all of the 8-bit values which we could then output using a PWM channel. Our system does not infringe any of his copyrights, and we are very grateful for his making this program available to the general public.
For more detail: Drums Anywhere: solution to making a great drum beat Using 3D-printed boxes