
Summary of Standalone Arduino / ATMega chip on breadboard
This article outlines the components and initial assembly steps for building a standalone Arduino using an ATMega328 chip on a breadboard. It details primary parts required from retailers like Digikey and Sparkfun, including the microcontroller, power supply, capacitors, and crystal oscillator. The guide also offers alternatives for power regulation and timing components, followed by instructions on connecting power rails and correctly orienting the chip on the breadboard.
Parts used in the Standalone Arduino:
- ATMega328 chip with Arduino bootloader pre-installed
- 5VDC Switching power supply
- 22 pF ceramic disc capacitors
- 16MHz Crystal
- Power jack
- Breadboard
- 22 awg solid wire
- 5V Voltage Regulator (Alternative)
- 10 uF Aluminum Capacitor (Alternative)
- 16 MHz Ceramic Resonator (Alternative)
Step 1: Parts needed
I bought my parts from Digikey and Sparkfun Electronics – they’re 2 of my favorite places to buy components. Anyway, here’s the list:
#1 – (Qty: 1) – ATMega328 chip with Arduino bootloader pre-installed ($5.50)
#2 – (Qty: 1) – 5VDC Switching power supply ($5.95)
(Note: If you don’t use a switching power supply, you must add in a voltage regulator and a couple of capacitors…see below)
#3 – (Qty: 2) – 22 pF ceramic disc capacitors ($.24 / ea)
#4 – (Qty: 1) – 16MHz Crystal ($1.50)
#5 – (Qty: 1) – Power jack ($.38) (Optional)
#6 – (Qty: 1) – Breadboard (hopefully you have one laying around, but if not, here’s one. ($8.73)
#7 – Small pieces of 22 awg solid wire. If you don’t have any, you can probably pick some up at your favorite electronics store.
Total cost for above before tax/shipping: about $14 (not including breadboard).
Alternatives / options:
Option / Alternative #1:
If you want to use an existing power supply you have around the house, make sure it is between 5V – 16V. If you are not sure if it is a regulated switching power supply, then you must use the following components too:
#1 option – (Qty: 1) – 5V Voltage Regulator (or another similar 5V voltage regulator) ($.57)
and
#1 option – (Qty: 2) – 10 uF Aluminum Capacitor ($.15 / ea)
(See below reference links for how to hook them up)
Option / Alternative #2:
If you don’t want to use standard items #3 and #4, you can replace those with:
#2 option – (Qty: 1) – 16 MHz Ceramic Resonator (w/cap) ($.54)
This part looks like a ceramic capacitor, and you hook the 2 outside pins up to where you would hook the crystal up (covered later in the Instructable), and the middle pin goes to ground. At least this is what I’ve read – I haven’t tried it yet. But as you may note, it is a little cheaper to go this route. 🙂
Ok, let’s start hooking stuff up!
Step 2: Hooking up power
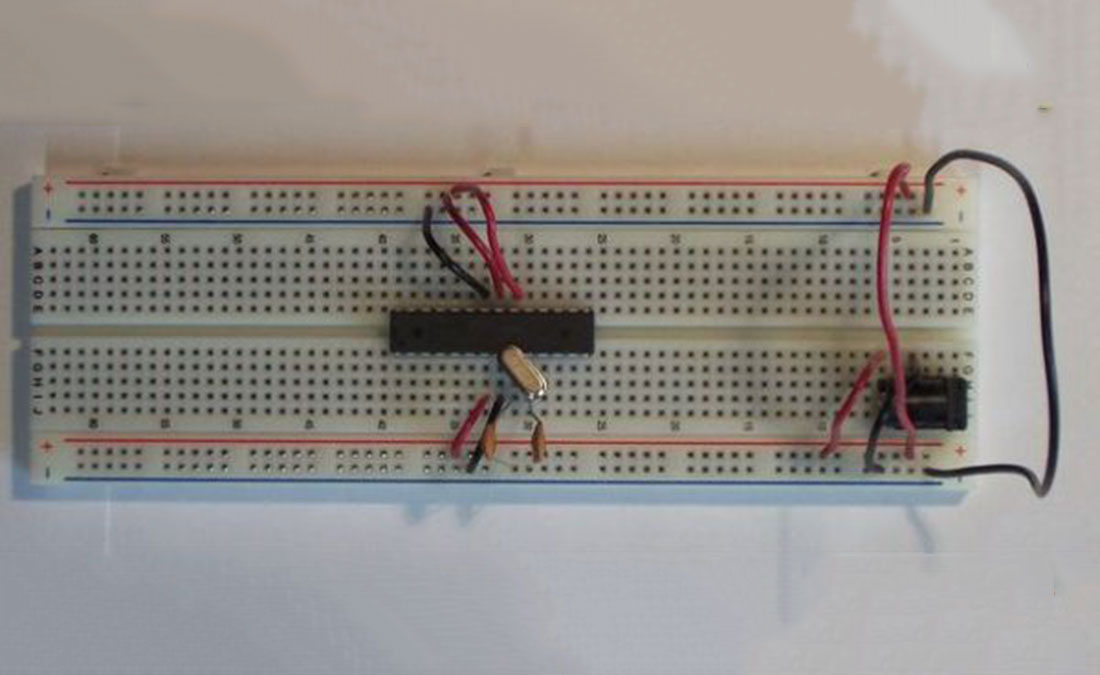
Go ahead and connect your power jack as shown in the first photo if you are using a power jack. Next, hookup a couple of wires as shown in the photo connecting the respective power (+ and -) rails together.
Now we want to put the microcontroller on your breadboard as shown in the photo. If this is a brand new chip, you have to bend both rows of pins in a little bit. What I do, is I hold the chip from both sides, and press the chip a little bit against a flat surface like a desk, and do this on both sides so that both sides are bent in equailly.
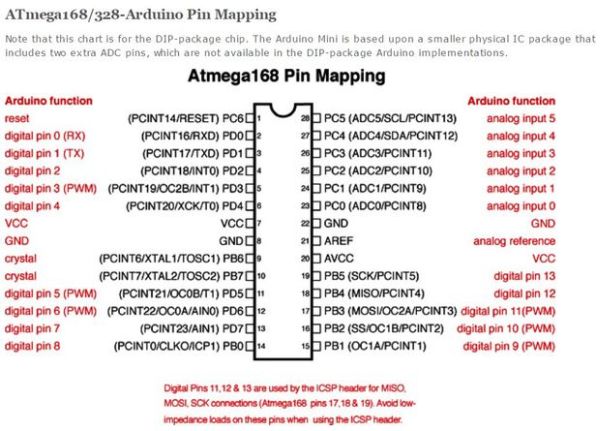
You most likely won’t have to do this if you’re pulling your chip from your Arduino – they’re already bent from being in the socket.
Please note the orientation of the chip – in the photos and for this Instructable, please place the chip so that the little half-round ‘notch’ is on the left.
For more detail: Standalone Arduino / ATMega chip on breadboard
- Where can I buy the necessary components?
You can purchase parts from Digikey and Sparkfun Electronics. - What is the total cost before tax and shipping?
The total cost is about $14, excluding the price of the breadboard. - What voltage range must an existing house power supply be within?
An existing power supply must be between 5V and 16V. - When do I need to add a voltage regulator and capacitors?
You must add these if you are not using a regulated switching power supply or if your existing supply is unregulated. - How can I replace the standard crystal and capacitors?
You can replace them with a 16 MHz Ceramic Resonator which has a built-in capacitor. - How should I prepare a brand new ATMega328 chip for the breadboard?
You must bend both rows of pins slightly inward by pressing the chip against a flat surface. - Which direction should the chip be placed on the breadboard?
The little half-round notch on the chip should be placed on the left side.
