Summary of Stand Alone AVR Programmer
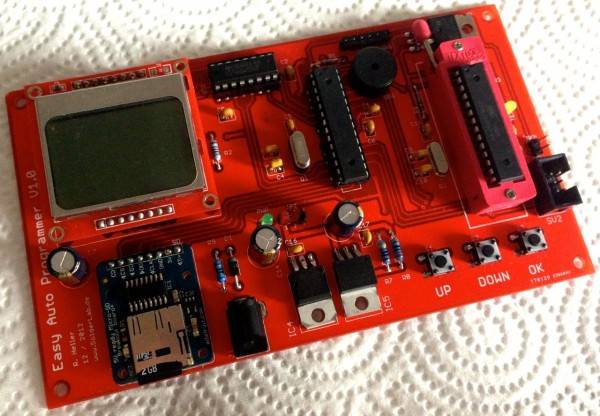
The SolderLab Easy Auto Programmer V1.0 automates AVR chip programming without a PC. It features an SD card reader, Nokia 5110 display, ZIF socket, and ISP interface. Users place hex files with specific headers in a "hex" folder on a FAT32 SD card, power the device (7-20V), and press one button to flash chips, set fuses, and verify results. The project is open source.
Parts used in the SolderLab Easy Auto Programmer V1.0:
- AVR microcontroller
- SD-card slot
- Nokia 5110 display
- Zero Insertion Force Socket (ZIF)
- 6-pin ISP interface header
- Three push buttons
- Standard DC jack
- Jumper for voltage selection
Introduction
From project to project the number of hex files on our PC was increasing. Many people send us their virgin ATMegas to get them flashed. And last not least distributing PCB’s and pre-flahed chips via agile-hardware forced us to burn many, many AVRs. In principle this is a work an ape should do but reality was different. So we spend munch time in this boring job. To much time …
Thus it was just consequent to think about a device that would do the job for us. Here is the result, the SolderLab Easy Auto Programmer V1.0. An All-in-one AVR programmer with SD-card, Nokia Display, a ZIF-Socket and a 6-pin ISP interface. With this device the programming of an AVR is done in seconds including the setting of fuse bits (before AND after flashing), flashing the chip, verifying the flash. And all this without any connection to the PC and by pressing just one single button. You just have to put all your hex files into a folder called “hex” on a standard FAT32 formatted SD card, put the card into the programmer an supply it with some voltage (7-20V). That’s it the rest is done by the “ape”.
To make this job even more efficient the programmer boards includes a Zero Insertion Force Socket (ZIF) for fastest change of chips. But that does not necessarily mean that you are restricted to THT chips! The board also has a standard 6-pin ISP header that allows you to program AVRs in their circuit (if they have an ISP header too) all you need in this case is a 6-pin ribbon wire. The selection of the correct hex file in your “hex” folder on the SD card is done via the build-in Nokia 5110 display and three push buttons on the board.
Beside the flashing process itself (including writing of fuse bits) the programmer offers you a fast an uncomplicated way to read out device ID and fuse settings of any AVR. The speed of programming can be adjusted in an option menu. Thus you can even program AVR with incidentally reduced clock speeds (everyone who once set the fuse bits of his/her AVR incorrectly knows what I am talking about).
The device can be powered by 7-20V via standard dc jack. The device also powers the destination circuit when programming via ISP-connector and ribbon wire. With a simple jumper on the programmer you can choose the programming voltage between 5V and 3.3V. Thus you will be also able to flash AVR operation at 3.3V.
The complete project is open source and you can download the schematics, layout (in eagle file formate), as well as the firmware for the programmer itself from our download section.
SD-Card and File Format
Ok now let’s come to the point were we (you) want to burn some chips. The first thing to do therefore is to get your hex file(s) on a micro SD card. This card has to be formatted with Fat file system. Now creat a folder called “hex” in the root of the SD card and put your hex-files in.
Now, each hex-file has to be equipped with a header that gives the programmer information of
- the device ID of the target CPU
- the FUSE settings during programming
- the FUSE settings after programming (this is necessary only if you burn things like boot loaders that have to be protected after burning by special look bits)(if you don’t need this just type in the same fuse settings as during programming)
- the FUSE mask (can be found found in the data sheet of your AVR, if un-known just use FFFFFF)
- the chip’s flash size in HEX-FORMAT! (e.g. for 32kB = 32768 byte you’ll have to write 8000)
- the chip’s flash page size in HEX-FORMAT (e.g. for 128 byte you’ll have to write 80) (Flash page size can be found in the manual of your AVR)
That’s it. The format of the header should be self-speaking from the following example:
-950F //Target Device ID
-FFDE053F //Fuse settings while programming (LOW,HIGH,EXT,LOCK)
-FFDE053F //Fuse settings after programming (LOW,HIGH,EXT,LOCK)
-FFFF073F //Fuse mask (LOW,HIGH,EXT,LOCK)
-8000 //chip's flash size
-80 //chip's flash page size
:100000000C9461000C947E000C947E000C947E0095
:100010000C947E000C947E000C947E000C947E0068
...
:10041000892B8C932FBF0895CF93DF930E943E01C9
:100420000E949700C0E0D0E00E9480002097E1F396
:0A0430000E940000F9CFF894FFCFFE
:02043A000E00B2
:00000001FF
If you should do any mistake in the header don’t worry! The programmer will let you know about 🙂
For more detail: Stand Alone AVR Programmer
- How do I prepare the SD card for use?
Format the micro SD card with a Fat file system, create a root folder named hex, and place your hex files inside it. - Can I program AVRs while they are still in the circuit?
Yes, using the standard 6-pin ISP header and a 6-pin ribbon wire allows you to program AVRs in their circuit. - What information must be included in the hex file header?
The header requires the target CPU device ID, fuse settings during and after programming, fuse mask, flash size in HEX format, and flash page size in HEX format. - Does the programmer require a connection to a PC?
No, the device operates independently by pressing a single button after inserting the powered SD card. - What voltage range powers the device?
The device can be powered by 7-20V via a standard DC jack. - How do I select the correct programming voltage?
You can choose between 5V and 3.3V programming voltage using a simple jumper on the programmer board. - Can I adjust the programming speed?
Yes, the speed of programming can be adjusted within an option menu to accommodate AVRs with reduced clock speeds. - Is the project documentation available?
Yes, the complete project is open source, and schematics, layouts, and firmware are available for download.