Summary of Analog Discovery USB isolation
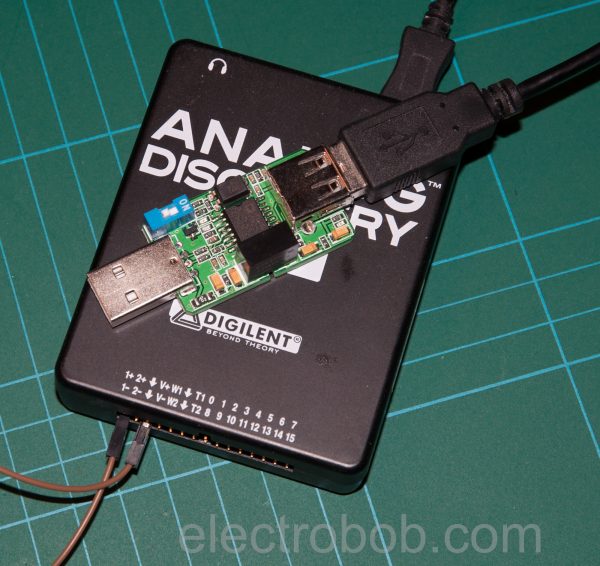
To isolate the Analog Discovery from ground noise, the author used an ADUM3160 isolator module. Since the original 1W DC/DC converter was insufficient for the device's power needs, three converters were connected in parallel to achieve approximately 2.5W. The input fuse was upgraded to 0.9A (recommended) or 0.65A (used), and a thicker wire replaced the small PCB trace to prevent voltage drop. An additional 470uF capacitor was added for decoupling. Performance testing confirmed that while USB 2.0 speeds are limited to 12 Mbps via this method, it supports 1 MHz signal generation effectively when powered by a high-current USB 3 port or self-powered hub.
Parts used in the Analog Discovery USB Isolation Project:
- ADUM3160 isolator module
- B0505S DC/DC converter (three units connected in parallel)
- 0.65A or 0.9A input fuse
- Extra wire for output connection
- 470uF capacitor for decoupling
- Self-powered USB hub
Intro
Back when I was deverloping the PSU burner, I wanted to have the Analog Discovery isolated from the common ground, to avoid noise and other issues. Since I did not have a way to do this, I ended up using a laptop on battery for measurements. But for long term, I needed to have this isolation. Unfortunately, things that can isolate USB at 480Mbps or faster are too expensive to justify.
The solution
The ADUM3160 isolator can provide a magnetically isolated 12 Mbps connection, which proved to be good enough. I grabbed one ready made isolator module from ebay for about $12, cheap enough. Well, it is not perfect: the B0505S DC/DC converter provided can only supply 1W and the Analog Discovery is a hungry beast.
Luckily, these DC/DC converters are cheap and I had some more in my parts bin. Their internal structure allows them to be connected in parallel, so I used 3, which should cover the 2.5W needed.
Next up, I had to upgrade the input fuse, to allow for higher current, my parts bin provided 0.65A one. Given the efficiency of the converters, this his slightly too small, so I would advice for a 0.9A one, the limit of USB 3 ports. Next up I have used an extra wire to connect the output of the DC/DC converter because the PCB trace was too small, dropping 0.3V on it already. Added an extra 470uF capacitor for decoupling, just to be sure.
The device works, but make sure to power it from a USB 3 or high current USB port, 0.5A classical is not enough. I am using a self powered USB hub.
Performance testing
I fired up Waveforms and set the signal generator to output a 1 MHz sine on a channel and used an oscilloscope channel to observe it. Luckily, the persistence mode does both a time count and a frame count, so I could use that as a method of USB performance. Without the isolator, I could do about 32 acquisitions per second.
Read more: Analog Discovery USB isolation
- How can I isolate the Analog Discovery from common ground?
Use an ADUM3160 isolator which provides a magnetically isolated 12 Mbps connection. - What is the best way to increase power supply capacity for the isolator?
Connect three B0505S DC/DC converters in parallel since their internal structure allows this configuration. - Does the standard USB 2.0 port provide enough current for this setup?
No, you must power the device from a USB 3 port or a high current USB port as 0.5A classical ports are not enough. - What fuse size should I use for higher current requirements?
A 0.9A fuse is recommended as the limit of USB 3 ports, though a 0.65A fuse was used in the project. - Why did the author add an extra wire to the DC/DC converter output?
The original PCB trace was too small and caused a 0.3V voltage drop. - What performance test was used to verify the USB isolation speed?
The author set the signal generator to 1 MHz sine wave and measured acquisition rates using persistence mode. - Can I connect multiple DC/DC converters together?
Yes, the internal structure of these specific converters allows them to be connected in parallel. - What component was added to ensure stable decoupling?
An extra 470uF capacitor was added just to be sure about decoupling stability.