Summary of Microbit Tic Tac Toe Game
This article details a collaborative project creating a large-scale Tic Tac Toe game using ten micro:bit controllers. Nine worker micro:bits, each assigned a grid coordinate, send X or O signals via radio to a master micro:bit upon button presses. The master tracks win states and resets the game. The team built a custom plywood enclosure with laser-cut supports to house the devices and batteries, completing the build in under 24 hours for a successful public event.
Parts used in the Microbit Tic Tac Toe Game:
- 10 microbit controllers
- Micropython IDE
- Drill with 1/4 in bit
- 4 pieces of 12x24" 1/8 plywood
- 3 6m 20mm bolts
- 1 6m 40mm bolt
- 4 6mm nuts
- Batteries for micro:bits
- Tape for securing components
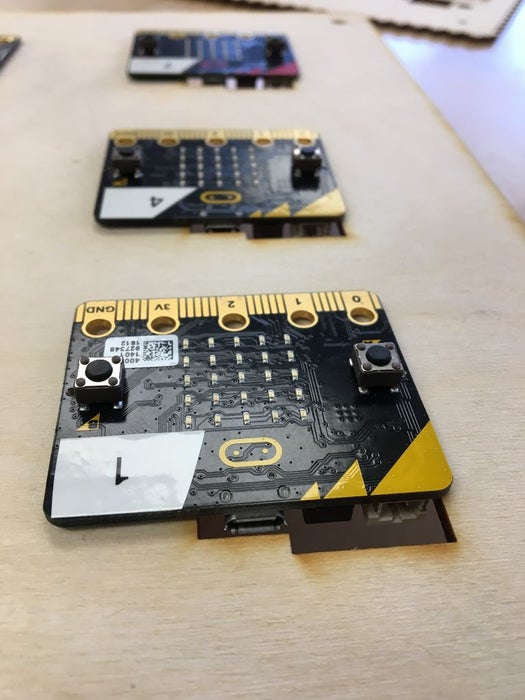
For this project, my co-worker – @descartez and I created an awesome tic tac toe game using the radio functionality of microbits. If you haven’t heard of microbits before, they’re an awesome microcontroller designed to teach kids programming. They have A TON of functionality including what we used for this project; the LED matrix, 2 buttons, and radio capability. The game works very simply, we have a 3×3 grid of worker mirco:bits that send a signal of either X or O to the master micro:bit who keeps track of all the win states and also resets the game. We were able to complete this project in less than 24 hours and displayed it during an event the next weekend where it was heavily used! And people seemed to really enjoy it! Obviously, as you follow along, you’ll see where we had to cut some corners to get it done in time, but we think what we have so far is pretty rad. Show us your tic tac toe games, or any spots we could improve!
Step 1: Materials
- 10 microbit controllers (All together this costs around $150, which is a lot! However, in our experience there are lots of these around, so don’t be afraid to reach out to your community of makers, techies, and students.)
- micropython IDE
- Drill with 1/4 in bit
- 4 pieces of 12×24″ 1/8 plywood
- 3 6m 20mm bolts
- 1 6m 40mm bolt
- 4 6mm nuts
Step 2: Game Design
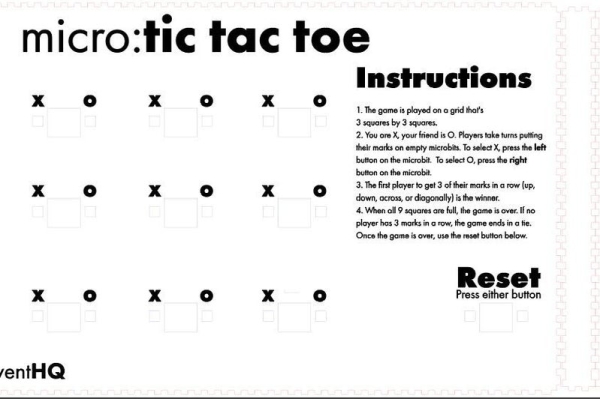
Step 1: Deciding the rules for Tic Tac Toe
Step 2: Code for the worker :bits
- Each worker :bit is given a coordinate.
(0,0) (0,1) (0,2)
(1,0) (1,1) (1,2)
(2,0) (2,1) (2,2)
- This coordinate is adjusted in the top line of code for the worker:bits.
- coord_x = 0
- coord_y = 0
- Each worker has two things. 1) When button A is pressed the LED matrix flashes X and a radio signal is sent to the master saying ‘X was pressed on microbit (0,0)’, and the same for button B.
Step 3: Code for the master micro:bit
- The master micro:bit knows a bunch of things.
- It knows all the win states
- Rows
- (0,0)(1,0)(2,0)
- (0,1)(1,1)(2,1)
- (0,2)(1,2)(2,2)
- Columns
- (0,0)(0,1)(0,2)
- (1,0)(1,1)(1,2)
- (2,0)(2,1)(2,2)
- Diagonals
- (0,0)(1,1)(2,2)
- (0,2)(1,1)(2,0)
- Rows
- It knows that there are only 9 :bits, and that the game ends immediately after a win state is sent
- It can reset the game, and clear all the worker :bits
- This is our workaround for pretty much all of the holes in the code, because we did this project so quickly. If there’s a cat’s game, the users are supposed to hit reset. Otherwise, we would have had to add in another chunk of code for all the Tie game states, and we just didn’t have time to do that
- It knows all the win states
Link to Descartez’s code on Github
Step 3: Designing the Enclosure
I knew in making this project that I wanted to be able to display this, and that I might not have access to power. This was both a blessing and a problem because it meant that each micro:bit was going to need a battery connected. The easiest solution was to put everything in a box. For this, I generated one using makercase.com. I designed it large enough that it could hold the micro:bits and their batteries, as well as have some written instructions.
I also knew I needed support for the micro:bits to not fall in, so I laser cut a smaller piece to fit behind the micro:bits. This piece is secured screws. The backplate and the sides were glued together, but the top was left detached and only secured with the screws, so that I could access the inside as needed. I used tape to hold the interior panel in place. And to tape them to the front plate so that they didn’t fall in or down.
It was a bit tricky, but I got all of the microbits plugged in with their batteries and taped in. On 3 corners I used smalled 6m screws to secure the front panel and the interior panel together. On the last corner, I used a longer screw to screw all the way through the box to hold the lid on.
Step 4: Playtesting
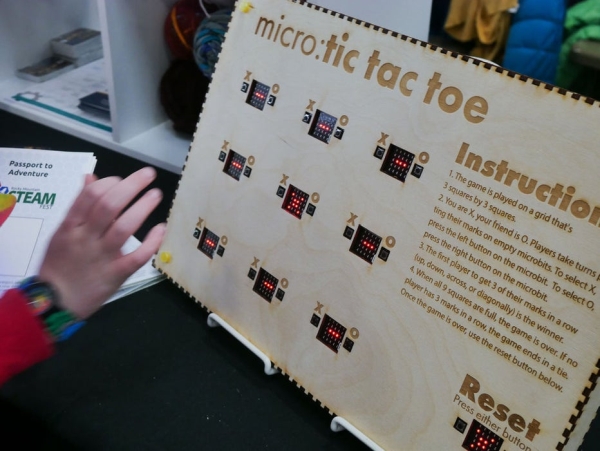
This game was a hit at our weekend event! Kids and adults both seemed to really enjoy trying to work out what was happening, as well as, what components were used. This project only took us an evening to put together, and it was well worth it. Show us your designs, and let us know what tweaks you made!
Source: Microbit Tic Tac Toe Game
- How does the game determine a winner?
The master micro:bit tracks all win states including rows, columns, and diagonals, ending the game immediately after a win signal is received. - What happens if there is a tie in the game?
The users are supposed to hit reset because the code did not include logic to handle cat's games due to time constraints. - How do the worker micro:bits communicate with the master?
They use radio functionality to send signals indicating which button was pressed and their specific coordinate. - Can this project be played without a power source?
No, each micro:bit requires a connected battery, so the team designed an enclosure to hold both the controllers and their power sources. - What materials were used to build the enclosure?
The enclosure consists of 12x24" 1/8 plywood pieces, screws, bolts, and a laser-cut interior support panel. - How are the micro:bits secured inside the box?
The interior panel is taped to the front plate to prevent falling, while screws secure the panels together at the corners. - What is the role of Button A and Button B on the worker bits?
Pressing Button A flashes X and sends an X signal, while pressing Button B flashes O and sends an O signal. - How long did it take to complete this project?
The team completed the project in less than 24 hours.