Summary of How to Make a Cheap Attiny Arduino Board
Summary: This article explains how to build a cheap ATtiny-based Arduino-compatible board using the Arduino-Tiny cores. It lists parts, shows wiring to program ATtiny85/84/2313 via an Arduino as ISP, and gives steps for installing Arduino-Tiny, uploading the ArduinoISP sketch, burning the bootloader, and uploading sketches (example: Blink). It highlights advantages (very low cost, standalone use) and limitations (few I/O, limited memory).
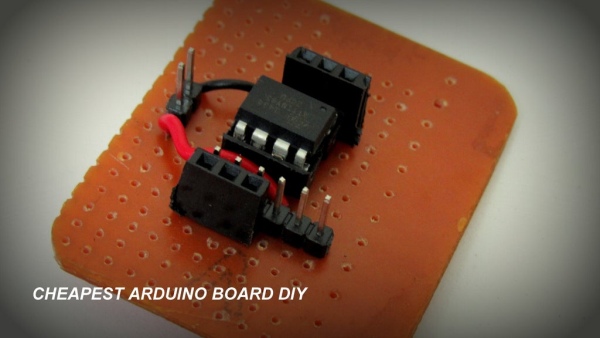
Parts used in the Cheap Attiny Arduino Board:
- Veroboard
- 8 pin IC socket
- Single core 22 gauge wires
- ATtiny85 (or ATtiny84/2313 variants)
- Male header
- Female header
- Arduino board (for Arduino as ISP)
- 10 uF capacitor (for Arduino Uno reset workaround)
- Regulated 5V power supply (for standalone use)
Well most of time i get troubled when i need Arduino in some projects where i need few I/O pins
Well thanks to Arduino-Tiny platform Arduino program can be burned into the Avr-tiny Series like Attiny 85/45 Arduino-Tiny is an open source set of ATtiny “cores” for the Arduino platform.
It provides a core that enables Arduino users to work with the ATtiny84 (84/44/24), ATtiny85 (85/45/25), and ATtiny2313 (4313) processors.
=============================================================
Advantages of Attiny series
Cheap cost hardly 1$
They can be used as stand alone in any circuit
Disadvantages of Attiny
Few I/O pins as compared to megaSeries
Less memory usually Attiny 25/45/85 have 2kb 4kb and 8kb respectively
=============================================================
But if u ask me Attiny are really useful for small projects
Even i think it is too cheap for a dummy to experiment on it.
So i made this small project that anyone can make their cheapest tiny arduino at home
Also like my page for support
https://www.facebook.com/makewithRexAdd Tip
Step 1: Parts
Things that you will need
- Veroboard -0.3$
- 8 pin IC Socket -0.10$
- Wires single core 22 gauge- 0.10$
- Attiny 85- 1.35$
- Male header-0.16$
- Female header-0.16$
So Total cost is 2.17$
Step 2: Circuit Diagram
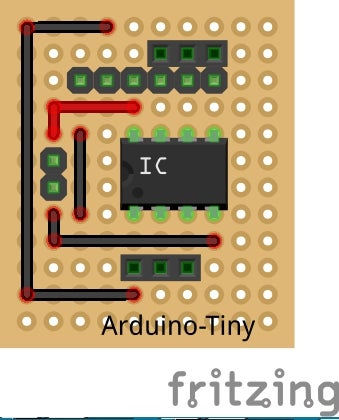
Almost all chips are programed By Using 6 pins
- MISO(Master In Slave Out)
- MOSI(Master OUt Slave In)
- RESET
- SCK(Slave Clock)
- Vcc
- Gnd
Connecting With Arduino
Pin13 will be connected to SCK
Pin12 will be connected to MISO
Pin11 will be connected to MOSI
Pin10 will be connected to RESET
Next part will Cover how to use the arduino as ISP to Program the attiny85
Step 3: Using Arduino As ISP
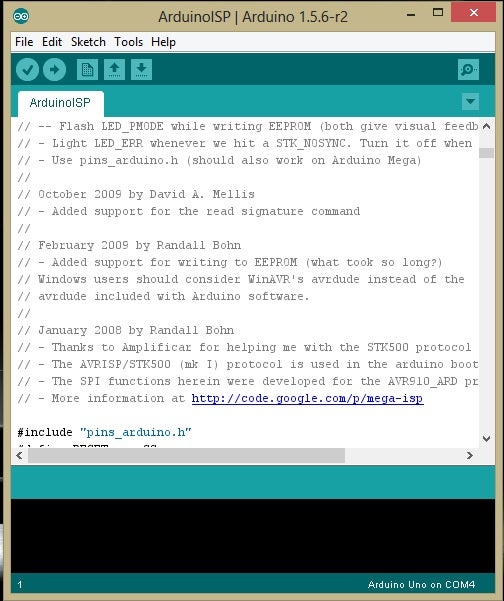
Setting Up the Firmware
You need to download this file for programing the attiny
http://code.google.com/p/arduino-tiny/
after you install it
- Open Arduino.exe
- File > Examples >ArduinoISP
- Upload Sketch to your Board
- On the Arduino Uno, you’ll need to connect a 10 uF capacitor between reset and ground (after uploading the ArduinoISP sketch)
- Connect The Arduino Pins To the Arduino Tiny Board
- Goto Tools >Boards>Attiny 85 8 MHz
- Goto Tools>Programmer>Arduino as ISP
- Burn Bootloader
CONGO attiny is Ready To be Programmed By arduino
Lets Us see a simple Program “Blink ” in action
Again going to
File > Examples >Blink
Change The pin no. from 13 to any one of the pin out of Attiny85
0,1,2,3,4
Upload it
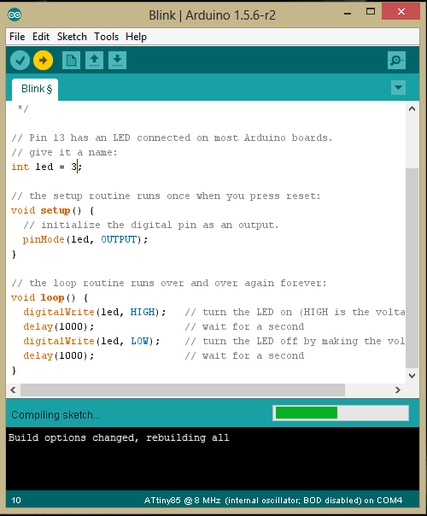
The Blink Program In action
Enjoy Your Board
It can be Also Run on A external Power source You just need a regulated Power supply of 5
You can also Use a Serial Programmer to Burn the Bootloader and sketche
If You have any queries Feel free to ask me
https://www.facebook.com/prajjwal.nag
Source: How to Make a Cheap Attiny Arduino Board
- What is Arduino-Tiny?
Arduino-Tiny is an open source set of ATtiny cores that enable Arduino users to work with ATtiny84, ATtiny85, and ATtiny2313 processors. - Which ATtiny chips are supported?
The cores provide support for ATtiny84 (84/44/24), ATtiny85 (85/45/25), and ATtiny2313 (4313). - How do you connect an Arduino to program an ATtiny85?
Connect Arduino pin 13 to SCK, pin 12 to MISO, pin 11 to MOSI, and pin 10 to RESET on the ATtiny board. - What additional component is needed when using an Arduino Uno as ISP?
After uploading ArduinoISP, connect a 10 uF capacitor between reset and ground on the Uno. - How do you install and use the Arduino-Tiny cores?
Download Arduino-Tiny from the provided link, install it, then select the appropriate Attiny board under Tools > Boards. - How do you burn the bootloader to the ATtiny?
Select Tools > Programmer > Arduino as ISP and choose the Attiny board, then use Burn Bootloader. - Can you upload sketches like Blink to the ATtiny?
Yes; open the Blink example, change the pin number to one of the ATtiny pins (0,1,2,3,4), and upload using Arduino as ISP. - What are the main advantages of the ATtiny series?
They are very cheap (around 1 USD) and can be used as standalone devices in circuits. - What are the limitations of the ATtiny chips?
They have fewer I/O pins compared to Arduino Mega series and limited memory (e.g., ATtiny25/45/85 have 2KB, 4KB, and 8KB respectively). - Can the ATtiny board run from an external power source?
Yes; it can run from a regulated 5V power supply.