Summary of ARDUINO CLONE With ATMEGA328-PU Non P
The author created a classic Arduino clone using an ATMEGA328-PU (non-PicoPower) chip, which is incompatible with the standard ISP bootloader. To resolve this, they modified the `avrdude.conf` and `boards.txt` files in Arduino 1.0.6 to support the specific signature of the non-P chip, allowing successful bootloading and board recognition.
Parts used in Arduino Clone With ATMEGA328-PU Non P:
- ATMEGA328-PU microcontroller
- Arduino Duemilanove or Diecemilia board
- Prototype board
- Cables
- Arduino 1.0.6 software
- avrdude.conf file
- boards.txt file
Step 1: The Beginning

Last week I decided to make a classic Arduino clone with an ATMEGA328P-PU. I seemed to be so easy and quick but a very bad surprise for me: I odered the cheaper ATMEGA328-PU (non P!!) that is to say: non pico power.
The difference: this IC needs a bit more energy and IS NOT COMPATIBLE with the Arduino ISP bootloader (see the wrong signature). So I was a bit disappointed.
I looked on the net for a method to boot load this kind of circuit: a lot of methods found but none of them would run with Arduino 1.0.6. So I tested one of mine: a sort of mix between all this tricks. I will give it to you now…
Step 2: The Schematic and the Bootloader to Use:
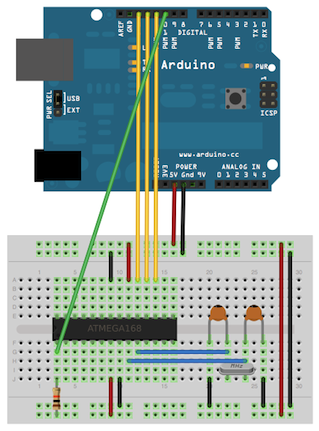
You can find it easily on:
https://www.arduino.cc/en/Tutorial/ArduinoISP
I use a prototype board to connect all the cables on the photo (components on the top of the board are decorative).
Then you have to follow these steps:
1-download in your arduino the famous example “arduinoISP”, then close Arduino 1.0.6
2-backup the arduino/hardware/tools/etc/avrdude.conf and do the following change (at line 8080 for me in notepad++):
#————————————————————
# ATmega328
#————————————————————
part
id = “m328”;
desc = “ATmega328”;
has_debugwire = yes;
flash_instr = 0xB6, 0x01, 0x11;
eeprom_instr = 0xBD, 0xF2, 0xBD, 0xE1, 0xBB, 0xCF, 0xB4, 0x00,
0xBE, 0x01, 0xB6, 0x01, 0xBC, 0x00, 0xBB, 0xBF,
0x99, 0xF9, 0xBB, 0xAF;
stk500_devcode = 0x86;
# avr910_devcode = 0x;
signature = 0x1e 0x95 0x14; # do not change it
pagel = 0xd7;
bs2 = 0xc2;
chip_erase_delay = 9000;
pgm_enable = “1 0 1 0 1 1 0 0 0 1 0 1 0 0 1 1”,
“x x x x x x x x x x x x x x x x”;
chip_erase = “1 0 1 0 1 1 0 0 1 0 0 x x x x x”,
“x x x x x x x x x x x x x x x x”;
timeout = 200;
stabdelay = 100;
cmdexedelay = 25;
synchloops = 32;
bytedelay = 0;
pollindex = 3;
pollvalue = 0x53;
predelay = 1;
postdelay = 1;
pollmethod = 1;
pp_controlstack =
0x0E, 0x1E, 0x0F, 0x1F, 0x2E, 0x3E, 0x2F, 0x3F,
0x4E, 0x5E, 0x4F, 0x5F, 0x6E, 0x7E, 0x6F, 0x7F,
0x66, 0x76, 0x67, 0x77, 0x6A, 0x7A, 0x6B, 0x7B,
0xBE, 0xFD, 0x00, 0x01, 0x00, 0x00, 0x00, 0x00;
hventerstabdelay = 100;
progmodedelay = 0;
latchcycles = 5;
togglevtg = 1;
poweroffdelay = 15;
resetdelayms = 1;
resetdelayus = 0;
hvleavestabdelay = 15;
resetdelay = 15;
chiperasepulsewidth = 0;
chiperasepolltimeout = 10;
programfusepulsewidth = 0;
programfusepolltimeout = 5;
programlockpulsewidth = 0;
programlockpolltimeout = 5;
ocdrev = 1;
memory “eeprom”
paged = no;
page_size = 4;
size = 1024;
min_write_delay = 3600;
max_write_delay = 3600;
readback_p1 = 0xff;
readback_p2 = 0xff;
read = ” 1 0 1 0 0 0 0 0″,
” 0 0 0 x x x a9 a8″,
” a7 a6 a5 a4 a3 a2 a1 a0″,
” o o o o o o o o”;
write = ” 1 1 0 0 0 0 0 0″,
” 0 0 0 x x x a9 a8″,
” a7 a6 a5 a4 a3 a2 a1 a0″,
” i i i i i i i i”;
loadpage_lo = ” 1 1 0 0 0 0 0 1″,
” 0 0 0 0 0 0 0 0″,
” 0 0 0 0 0 0 a1 a0″,
” i i i i i i i i”;
writepage = ” 1 1 0 0 0 0 1 0″,
” 0 0 x x x x a9 a8″,
” a7 a6 a5 a4 a3 a2 0 0″,
” x x x x x x x x”;
mode = 0x41;
delay = 20;
blocksize = 4;
readsize = 256;
;
memory “flash”
paged = yes;
size = 32768;
page_size = 128;
num_pages = 256;
min_write_delay = 4500;
max_write_delay = 4500;
readback_p1 = 0xff;
readback_p2 = 0xff;
read_lo = ” 0 0 1 0 0 0 0 0″,
” 0 0 a13 a12 a11 a10 a9 a8″,
” a7 a6 a5 a4 a3 a2 a1 a0″,
” o o o o o o o o”;
read_hi = ” 0 0 1 0 1 0 0 0″,
” 0 0 a13 a12 a11 a10 a9 a8″,
” a7 a6 a5 a4 a3 a2 a1 a0″,
” o o o o o o o o”;
loadpage_lo = ” 0 1 0 0 0 0 0 0″,
” 0 0 0 x x x x x”,
” x x a5 a4 a3 a2 a1 a0″,
” i i i i i i i i”;
loadpage_hi = ” 0 1 0 0 1 0 0 0″,
” 0 0 0 x x x x x”,
” x x a5 a4 a3 a2 a1 a0″,
” i i i i i i i i”;
writepage = ” 0 1 0 0 1 1 0 0″,
” 0 0 a13 a12 a11 a10 a9 a8″,
” a7 a6 x x x x x x”,
” x x x x x x x x”;
mode = 0x41;
delay = 6;
blocksize = 128;
readsize = 256;
;
memory “lfuse”
size = 1;
min_write_delay = 4500;
max_write_delay = 4500;
read = “0 1 0 1 0 0 0 0 0 0 0 0 0 0 0 0”,
“x x x x x x x x o o o o o o o o”;
write = “1 0 1 0 1 1 0 0 1 0 1 0 0 0 0 0”,
“x x x x x x x x i i i i i i i i”;
;
memory “hfuse”
size = 1;
min_write_delay = 4500;
max_write_delay = 4500;
read = “0 1 0 1 1 0 0 0 0 0 0 0 1 0 0 0”,
“x x x x x x x x o o o o o o o o”;
write = “1 0 1 0 1 1 0 0 1 0 1 0 1 0 0 0”,
“x x x x x x x x i i i i i i i i”;
;
memory “efuse”
size = 1;
min_write_delay = 4500;
max_write_delay = 4500;
read = “0 1 0 1 0 0 0 0 0 0 0 0 1 0 0 0”,
“x x x x x x x x x x x x x o o o”;
write = “1 0 1 0 1 1 0 0 1 0 1 0 0 1 0 0”,
“x x x x x x x x x x x x x i i i”;
;
memory “lock”
size = 1;
min_write_delay = 4500;
max_write_delay = 4500;
read = “0 1 0 1 1 0 0 0 0 0 0 0 0 0 0 0”,
“x x x x x x x x x x o o o o o o”;
write = “1 0 1 0 1 1 0 0 1 1 1 x x x x x”,
“x x x x x x x x 1 1 i i i i i i”;
;
memory “calibration”
size = 1;
read = “0 0 1 1 1 0 0 0 0 0 0 x x x x x”,
“0 0 0 0 0 0 0 0 o o o o o o o o”;
;
memory “signature”
size = 3;
read = “0 0 1 1 0 0 0 0 0 0 0 x x x x x”,
“x x x x x x a1 a0 o o o o o o o o”;
;
;
part parent “m328”
id = “m328p”;
desc = “ATmega328P”;
#signature = 0x1e 0x95 0x0F; # change this to:
signature = 0x1e 0x95 0x14;
ocdrev = 1;
;
#———————————————————————————————-
#———————————————————————————————-
I give you the initial avrdude.conf and the modified file in 2 archives.
3-run ARDUINO 1.0.6
4-select the board Arduino Duemilanove or Diecemilia
5-select the good pprocessor: Atmega328
6-select Arduino s ISP
7-burn the bootload
8-shut off ARDUINO 1.0.6, replace avrdude modified by the original file you back up.
9-now you have to change the file arduino/hardware/arduino/avr/boards.txt to make appear the new board name with this kind of circuit. I called it: Arduino Uno w/ ATmega328 (non-P)
The text you have to insert in it:
##############################################################
uno328.name=Arduino Uno w/ ATmega328 (non-P)
Source: ARDUINO CLONE With ATMEGA328-PU Non P
- Why did the initial Arduino clone project fail?
The project failed because the cheaper ATMEGA328-PU chip ordered was not PicoPower compatible and had a wrong signature for the standard Arduino ISP bootloader. - How can I bootload a non-PicoPower ATMEGA328 chip?
You must modify the avrdude.conf file by changing the signature line to match the non-P chip and update the boards.txt file to recognize the new board configuration. - Which version of Arduino software should be used for this method?
The tutorial specifies using Arduino 1.0.6 because other found methods did not run with this specific version. - What steps are required before burning the bootloader?
You must download the arduinoISP example, close the software, backup the avrdude.conf file, and edit the signature line within that configuration file. - How do you make the new circuit appear as a selectable board?
You need to edit the boards.txt file in the hardware directory to add a new entry named Arduino Uno w/ ATmega328 (non-P). - What happens after selecting the correct processor and programmer?
You select the Atmega328 processor and Arduino s ISP option, then burn the bootloader to program the chip correctly. - Is it necessary to restore the original avrdude.conf file later?
Yes, the instructions state to shut off Arduino 1.0.6 and replace the modified avrdude.conf with the original backed-up file after burning the bootloader. - Where can the schematic and bootloader information be found?
The article references the official Arduino website tutorial at arduino.cc/en/Tutorial/ArduinoISP for the schematic and bootloader details.