
Summary of ATtiny85 Light Sensor – I2C slave device
This article describes a low-cost daylight sensor project using an ATtiny85 microcontroller as an I2C slave to interface with a Raspberry Pi. The system utilizes a photoresistor and signal LED, powered by the ATtiny's watchdog timer for periodic voltage measurement and filtering. The TinyWireS library manages I2C communication, allowing the master device to retrieve 10-bit ADC values stored in memory upon request.
Parts used in ATtiny85 Light Sensor:
- ATtiny85 microcontroller
- Raspberry Pi
- Photoresistor
- 10kOhm pull down resistor
- Signal LED
- TinyWireS library
- I2C bus connection
I love AVR ATtinyx5 series microcontrollers. They are cheap, easy to use, they can be programmed just like Arduinos and comparing to their size they offer great features. For example, they can be used as remote analog to digital converters connected to master device using I2C bus.
Background: few year ago I’ve build a weather station based on Raspberry Pi. It collects various data and displays them on dedicated web page and Android app. Every few months I try to add a new sensor to it. Last time it was a daylight sensor. Raspberry Pi does not offer ADC inputs and I has few ATtiny85 on hand that time. One to another, few hours later: photoresistor based daylight meter sensor connected via I2C bus.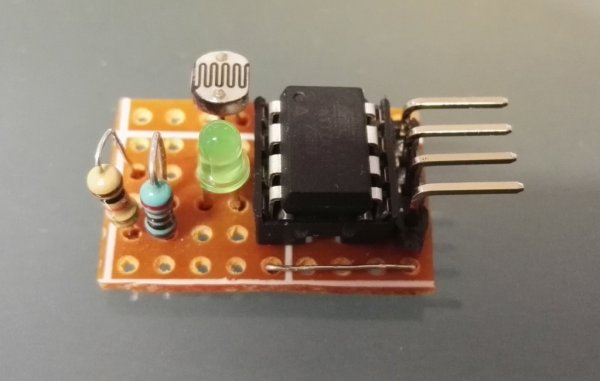
Electric assembly is pretty simple: ATtiny85 directly connected to Raspberry Pi via I2C, photoresistor with 10kOhm pull down connected to ATtiny85 and signal LED.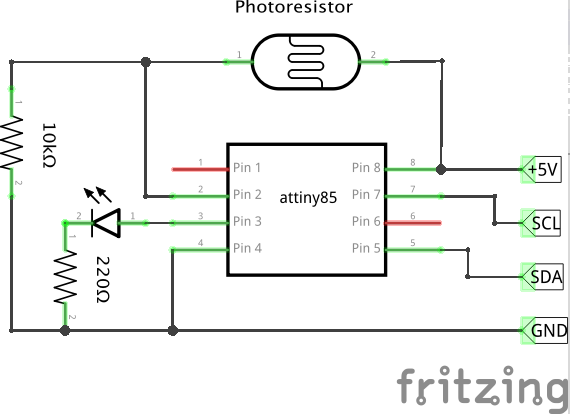
Code driving this rig is also pretty simple: watchdog timer wakes up ATtiny every few minutes, measures voltage, filters it and stores in memory. Every time read operation is requested, last filtered ADC value (10 bits as 2 bytes).
I2C support is provided by TinyWireS library that configures USI as I2C slave.
/**
 * This function is executed when there is a request to read sensor
 * To get data, 2 reads of 8 bits are required
 * First requests send 8 older bits of 16bit unsigned int
 * Second request send 8 lower bytes
 * Measurement is executed when request for first batch of data is requested
 */
void requestEvent()
{
  TinyWireS.send(i2c_regs[reg_position]);
  reg_position++;
  if (reg_position >= reg_size)
  {
      reg_position = 0;
  }
}
/*
 * Setup I2C
 */
TinyWireS.begin(I2C_SLAVE_ADDRESS);
TinyWireS.onRequest(requestEvent); //Set I2C read event handler
Example code to read from device might look like this:
For more detail: ATtiny85 Light Sensor – I2C slave device
-
Why use an ATtiny85 with a Raspberry Pi?
The Raspberry Pi lacks built-in analog-to-digital converter inputs, requiring the ATtiny85 to act as a remote ADC. -
How is the ATtiny85 programmed?
It can be programmed just like Arduinos despite its small size and low cost. -
What triggers the measurement process?
A watchdog timer wakes up the ATtiny every few minutes to measure voltage. -
Which library handles I2C communication?
The TinyWireS library configures the Universal Serial Interface (USI) as an I2C slave. -
How many bytes are sent when reading data?
The system sends two reads of 8 bits each to transmit a single 10-bit value as 2 bytes. -
When is the actual measurement executed?
The measurement runs when the request for the first batch of data is received. -
How is the data filtered?
The code filters the voltage readings before storing the last value in memory.
