In this project we demonstrate BBC micro:bit how to connect it to WiFi and send a notification to a phone without writing a single line of code. The micro:bit comes with a microphone, among the other features. We are going to use it to detect loud sound e.g. clicking fingers and when a loud sound is detected we send an alert notification to our phone.
In order to connect and send the alert notification, we use the IOT Circket WiFi module. All we have to do with it is to attach batteries, configure it and our “IoT sound detector” is ready to communicate with our phone. In this example we choose a Pushsafer internet service but you might want to choose any other services e.g. Pushover, Blynk, IFTTT, Zapier, Emails, Google Docs, practically any internet service you like. Alternatively you can also integrate it to your local home automation system such as Home Assistant, Node-RED and the like over MQTT or HTTP apis.
What is really cool is that both Circket and micro:bit can operate directly on batteries. We can easily create an advanced mobile device which you can place anywhere within WiFi range. Everyone can realise this project from beginners to advanced engineers. Let’s start!
Supplies:
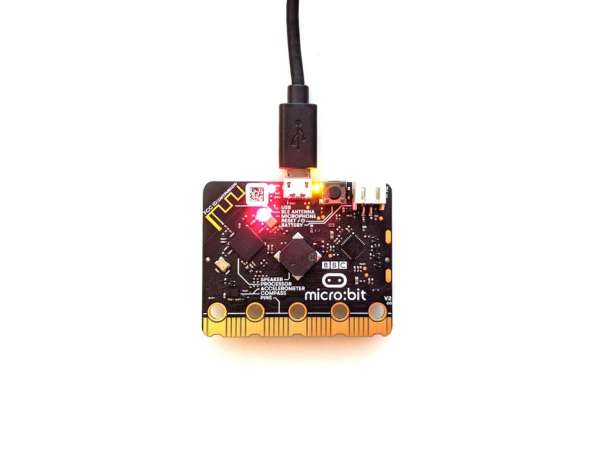
- BBC micro:bit V2
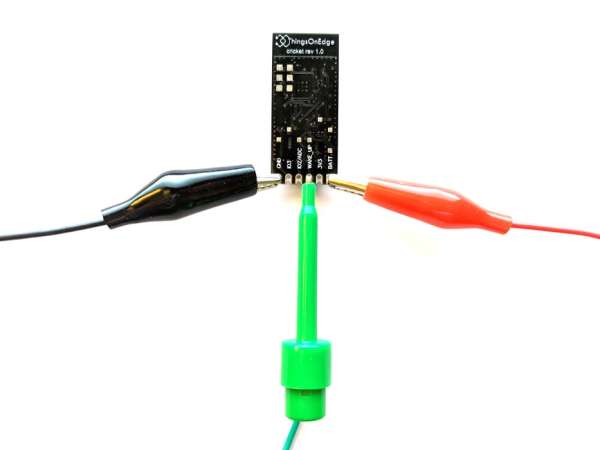
- IOT Cricket WiFi module
- Hook Clips / Crocodile Clips cables
- Battery Holder 2xAA
- 2xAA batteries
Step 1: Set Up Micro:bit [1 / 2]
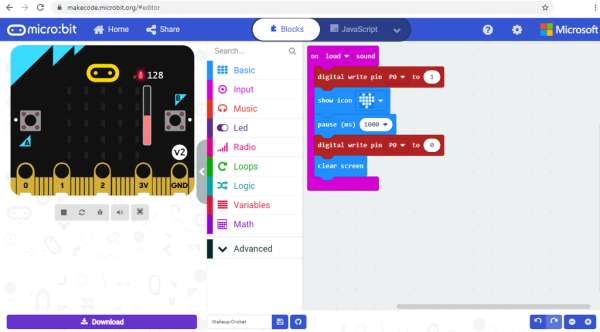
Micro:bit is a tiny computer which empowers anyone at all skill levels to create exciting electronics projects. It includes microphone, gyroscope, accelerometer, temperature sensor, light sensor and other features. In this example we are going to use the microphone to detect clicking fingers or any other high volume noise. Once the sound is detected we are going to:
- Display the Heart icon on the LED display
- Set the P0 pin to “1” for a short period of time (1 second) – to wake up Cricket WiFi module to send a notification to a phone
Let’s go and create the program in https://makecode.microbit.org/ as shown below:
Step 2: Set Up Micro:bit [2 / 2]
Our micro:bit is ready! We can test it by clicking fingers and see if the heart icon shows up on the LED display. If yes, we can disconnect from USB and move on to the next step.
For more information how to get started with micro:bit please check out this official guide how to get started with micro:bit. We were inspired to do this project with the sound input tutorials which you might also like to check.
Step 3: Assembly [ 1 / 2 ]
In this step we are going to connect all the components together with the following steps:
- Connect micro:bit to the batteries
- Connect Cricket to the batteries (we peel out the coat from the cables to connect Cricket on the same power source)
- Connect micro:bit’s P0 pin to Cricket’s WAKE_UP pin [green cable]
Step 4: Assembly [ 2 / 2 ]
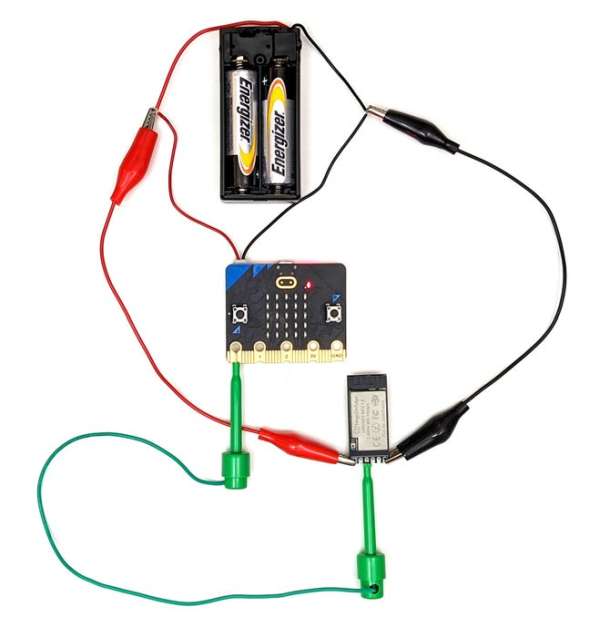
A complete project assembly may look like this.
Step 5: Setup Pushsafer
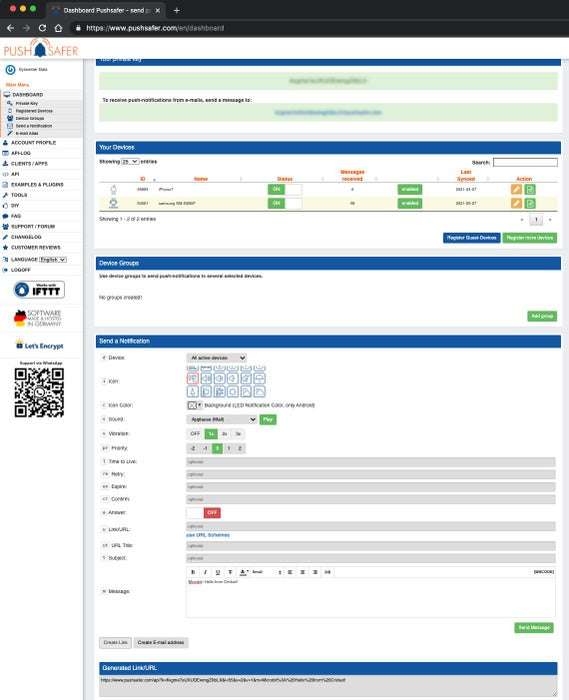
Pushsafer, we learned, is one of the easiest and reliable internet service which provides multi-platform push notifications. There is some free allowance of notifications but we quickly ran out of it and had to purchase 1000 extra notifications for ~$1. It is very cheap for what it gives you back and it is super simple to set up:
Go to pushsafer.com Open an account Create a notification message Generate a URL link and save it somewhere (we will need this link to copy/paste to Cricket’s configuration in the next step) Install mobile app on your phone (iPhone or Android) and login with the same account
There is an attached screenshot of how we created an example message.
Now we can press the “Send Message” button and, if everything is configured correctly, we should receive a message: “Microbit: Hello from Cricket!” on our phone.
Please do not forget to press the “Create Link” button and save the URL address as we will need this to configure Cricket in the next step.
Step 6: Configure Cricket
IOT Cricket is an easy to use ultra-low power WiFi module, which can operate directly on batteries for a very long time (for years in many use cases). You simply attach a sensor and battery to it and the device is ready to transmit data instantaneously to a network.
Now we are going to configure the Cricket module to send notifications to a phone when it wakes up. It happens when a voltage appears on the WAKE_UP pin. In our case it is when micro:bit sets the P0 pin to “1” and as it is connected to Cricket’s WAKE_UP pin, it raises the voltage on that pin and it wakes it up. After that, Cricket connects to the Pushsafer service by using the URL link, which we obtained in the previous step. Once connected, the Pushsafer service sends the notification to our phone.
Let’s do it step by step.
Let’s first connect Cricket to our WiFi network:
- Press the built-in Cricket’s button for 5 seconds (it opens toe_device hotspot)
- Connect to the “toe_device” hotspot from a phone or laptop
- Pass your WiFi credentials: SSID and Password; and press CONNECT button
For more information please see the steps here.
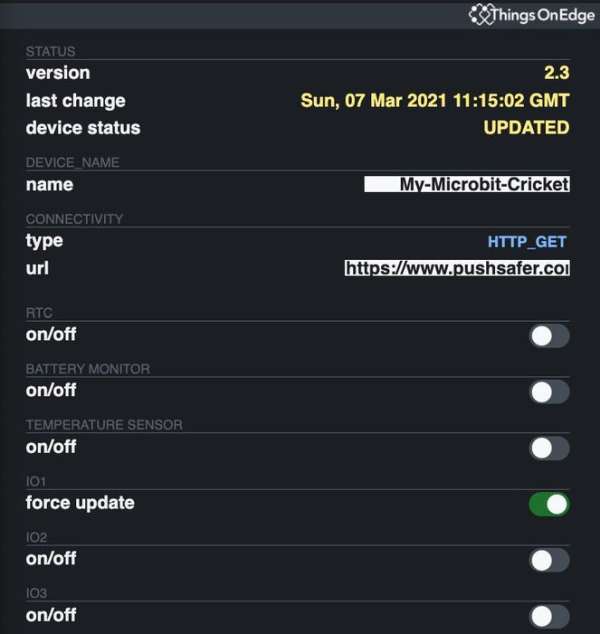
Open CONFIG panel and set the following:
- CONNECTIVITY > type: HTTP_GET
- CONNECTIVITY > url: [copy/paste the URL obtained from the previous step]
- IO1 > force update: On
An example configuration may look like on the attached image.
This is it. We can press the switch off button in the top right corner to exit from the configuration and our device is ready to go!
It’s time to test it out!
Source: BBC Micro:bit + WiFi + Phone Notifications