This guide is going to show you how to create a Bluetooth Temperature sensor to connect to your cellphone.
For my “Dry-Active” project I worked with Nordic nRF51822 chipset.
This process is not a single day exercise but it’s pretty straightforward and “solid” experience.
Looking online I didn’t find all info required to accomplish my task collected on a single site so I’m thinking to sharing my experience may be beneficial for others as well.
Let’s start!
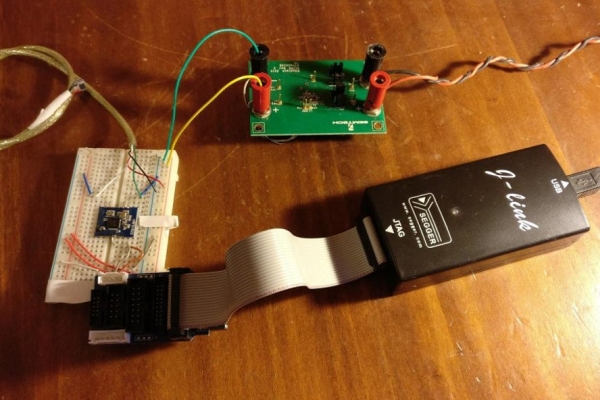
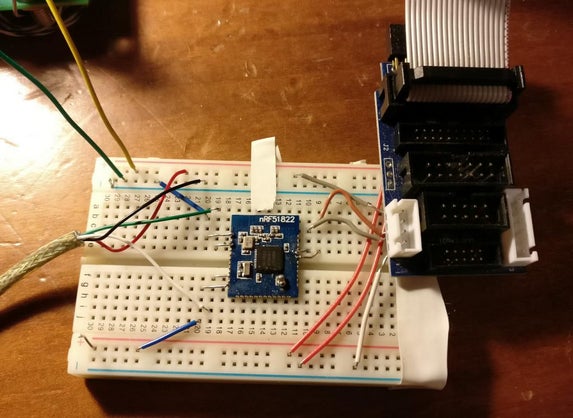
This is the list of the components I used to create the final BlueTempSense.
- Waveshare Bluetooth Module (based on nRF51822 chipset)
- Adafruit MCP9808 temperature sensor (or equivalent)
- Segger J-Link debug probe
- A 3.3Vdc Power Supply (+cables)
- Some sort of 4 pin cable (to connect J-Link probe to Waveshare board)
- Soldering equipment (solder iron, solder wire, soldering skills, …)
- Misc electrical wires (desirable with different colors)
- A proto-board to assemble the system
Check here some pictures of my final setup.
Step 2: Software Environment Setup
J-Link comes with it’s own software and you are supposed to install and became familiar with that
To write code for nRF51822 you should download the free SDK available on Nordic Semiconductors website.
I developed my application using SDK version 10.
You can download a different version but the you’ll need to adjust the makefile I’m using to compile the code.
As a starting point I’m recommanding to install the same version I have and once you are familiar with the process you can come to a more updated version if you need to.
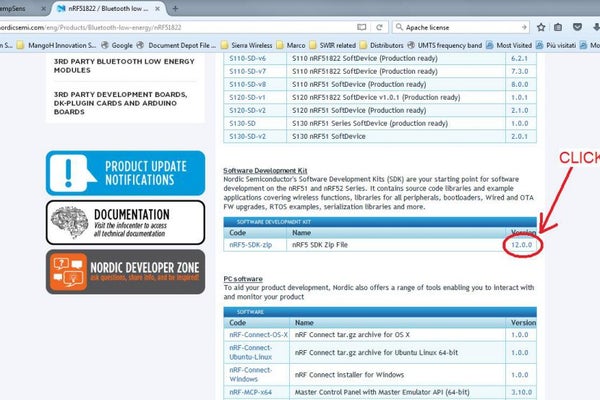
To download Nordic SDK Ver 10 you can do the following:
- go to Nordic nRF51822 product’s webpage (http://www.nordicsemi.com/eng/Products/Bluetooth-low-energy/nRF51822)
- Click “Download” Tab
- Click on current SDK “version number” (check picture above)
- Download SDK version 10 (check picture above)
- Unzip in a folder without spaces in pathname
- Nordic has a good guide to setup GCC toolchain for your development
BUT in my experience having a path containing SPACEs is not a good idea (possible because I’m developing using Windows VISTA).To avoid potential issue make sure you are going to install GNU gcc toolchain in a simple path with no spaces.Something like C:\nRF51_DEV\gcc_toolchainBasically replace all the references to/GNU Tools ARM Embedded/4.9 2015q3with\nRF51_DEV\gcc_toolchain - Follow Nordic “Development with GCC and Eclipse” step by step guide to
setup GCC environment (I didn’t use Eclipse so I did stop at”Setting up Eclipse the first time”)https://devzone.nordicsemi.com/tutorials/7/
Now you should have a full nRF51 development environment.
Step 3: NRF51822 Firmware
To make things easy I have a working example you can download and install to test on your platform
soliditec_bluetempsens-1.zip.
Unzip and install files at this location:
C:\nRF51_DEV\nRF51_SDK10\examples\ble_peripheral\ble_app_iDry_Soliditec
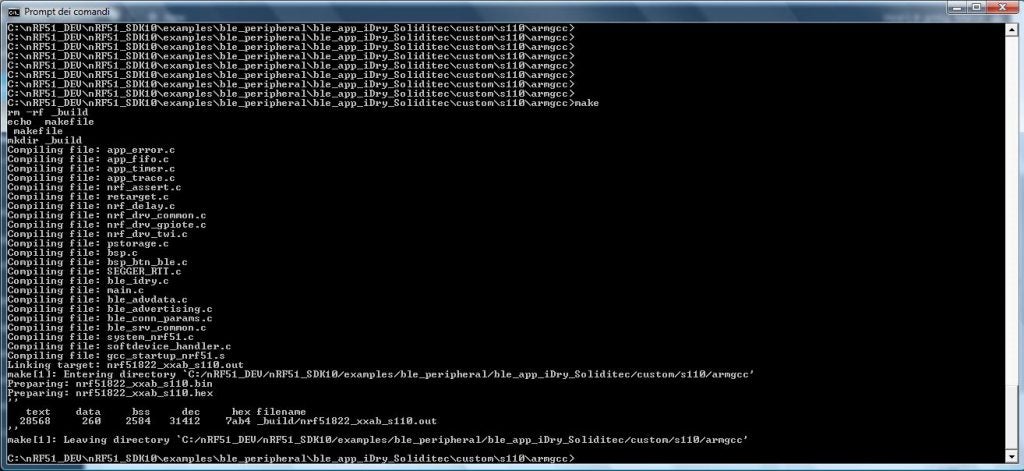
Now you can compile my example to test if your environment is correctly installed
Open a Shell window and change directory to:
C:\nRF51_DEV\nRF51_SDK10\examples\ble_peripheral\ble_app_iDry_Soliditec\custom\s110\armgcc
type “make” and press enter.
If all is good you should get the window as shown in picture above
if that is not what you are getting:
most probably you are missing some critical path in your PATH variable
Step 4: Hardware Setup
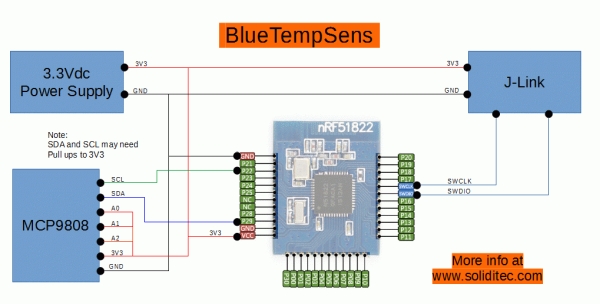
Here’s a diagram of the connection you need to have in order to loading and testing firmware and also read temperature on nRF51822 platform
Step 5: Firmware Upload
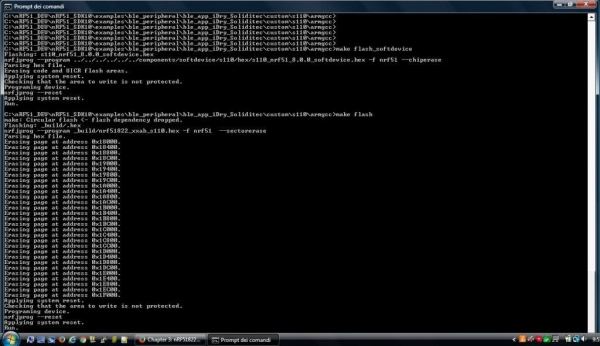
It’s time to upload our compiled code to the platform and check if is correctly running.
We can use J-Link RTT Viewer to check what is happening in our platform.
- Turn on platform
- Make sure J-Link is connected with green light blinking
- load Nordic Softdevice for BLE client
- load firmware using:make flash_softdevice
- load firmware usingmake flash
You should get the same results as per image above.
Step 6: Test and Debug
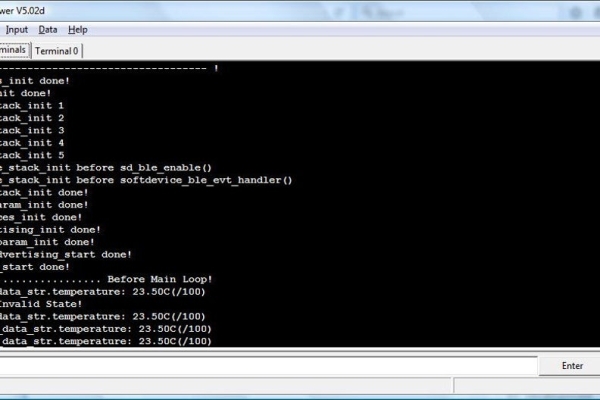
- Open J-Link RTT Viewer
Normally you can just accept default window (check image above) - J-Link RTT main window should be as picture above
- Terminal “0” shows debug messages
- Here’s my debug session shrinked and with some explanations
BOOT ———————————- !
timers_init done!
twi_init done!
ble_stack_init 1
ble_stack_init 2
ble_stack_init 3
ble_stack_init 4
ble_stack_init 5
in ble_stack_init before sd_ble_enable()
in ble_stack_init before softdevice_ble_evt_handler()
ble_stack_init done!
gap_param_init done!
services_init done!
advertising_init done!
conn_param_init done!
ble_advertising_start done!
timer_start done!
…………………. Before Main Loop!
idry_data_str.temperature: 23.37C(/100)
BLE Invalid State!
idry_data_str.temperature: 23.43C(/100)
BLE Invalid State!
idry_data_str.temperature: 23.37C(/100)
BLE Invalid State!
idry_data_str.temperature: 23.37C(/100)
idry_data_str.temperature: 23.43C(/100)
BLE Invalid State!
idry_data_str.temperature: 23.37C(/100)
BLE Invalid State!
idry_data_str.temperature: 23.37C(/100)
idry_data_str.temperature: 23.37C(/100)
idry_data_str.temperature: 23.37C(/100)
idry_data_str.temperature: 23.37C(/100)
idry_data_str.temperature: 23.37C(/100)
BLE Invalid State!
idry_data_str.temperature: 23.25C(/100)
idry_data_str.temperature: 23.25C(/100)
idry_data_str.temperature: 23.25C(/100)
idry_data_str.temperature: 23.25C(/100)
Step 7: Scan for Device and “Connect” Using NRFConnect Android Tool
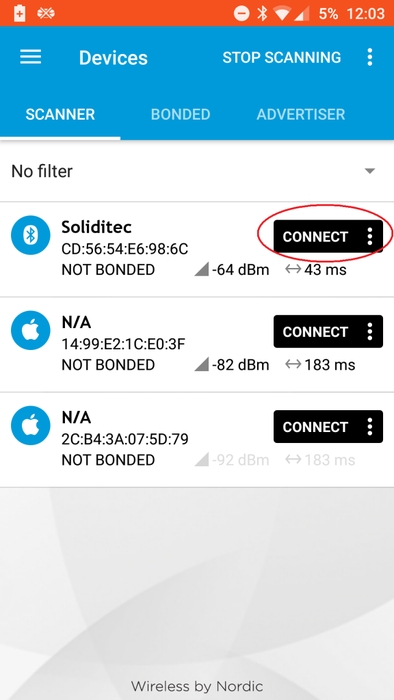
Look for nRFConnect in Android Play store
Download and install
Start the “scanner”
Your device should show up as shown in picture above
Choose “Connect”
Your RTT debug messages should change and show you are now connected to your phone
Here’s my RTT output
dry_data_str.temperature: 23.25C(/100)
idry_data_str.temperature: 23.25C(/100)
idry_data_str.temperature: 23.18C(/100)
>>>>>>>>>>>>>>>>>>> This is the error but let’s keep going !
idry_data_str.temperature: 23.25C(/100)
>>>>>>>>>>>>>>>>>>> This is the error but let’s keep going !
idry_data_str.temperature: 23.31C(/100)
>>>>>>>>>>>>>>>>>>> This is the error but let’s keep going !
idry_data_str.temperature: 23.25C(/100)
>>>>>>>>>>>>>>>>>>> This is the error but let’s keep going !
idry_data_str.temperature: 23.25C(/100)
idry_data_str.temperature: 23.25C(/100)
idry_data_str.temperature: 23.25C(/100)
idry_data_str.temperature: 23.25C(/100)
idry_data_str.temperature: 23.25C(/100)
idry_data_str.temperature: 23.25C(/100)
idry_data_str.temperature: 23.25C(/100)
idry_data_str.temperature: 23.25C(/100)
idry_data_str.temperature: 23.25C(/100)
idry_data_str.temperature: 23.18C(/100)
>>>>>>>>>>>>>>>>>>> This is the error but let’s keep going !
idry_data_str.temperature: 23.25C(/100)
>>>>>>>>>>>>>>>>>>> This is the error but let’s keep going !
idry_data_str.temperature: 23.25C(/100)
idry_data_str.temperature: 23.25C(/100)
idry_data_str.temperature: 23.25C(/100)
Read continuously Temperature Characteristic using nRFCOnnect Android tool
Errors should go away like this
idry_data_str.temperature: 28.93C(/100)
idry_data_str.temperature: 28.93C(/100)
idry_data_str.temperature: 29.00C(/100)
idry_data_str.temperature: 29.06C(/100)
idry_data_str.temperature: 28.87C(/100)
idry_data_str.temperature: 28.75C(/100)
idry_data_str.temperature: 28.56C(/100)
idry_data_str.temperature: 28.43C(/100)
idry_data_str.temperature: 28.37C(/100)
idry_data_str.temperature: 28.31C(/100)
idry_data_str.temperature: 28.25C(/100)
idry_data_str.temperature: 28.12C(/100)
Disconnecting from BLE device
idry_data_str.temperature: 28.00C(/100)
BLE Invalid State!
idry_data_str.temperature: 27.93C(/100)
BLE Invalid State!
idry_data_str.temperature: 27.62C(/100)
idry_data_str.temperature: 27.50C(/100)
BLE Invalid State!
idry_data_str.temperature: 27.43C(/100)
BLE Invalid State!
idry_data_str.temperature: 26.75C(/100)
idry_data_str.temperature: 26.75C(/100)
idry_data_str.temperature: 26.68C(/100)
BLE Invalid State!
idry_data_str.temperature: 26.25C(/100)
idry_data_str.temperature: 26.18C(/100)
BLE Invalid State!
idry_data_str.temperature: 26.18C(/100)
Step 8: Congratulations
Congratulations!!!!
Now your phone and your BLE device are connected and transmitting data!!!!
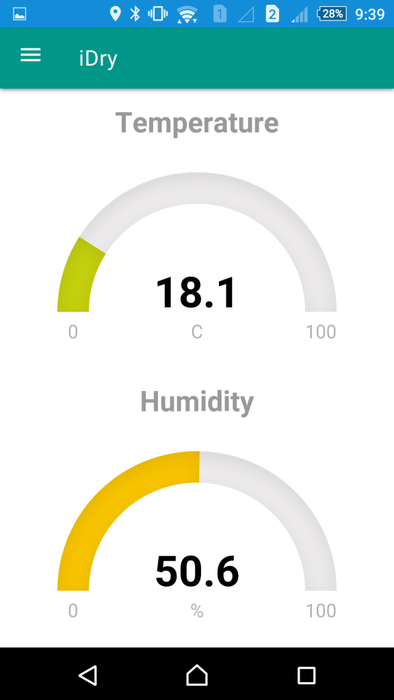
In my next lessons I’ll show you how to create an App to connect to your BLE device and show nicely temperature on cellphone screen.
Like the screenshot here
Source: Bluetooth Temperature Sensor for SmartPhone