Summary of Build a Holiday Whack-a-Mole Game With Scratch and Makey Makey
This Instructable describes building a holiday-themed Whack-a-Mole (Whack-an-Elf) game in Scratch, with a physical whack box and hammer wired to a Makey Makey. It covers cutting a box for Pringles-can moles, adding bubble-wrap padding, wiring cans and hammer with foil/copper tape and wires, connecting to Makey Makey and computer, running the Scratch project, and tips for remixing the game for classrooms.
Parts used in the Whack-an-Elf:
- Cardboard box
- Aluminum foil
- Wire (speaker wire or similar)
- Bubble wrap
- Serving-sized Pringles cans
- Toy hammer (soft-headed)
- Copper foil tape
- Duct tape
- Strong scissors or a utility knife
- Wire cutters/strippers
- Makey Makey
- Alligator clips (three)
- Computer with internet connection
- Web browser that supports Flash plugin
My children participated in an “Hour of Code” exercise in their classrooms this year. To reinforce those concepts, and to show students in their classrooms how accessible and enjoyable programming can be, I created a holiday-themed Whack-a-Mole game in Scratch to play in their classrooms’ winter celebrations. To make the game more interactive, I created a whack-a-mole box and hammer, and connected it with a Makey Makey to complete the experience. This Instructable details the steps to replicate the game on your own.

To construct this game, you will need:
- A cardboard box
- Aluminum foil
- Wire
- Bubble wrap
- Serving-sized Pringles cans
- Toy hammer
- Copper foil tape
- Duct tape
- Strong scissors or a utility knife
- Wire cutters/strippers
To connect the game components, you will need:
- Makey Makey
- Alligator clips (three)
To run the software, you will need:
- A computer with an internet connection
- A web browser that support the Flash plugin
Step 1: Cut Holes in Your Box

On the top of your box, trace the outline of your Pringles cans. Using strong scissors or a utility knife, carefully cut out the openings. I cut just inside the outlines I traced to ensure a tight fit.
Step 2: Add Padding to Your Box

Adding padding isn’t absolutely necessary, but I wanted to increase the tactile sensation when beating away at these “moles.” Layers of bubble wrap have enough give when compressed that it lets the kids feel as if they’re hammering something, without letting the materials get too beat up in the process. It’s hard to see in this image, but I used wrap with large bubbles on the bottom of the box, and topped it with wrap having smaller bubbles. ‘Tis the season for saving packing supplies from Christmas shipments!
Add layers of bubble wrap to the bottom of the box, building up layers to a suitable height for the box you are using. While you’re adding layers of bubble wrap, drop your cans (upside down) in the openings to test the height of the cans when the box is closed. I built layers until about 1.25″ of each can was sticking out of the top of the openings.
Step 3: Wire the Moles
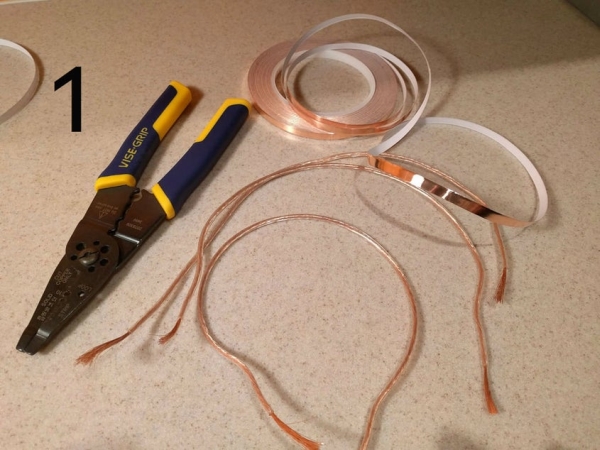
- Cut three lengths of wire to 8″, and strip the ends. You can use any covered wire you like; USB only provides 5V of supply, so the wire needn’t be heavy. I had a spool of speaker wire left over from a home theater installation, so I used that.
- Using copper foil tape, run a line across the bottom of the can (you’ll insert the cans in the holes upside down) and down the sides. Connect the end of the foil tape to one end of your cut wires, wrapping the tape around tightly to make a good connection.
- In testing, I found that connections were inconsistent with this simple setup, so I added more copper foil tape to the bottoms of the cans.
- Create 3 squares of aluminum foil, folded so that each has four layers (fold in half twice). The aluminum foil squares should be about twice the diameter of the Pringles cans. Cover the bottoms of the cans with the aluminum foil squares, and secure the aluminum foil, copper foil tape, and connecting wire with duct tape.
- On the side of the box, poke holes at the mid-point of where your cans will be placed. Poke from the outside of the box to the inside for a neater appearance. Place the upside-down cans into your box, and feed the wires through holes poked into the side of your box.
- Close the box lid, and tape it tightly shut with your duct tape.
Step 4: Construct the Hammer
Having a son, there is no shortage of toy weapons in the house. So I used a power hammer with a soft head as the base of my whacking hammer. It’s something like a Nerf hammer, but it has a very satisfying feel when you swing it, and the “whump” sound it makes when hit was perfect for the game.
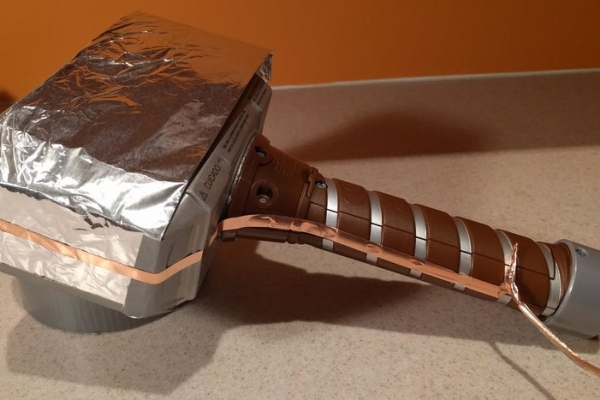
Cut a length of wire to 48″ to attach to the hammer, and strip the ends. You can certainly cut a shorter length, but the extra length allows some room for swinging and carrying. Fold a rectangle of aluminum foil in half twice, to create four layers of foil. The head of my hammer was about 2″ across x 3″ tall, so I folded aluminum foil into a rectangle about 3″x6″. This enabled me to affix a layer of foil to the hammer with duct tape, add the copper tape as a “filling,” and then fold the remaining foil back over the top, creating a sandwich. You could also just do this in layers. I’ll describe the layering approach next.
Affix several folded over layers of foil to the head of your hammer. Using copper foil tape, run a line of tape from the head of the hammer down the length of the handle, and attach that end of the tape to one end of the 48″ wire you just cut, wrapping the tape around tightly to make a good connection.
Affix several more folded over layers of foil to the head of your hammer, covering the foil tape you just applied. In essence, you’re creating a sandwich with aluminum foil and copper foil tape (aluminum foil bread, copper foil tape filling, and aluminum foil bread). Then secure the foil on the head of the hammer with duct tape; and secure the foil tape-to-wire connection on the hammer’s handle with duct tape.
Step 5: Connect and Power the Makey Makey
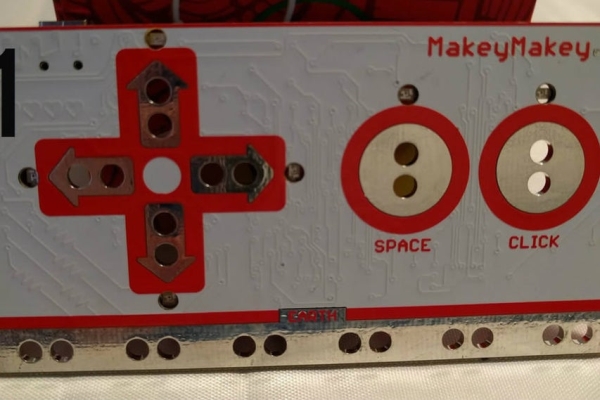
- Flip your Makey Makey over to the back side, which is technically the front.
- Using alligator clips, connect the left arrow on the Makey Makey with the leftmost wire in your whacking box.
- Using alligator clips, connect the down arrow on the Makey Makey with the center wire in your whacking box.
- Using alligator clips, connect the right arrow on the Makey Makey with the rightmost wire in your whacking box.
- Using alligator clips, connect “Earth” on the Makey (this is the ground) to your hammer.
- Insert the power cord into your Makey Makey, and insert the other end into a USB port on your computer. If you see any prompts upon powering the Makey, you can just dismiss them. You’ll notice a red light indicating that the Makey Makey is powered. If you use your hammer to strike one of the Pringles cans (the “moles”), you’ll notice that the Makey will light, indicating which input was triggered. If you see this, you’re probably connected correctly.
Step 6: Open the Scratch Software on Your Computer
Point your browser to https://scratch.mit.edu/projects/134861485/ to view the Whack-an-Elf project. This game is created in Scratch. A very simple to use programming environment for children. It will help them learn the basics of programming and logic, and it eliminates many of the headaches they might encounter in other environments. It is an excellent learning environment for kids, and it’s fun for adults, too!
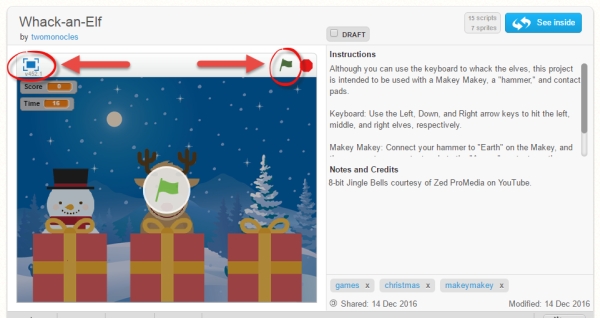
In the upper left hand corner of the game (directly below the title). Press the “Fullscreen” button to switch to a larger view of the game. In browsers like Chrome and Firefox, you can also download extensions that will remove the “chrome” from around the window, giving you a larger viewable gaming area. The one I’m using in Chrome is creatively titled “Full Screen.”
When you’re ready to play, press the green flag in the upper right hand corner to begin the game.
When the game starts, elves, Santas, reindeer, and snowmen will pop up in random intervals from each of the presents. Use your hammer to whack the corresponding “mole” on your whacking box, and see how high a score you can get in the 30-second time limit.
Step 7: Remix and Improve the Game
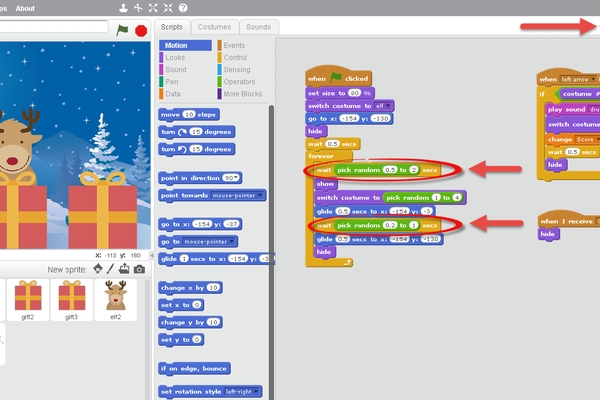
One of the nice features of Scratch is that you can make any of these games your own. Back on the project page (https://scratch.mit.edu/projects/134861485/). Press the blue “See inside” button to take a peak under the hood of the game.
One of my teaching goals with this project was to get the kids comfortable with experimenting with settings to change up the gameplay. Try adjusting how quickly characters appear on the screen after they’ve been whacked, and how long they stay on the screen before hiding. If you decide to make changes, be sure that you change the settings for each character. In the left hand pane, select the “elf” sprite and make your changes, then select the “elf2” sprite and make your changes, and finally select the “elf3” sprite and make your changes.
Source: Build a Holiday Whack-a-Mole Game With Scratch and Makey Makey
- What materials are needed to build the whack box?
The article lists a cardboard box, aluminum foil, wire, bubble wrap, Pringles cans, copper foil tape, duct tape, scissors or utility knife, and wire cutters/strippers. - How are the Pringles cans prepared as moles?
Trace and cut holes in the box for upside-down Pringles cans, add aluminum foil and copper tape to the bottoms, secure with duct tape, and feed wires through holes in the box sides. - How is padding added to the box?
Layers of bubble wrap are placed at the bottom of the box, building up height until about 1.25 inches of each can protrudes when closed. - How is the hammer wired to trigger the Makey Makey?
Fold aluminum foil layers on the hammer head, run copper foil tape down the handle, attach a 48-inch wire to the tape, and secure with duct tape to form the hammer connection. - How do you connect the box and hammer to the Makey Makey?
Use alligator clips to connect left, down, and right inputs on the Makey Makey to the three box wires, and connect Earth (ground) to the hammer, then plug Makey Makey into a computer USB port. - Which Scratch project is used to run the game?
The article points to the Scratch project at https://scratch.mit.edu/projects/134861485/ titled Whack-an-Elf. - How do you start and play the Scratch game?
Open the project page, optionally use Fullscreen, then press the green flag to begin the 30-second game where characters pop up and you whack corresponding moles. - Can the Scratch game be modified?
Yes; press See inside on the project page to remix and change sprite settings like appearance speed and hide duration for each character.