
Summary of Build Your Own I2C Sensor
This article details a project where Paweł Spychalski built a custom I2C ADC using an ATtiny85 microcontroller to enable a Raspberry Pi weather station to read analog sensors like daylight detectors. Since the Pi lacks a built-in ADC, this solution allows connecting various analog meters via the I2C bus using the TinyWireS library.
Parts used in the Custom I2C Sensor Project:
- Raspberry Pi
- ATtiny85 microcontroller
- I2C ADC chip or module
- Daylight sensor (photoresistor)
- TinyWireS library
- Serial Data Line (SDA) wire
- Serial Clock Line (SCL) wire
- Pull-up resistors
- Analog meter (temperature, potentiometer, moisture)
Since Raspberry Pi doesn’t have a built-in ADC (Analog to Digital converter) to read the voltage off from most of sensors, the best solution is to add I2C ADC chips and modules to your project.
Paweł Spychalski faced this problem while building his own weather station that is based on Raspberry Pi. It collects various data and displays them on dedicated web page and Android app. Every few months he tries to add a new sensor to it. Last time it was a daylight sensor. He added this sensor to his system by using ATtiny85 and it was connected via I2C bus.
ATtiny85 is a member of Atmel tinyAVR series which has 8-bit core and fewer features, fewer I/O pins, and less memory than other AVR series.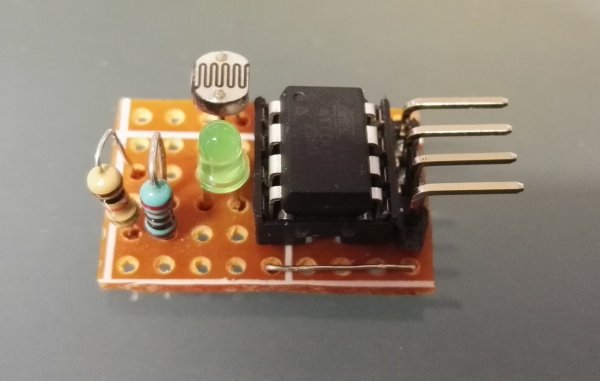
The Inter-integrated Circuit (I2C) Protocol is a protocol intended to allow multiple “slave” digital integrated circuits (“chips”) to communicate with one or more “master” chips. Like the Serial Peripheral Interface (SPI), it is only intended for short distance communications within a single device. Like Asynchronous Serial Interfaces (such as RS-232 or UARTs), it only requires two signal wires to exchange information.
I2C uses only two bidirectional open-drain lines, Serial Data Line (SDA) and Serial Clock Line (SCL), pulled up with resistors. Typical voltages used are +5 V or +3.3 V although systems with other voltages are permitted.
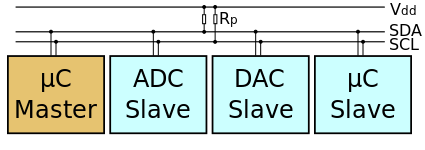
Most of developers use I2C to connect to sensors with the help of the Arduino “Wire” library or “i2c-tools” on the Pi, but it is rare to see someone that is actually building the I2C slave device. Paweł’s project uses TinyWireS library, a slave-mode SPI and I2C library for AVR ATtiny Arduino projects.
This diagram shows how to build analog to digital converter using ATtiny85 and connect it to any device (Raspberry Pi, Arduino) using I2C bus. Here photoresistor has been used, but any analog meter will be fine: temperature, potentiometer, moisture…
For more detail: Build Your Own I2C Sensor
-
Why is an external ADC needed for the Raspberry Pi?
The Raspberry Pi does not have a built-in ADC to read voltage from most sensors. -
What microcontroller was used to build the I2C slave device?
The ATtiny85 microcontroller from the Atmel tinyAVR series was used. -
Which library facilitates the I2C communication in this project?
The TinyWireS library is used as a slave-mode SPI and I2C library for AVR ATtiny Arduino projects. -
What type of sensor was added last to the weather station system?
A daylight sensor connected via the I2C bus was the latest addition. -
How many signal wires does the I2C protocol require for information exchange?
The I2C protocol only requires two bidirectional open-drain lines, SDA and SCL. -
Can other types of analog meters be used instead of a photoresistor?
Yes, any analog meter such as temperature, potentiometer, or moisture sensors will work fine.
