In this project, I will show you how you can transform your normal doorbell into a smart one without changing any of the current functionalities or cut any wires. I will be using an ESP8266 board called Wemos D1 mini.
New to ESP8266? Watch my Introduction to ESP8266 video first.
Step 1: Watch the Video
The video has step by step instruction on how to build this project.
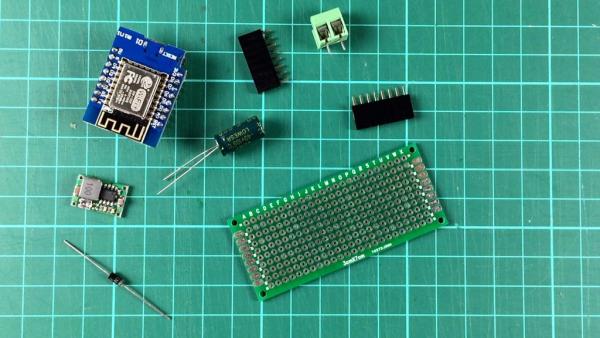
Step 2: Order the Components
Buy on Amazon.com
- Wemos d1 mini – https://amzn.to/3hZEpEx
- Mini Voltage Regulator – https://amzn.to/2Z4MIHQ
- 1N4001/4007 Diode – https://amzn.to/3gTW4wc
- 50V 680uF Capacitor – https://amzn.to/3i0eIE2
- 3D printer – https://amzn.to/3jNk8ms
Buy on Amazon.ca
- Wemos d1 mini – https://amzn.to/3d8ekjB
- Mini Voltage Regulator – https://amzn.to/2BerBtA
- 1N4001/4007 Diode – https://amzn.to/3eadLHc
- 50V 680uF Capacitor – https://amzn.to/2NbK8K0
- 3D printer – https://amzn.to/2N71Qy2
Step 3: Circuit
Smart doorbells are fun and useful to have but they are usually expensive. In this video, I will show you how I upgraded in a non-invasive way a typical doorbell and connected it to Home Assistant.
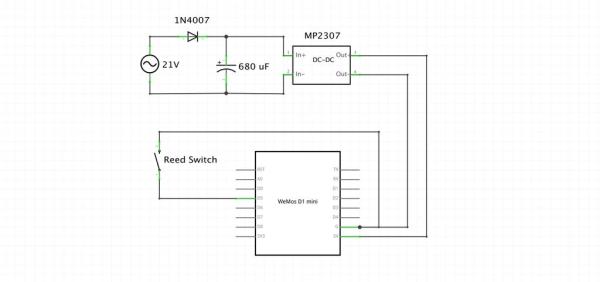
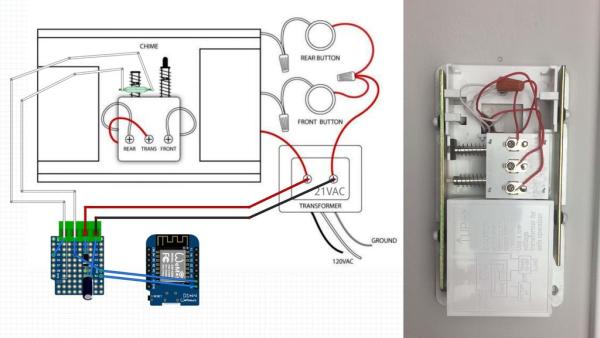
I powered the d1 mini using the doorbell AC power supply after I converted it to DC then used a reed switch connected to D5 to detect the doorbell chime as shown in the schematic below.
Most doorbells are powered by a 21 volt AC current. To get a DC current, I first passed it by a diode and then added a 680micro farad capacitor to smooth the output. This is called a half bridge rectifier. Last step was to add a buck converter to drop the voltage down to 5v. Now that the circuit is ready, it was time to put it all together. I used a 3×7 perfboard and mounted all components according to the schematics. I tested everything to make sure the 21 volt AC current is converted into a 5v direct current. Once everything looked good, I cut the extra perfboard area.
Step 4: Case

Next, I printed a small case to easily mount it ( Original Author Mitzpatrick at https://www.thingiverse.com/thing:1848391)
Step 5: Software
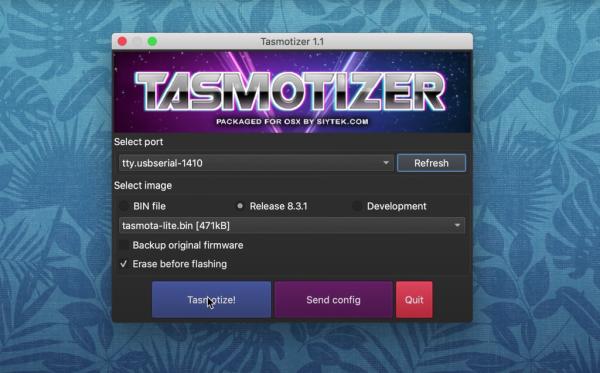
Back at the laptop, I connected the D1 mini to load Tasmota. Next, I followed a typical Tasmota setup to connect it to my network. Once the device was connected, I updated all the settings though the console. You can find the full command line attached. Just make sure you update the MQTT IP address and the credentials.
Next, it was time for the integration.
Step 6: Wiring It Up
Before I started, I disconnected the power. Attaching the device to the doorbell was easy: (1) I removed the cover, (2) attached the device to the wall using screws, (3) connected the power wires, (4) attached the reed switch using double sided tape (5) and put back the cover.
Back in home assistant, I opened the configuration file and added a new MQTT sensor, saved and restarted. The code is attached above. After I saved, I restarted home assistant.
Step 7: Done
The integration is now complete. You can now use this sensor to trigger alerts or any automation scenario!
If you found this useful, please consider subscribing to my YouTube channel – It helps me a lot.
If you are interested in supporting my work, you can check my Patreon page.
Much of the information contained is based on personal knowledge and experience. It is the responsibility of the viewer to independently verify all information.
Source: DIY Smart Doorbell: Code, Setup and HA Integration