Summary of Wireless Keyboard Using Atmega32
This project converts a standard 102-key PS/2 keyboard into a wireless device using RF technology. The design eliminates cluttered cables and offers a longer range than typical infrared keyboards at a lower cost. It utilizes two Atmega32 microcontrollers to manage the bi-directional PS/2 protocol, buffering data to accommodate the slower transmission speed of the RF components. This setup allows the keyboard to function wirelessly with a computer while maintaining full command capabilities between the host and the input device.
Parts used in the Wireless Keyboard:
- Regular 102 key PS/2 keyboard
- Two Atmega32 microcontrollers
- One 433.92MHz transmitter
- One 433.92MHz receiver from Radiotronix
- PS/2 port on the computer
- Pull up resistors
Introduction:
For our project, we designed a wireless keyboard that uses RF to transmit signals to the computer. In our design, we use a regular, 102 key ps/2 keyboard and connect it to our transmitter circuit. On the computers side, we connect our receiver circuit to the ps/2 port on the back of the computer. With this set up, we convert a cheap ordinary keyboard into a wireless keyboard.

We had several motives for choosing this project. First of all, computers have lots of wires and cables connected to them. These include the power cable, the monitor cable, the printer cable, network cable, speaker wire, microphone input, modem lines, various USB device and the essential mouse and keyboard wires. These wires form an unsightly tangled mess in the back of all computers. We therefore chose to eliminate one of these wires by making a wireless keyboard. Second, the trend for making wireless devices continues to increase. These days, we have wireless remote controls for TVs, VCRs, stereo systems, car alarms and garage door openers. Furthermore, we have wireless telephones, network connections and the now ubiquitous cell phones. We even have wireless remote controls for floor fans. Since wireless devices are becoming so popular, we decided to make a wireless device so that we could learn more about such devices. Furthermore, we decided to make a wireless keyboard because current wireless keyboards are either too expensive or have a fairly short range. For example, most current wireless keyboards use infrared for communication, which limits their range to about 6ft. These keyboards cost about $40. Some newer keyboards that use RF have a longer range, but these keyboards often cost twice as much or more. Finally, we had a need for a cheap wireless keyboard with a long range: Sean enjoys playing movies on his computer but watching them on his TV. To do this, he runs a long wire from his video card to the TV. However, if he wants to pause or rewind the movie, he needs to get up and go to his computers keyboard and hit the appropriate buttons. Although he has an infrared wireless keyboard, the range is only about 6 feet, which is too short a distance for him. So, being electrical engineers, we decided to make a cheap wireless keyboard with a longer range.
High Level Design:
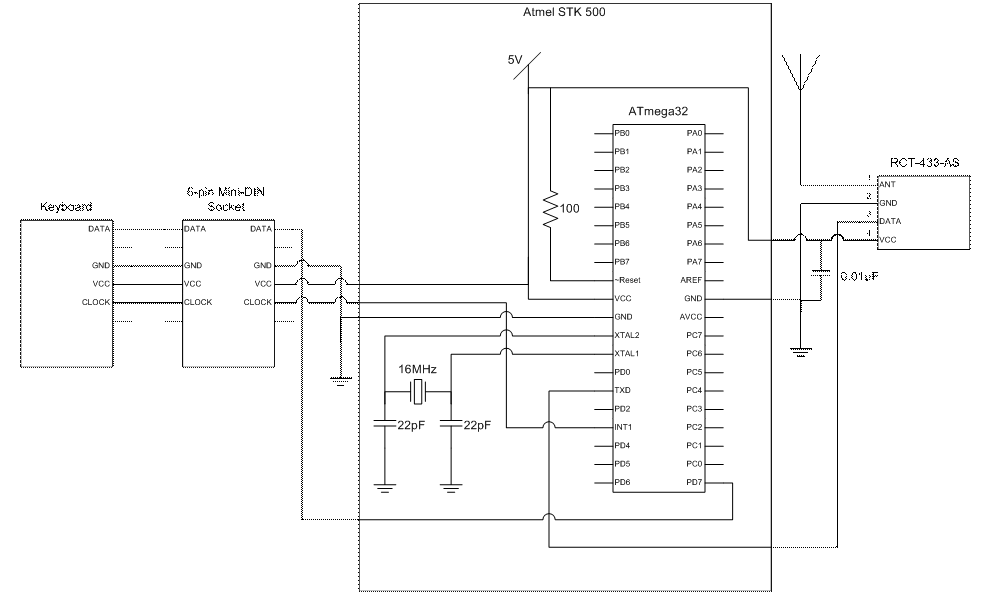
The wireless keyboard consists of a wired 102-key ps/2 keyboard, two Atmega32 microcontrollers, one 433.92MHz transmitter and one 433.92MHz receiver from Radiotronix.
Our design can be divided into two parts: the keyboard side and the computer side.� On the keyboard side, we have one of the microcontrollers connected to the keyboard and to the transmitter.� The keyboard communicates with the microcontroller and the microcontroller sends data out to the transmitter by using it�s built in UART.� On the computer side, we have the other microcontroller connected to the computer and to the receiver.� The computer communicates with the microcontroller and the microcontroller gets data from the receiver through its build in UART.� Note that we use the UART because they allow us to easily set the transmit and receive rate and they do all the transmitting and receiving in the background.� Our setup is shown in the figure below.
Because we decided to use a ps/2 keyboard and connect to the ps/2 port on the computer, we needed to implement the ps/2 protocol on the microcontrollers.� A very good reference on the ps/2 protocol is located on Adam Chapweske�s webpage.� The ps/2 protocol is a bi-directional protocol, which means that not only does the keyboard send data to the computer, but the computer sends data to the keyboard.� For example, the computer can do such things as tell the keyboard to reset or set the typematic delay and typematic rate, among other things.� This means that in our wireless set up, not only should the keyboard be able to transmit to the computer, but the computer should be able to transmit to the keyboard.� However, due to budgetary constraints, we could only purchase one transmitter and one receiver.� To overcome this obstacle, we had to program the microcontroller on the keyboard side so that it would pretend to be the computer and program the microcontroller on the computers side so that it would pretend to be the keyboard.� On the keyboard side, this requires that the microcontroller sends the appropriate commands to the keyboard when it boots up, and that it listens for the correct responses back from the keyboard.� Furthermore, on the computer side, this requires that the microcontroller responds correctly to all the commands that the computer sends to it.
In addition, the ps/2 protocol specifies that data be sent at a maximum rate of 10kbps to 16.6kbps.� However, the transmitter/receiver pair can only transmit at a maximum of 4.8kbps.� As a result, the microcontroller on the keyboard side needs to buffer the keyboard data so that it can send it out at a much slower rate through the transmitter.� We rely heavily on the fact that a human being can only type so fast, and that the typematic rate (the rate at which the keyboard resends a key that is held down) is well below the maximum.� On the computer side, this also means that the microcontroller needs to buffer all the data that it slowly receives before passing it along to the computer at a faster rate.
Program and Hardware Design:
First, a little background about the ps/2 protocol:� The ps/2 protocol is a bi-directional protocol that uses a Clock line and a Data line.� The clock is always generated by the keyboard and each clock cycle has to be between 60 and 100uSec long. �When no data is being sent by either the keyboard or the computer, both the Clock line and the Data line are pulled up to 5V through pull up resistors on the keyboard side and the computer side.� When the keyboard sends data, it generates clock pulses that go from 0V to 5V on the Clock line and it sends its data on the Data line.� If the computer wants to send a command to the keyboard, the computer pulls the Clock line low to 0V for at least 100uSec.� After the 100uSec elapse, the computer releases the Clock line, places a start bit of 0V on the Data line and waits for the keyboard to start generating clock pulses.� At each clock pulse, another bit of data is placed on the Data line by the computer. Although the clock is generated by the keyboard, the computer has control over the communication.� If the computer wants to stop the keyboard from sending data, it just pulls the Clock line low.� The keyboard then has to wait for the Clock line to be released before it can start generating a clock and sending data.� When the keyboard sends data to the computer, it sends a total of 10 bits: A start bit (0V), 8 data bits, a parity bit and a stop bit (1V).� When the computer sends commands to the keyboard, it also sends a total of 10 bits:� A start bit(0V), 8 data bits, a parity bit and a stop bit (1V).� However, on the next clock cycle after the stop bit of the command is sent, the keyboard has to respond with an acknowledge bit (0V) on the data line.� For more details on the ps/2 protocol, please see Adam Chapweske�s webpage.
For more detail: ECE 476 Final Project: Wireless Keyboard
- How does the project convert a wired keyboard to wireless?
The project connects a regular 102-key PS/2 keyboard to a transmitter circuit and links a receiver circuit to the computer's PS/2 port. - Why was this specific project chosen over buying existing products?
Existing wireless keyboards are either too expensive or have a short range due to infrared limitations, whereas this design is cheap with a longer range. - What communication method is used for the wireless signal?
The system uses Radio Frequency (RF) signals transmitted at 433.92MHz. - Can the computer send commands to the keyboard in this setup?
Yes, the system implements the bi-directional PS/2 protocol so the computer can reset the keyboard or set typematic delays. - How is the difference in data rates handled between the keyboard and the RF module?
The microcontroller buffers keyboard data because the human typing rate is slow enough to fit within the 4.8kbps limit of the transmitter. - What protocol is implemented on the microcontrollers?
The PS/2 protocol is implemented, which uses Clock and Data lines for bi-directional communication. - Who provided the RF transmitter and receiver components?
The 433.92MHz transmitter and receiver were purchased from Radiotronix. - Does the clock line generate pulses during data transmission?
Yes, the keyboard generates clock pulses between 60 and 100 microseconds long when sending data.