Summary of ESP 8266 Controlling Hot Water Circulation Pump
This article details a DIY project to control a hot water circulation pump using an ESP8266 (NodeMCU) for energy efficiency. The system uses a temperature sensor and a solid-state relay to automate pump cycles based on set timers and temperatures, featuring a web interface for configuration and IoT data transmission to ThingSpeak.
Parts used in the Hot Water Circulation Pump Control Project:
- Node MCU LUA from AZdelivery
- Solid state relay from Pollin
- DS18B20 temperature sensor from AZdelivery
- Old remote controlled wall plug
- Wires
- 5V usb power supply
Control a hot water circulation pump.
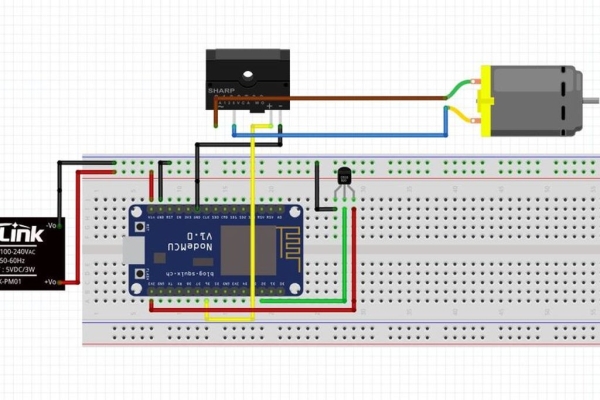
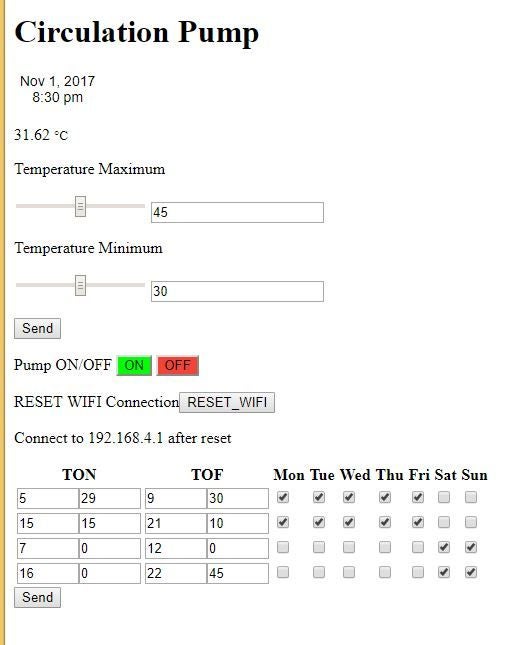
The hot water circulation pump used to work all the time. To save some energy at home it was necessary to control the pump cycles. The ESP8266 is an ideal platform to realize this kind of project. One of the IO ports is connected to a temperature sensor and another port is connected to a solid state relay. The control software offers an web interface to enter the temperature set points and the pump operation time/day. This version of the software offers 4 timers.
After setting the timers and temperature set points the pump is running during ON time. That means it runs only when the hot water is needed immediately.
If hot water is needed during off time the interface allows to switch the pump on or off manually.
Additionally the temperature values are transmitted to thingspeak.com
Step 1: Material and Tools
Material
1. Node MCU LUA from AZdelivery
2. Solid state relay from Pollin
3 DS18B20 temperature sensor from AZdelivery
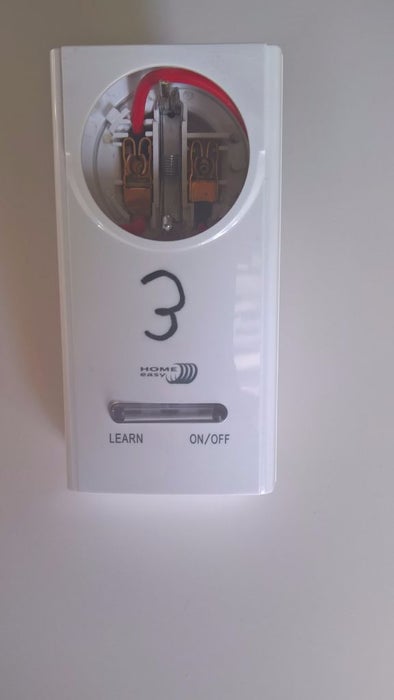
4 Old remote controlled wall plug
5. some wires
6. 5V usb power supply (try to find the smallest you can get)
Tools
1. screw driver
2. soldering iron
Step 2: Disembowel the Old Power Plug
Remove the internals from the old remote controlled wall plug.
For this step you need the screw driver and the soldering iron.
Step 3: Solder Things Together
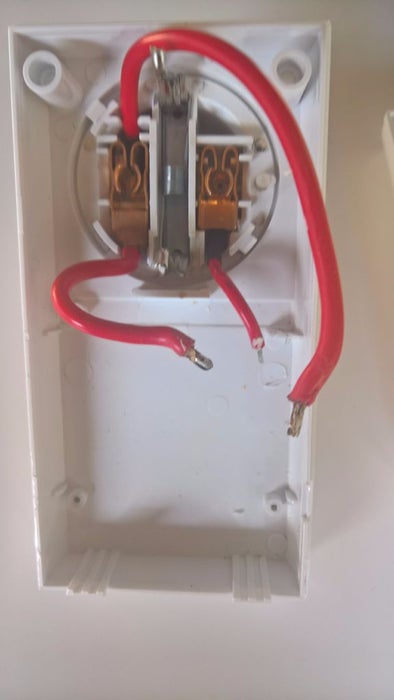
1. Connect the normally open contact from the solid state relay to the wires on the plug.
2. Solder 2 new wires to the USB power supply
3. Insulate the power supply with insulation tape or something similar
4. connect the power supply to the incoming pins of the wall plug
5. connect the node mcu to the 5V pins of the power supply
6. solder the temperature sensor to the ESP8266 board
Step 4: Install Software and Test Operation
Connect a USB cable to the ESP8266 Board and upload the code using the Arduino IDE.
The temperature values are also transmitted to thingspeak.com an IOT platform.
If you dont want the thingspeak part serch for: “sendTemperatureTS(temp);” in the main Loop and comment it.
After uploading the program you should be able to connect to you ESP8266. When you do this for thr first the ESP will run as Access Point. This will you allow to login to your local Wifi Network. For further description visit https://github.com/tzapu/WiFiManager.
After sucessfull connection to your network the ESP would run as web server.
You can probably find the IP address in the log data of your access Point.
Open your browser and enter the IP of your ESP.
Then you can use the web Interface to set your timer.
Test the operation of the device and if it runs as expected close the casing of the wall plug.
Step 5: Operation
1. Plugin the wall plug and connect your pump.
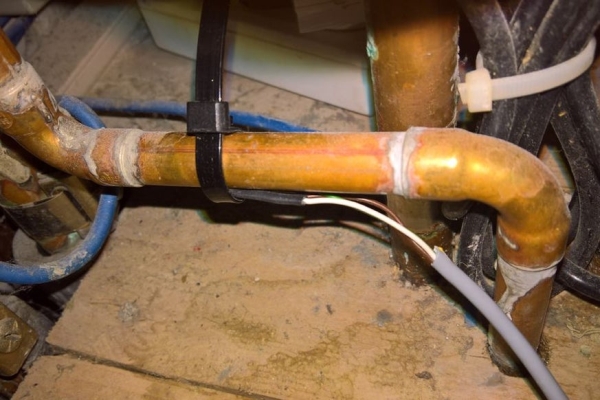
2. Attach the temperature sensor to the circulation water pipe.
Source: ESP 8266 Controlling Hot Water Circulation Pump
- How can I save energy with this project?
You can control the pump cycles by setting operation times and temperature points so the pump runs only when hot water is needed immediately. - What platform is ideal for realizing this project?
The ESP8266 is described as an ideal platform to realize this kind of project. - Does the software offer manual control options?
Yes, if hot water is needed during off time, the interface allows you to switch the pump on or off manually. - Can I disable the internet data transmission feature?
If you do not want the Thingspeak part, you can search for sendTemperatureTS(temp) in the main Loop and comment it out. - How do I connect to the device for the first time?
When connecting for the first time, the ESP will run as an Access Point to allow you to login to your local Wifi Network. - Where can I find the IP address of the ESP?
You can probably find the IP address in the log data of your access point after a successful connection. - What tools are required for this project?
The required tools are a screw driver and a soldering iron. - How many timers does the software version support?
This version of the software offers 4 timers.