Contents
hide
Summary of Floating Away with AmForth
Starting Forth and Starting AmForth introduce Forth for embedded use and describe using AmForth interactively on ATmega microcontrollers. The article covers learning resources, setting up AmForth (assemblers, flashing, enabling deletion), interacting via serial terminals on Linux and Windows (minicom, RealTerm, am4up, upload scripts), running more complex Forth code, and a simple AmForth development board with bill of materials and design notes.
Parts used in the AmForth Development Board:
- ATMEGA328-AU microcontroller (IC1)
- FT232RL USB to serial chip (IC2)
- MI0805K400R-10 ferrite bead (FB)
- AWSCR-20.00CV-T 20MHz ceramic resonator (X1)
- APT2012EC Red LED (RX)
- APT2012EC Red LED (TX)
- RMCF0805JT330R 330Ω resistor (R1)
- RMCF0805JT330R 330Ω resistor (R2)
- C0805C103K5RACTU 10nF capacitor (C1)
- C0805C104Z5VACTU 100nF capacitor (C2)
- C0805C104Z5VACTU 100nF capacitor (C4)
- CC0805ZRY5V6BB475 4.7μF capacitor (C3)
- Micro B USB connector 10118194-0001LF
- 6-pin ISP header 30306-6002HB
- PCB from OSH Park
1 Starting Forth
Forth[3] is a flexible, stack-based programming language that is ideal for embedded use. It has an amazing power to weight ratio; it can do a lot with limited resources. Forth zealots take this as one of many signs that Forth is the One-True-Language. I disagree; modern desktops and laptops are so powerful that a great power to weight ratio is unnecessary. Generally I’d rather use a language with dynamic typing, automatic memory management, many libraries available, etc. [B] However, microcontrollers don’t have cycles to burn, making Forth an appealing choice.
There’s a great introductory book for Forth, Starting Forth by Leo Brodie. IMHO, it is a top-of-the-line introductory programming book by any standard. Even better, it is legally available online for free from two sources: Forth Inc.[7] and Marcel Hendrix’s authorized reproduction.[8] I prefer the former because it has Leo Bordie’s great illustrations. Both have text updated by Marcel Hendrix to work with the ANS standard for Forth.[9] [C]
That said, be aware that all Forth implementations have their own quirks, especially in the under-the-hood parts you’d eventually want to know.
I recommend playing with Forth on a big computer first. Many implementations are available. I’m happy with GForth (GNU Forth).[10] Binaries are available for Linux and Windows.
Here’s a small view of what Forth code looks like. Below is a subroutine — a “word” in Forth parlance — that prints the first n numbers (where n is a parameter given to the word).
( This is a comment! )
: count ( n — )
  0 ( n 0 )
  do
    i . cr
  loop ;
If you’re into ideological language purity, consider this. People talk about “pure” object oriented languages — whether or not everything is an object. If you consider the purity of procedural languages, Forth would take the cake; basically everything in that definition is a subroutine. : is a subroutine that starts compilation, ( is a subroutine that tells the compiler to ignore the following text — which is a comment, 0 gets compiled into a subroutine that returns zero, do is a subroutine that starts the loop, i is a subroutine that returns the index of the loop, cr is a subroutine that prints carriage return (newline), etc.
Because of this, the language’s syntax is totally up to you — a mixed blessing.
2 Starting AmForth
IMHO, the killer feature of AmForth is that it runs on the microcontroller and can be used interactively; you develop directly on the device! Your big computer serves only as a serial terminal that sends text to and receives text from the microcontroller.
Contrast this with using C: you write the code on your big computer, compile the code on your big computer, upload the code to the microcontroller, and try running the code. If it works, that’s great. If not, you have to go through the whole process again, possibly using debugging tools.
Since AmForth can be used interactively, you just try the code, and you know right away if it works or not. Combine this with the preferred Forth coding style of breaking everything into small subroutines (that are easily tested), and you have a powerful programming tool.
The trade-off is somewhat slower execution; the code is compiled to byte-code — as with Java or Python — not to machine code. However, it’s fast enough for many things. [D] Note that — unless you’ve defined a subroutine — the code isn’t compiled, and execution will be slower since it’s not already byte-code; AmForth has to interpret the text.
2.1 The Microcontroller
That’s all well and good, but how do you put AmForth on an ATmega microcontroller? First, you need a device to run it on — like the board described in section 3↓ or an ATmega based Arduino — and a programmer — like the USB tiny ISP[11] or Pocket AVR Programmer.[12] You need a programmer even if your device has a bootloader (e.g. an Arduino) because AmForth will overwrite the bootloader; they’re incompatible.[13]
AmForth User’s Manual[14] has a good guide for getting started on Windows and Linux. However, I don’t recommend that you go with their default setup. It doesn’t include a way to delete old code! Add[16]
.include "dict_wl.inc"
to a new line in dict_appl.inc. That includes several words — written in assembly — needed to get deletion working.
Even on Linux, you need Atmel’s assembler — which is made for Windows [E] — and some other files from Atmel. These can be annoying to get on Linux because the installer doesn’t work well in Wine. However, I contacted Atmel and they said I can redistribute their assembler as long as I include the license — which I’ve done. [F] I’ve included them in the files for the development board described below. See section 3.2↓. That’s also a good example of the modifications needed to get AmForth working. The assembler executable also available here.[15]
Once everything is assembled, you need to upload the binary to the microcontroller — as described in the User’s Guide (with a few pointers in section 3.2↓).
However, the word that actually handles deletion — MARKER, and another word it relies on, are written in Forth, not assembly; they’re not installed when flashing the microcontroller. While short enough to enter by hand (see the page on MARKER[16] for their location), there’s an easier way…
2.2 Interacting with AmForth
Once AmForth is on a chip, you need a serial terminal to interact with it. Preferably, it should be able to send files, so you don’t have to enter them by hand. My suggestions follow. Note that by default, AmForth communicates at 9600 baud (bits per second). This can be changed before compilation. However, I know of few reasons to. [G] AmForth serial communication always uses 8 data bits, no parity bits, and 1 stop bit (often abbreviated as 8N1) without hardware or software flow control.
2.2.1 Linux Terminal
Welcome to minicom 2.6.2 OPTIONS: I18n Compiled on Feb 8 2013, 07:03:03. Port /dev/ttyUSB0, 12:30:21 Press CTRL-A Z for help on special keys 5 2 + . 7 ok > : hello ." Hello World! " cr ; ok > hello Hello World! ok >
Figure 1 An example Minicom session.
If you don’t mind compiling something, [H] Minicom[17] [I] is a good way to go. [J] See Fig. 1↑. Al Williams[21] released a great program, am4up,[22] that seamlessly interfaces with Minicom to upload files to AmForth. Many upload methods ignore feedback from AmForth, so text can be sent too fast for AmForth to process. [K] am4up watches AmForth’s output and sends text as soon as AmForth is ready — which results in fast uploads without causing problems.
am4up is written in C and distributed with AmForth — located at tools/am4up.c. Instructions for the one-time setup follow.
- Compile am4up: gcc -o am4up am4up.c
- Install am4up: sudo cp am4up /usr/local/bin
- Fire up minicom in configuration mode by entering minicom -s on the terminal. If you don’t have write access to the serial ports, first add yourself to the dial out group (sudo add user NAME dial out) and then log out and in again.
- Select File transfer protocols and hit enter.
- We’ll define a new setting for AmForth, so select an unused line (e.g. j).
- You want the definition to look like amforth am4up Y U N Y N , so enter amforth, hit enter, enter am4up, hit enter, etc.
- Return the to main menu by hitting enter and go to Serial port setup.
- Set the correct Serial Device by hitting a and then entering it. (If you’re using a USB to serial adapter, /dev/ttyUSB0 is probably the one.)
- Enter the Bps/Par/Bits menu by hitting e. Hit c then q to set it for 9600 8N1. Hit enter to exit this menu.
- Make sure hardware and software flow control are off (f and g as needed). Hit enter to exit this menu.
- Select Screen and keyboard and set Line Wrap to yes with r. Hit enter to exit this menu.
- Save setup as amforth
- Exit from Minicom
You can start up Minicom using these settings with minicom amforth. Do this to verify everything is working. The main screen is a terminal that allows you to communicate with AmForth. Try typing something like 5 2 + . followed by enter. (See Fig. 1↑.)
The Minicom command help screen is accessed with ctrl-a z; this brings up a list of possible commands. For example it says s is for uploading files, so entering s from this menu, or ctrl-a s from the main screen will bring up the upload menu. Select amforth, and navigate to the file to upload. Two spaces enter a directory, and one space selects a file. Once a file is selected, select [Okay] at the bottom of the screen (using the left and right arrows), and hit enter. (You can define a default upload directory in Filenames and paths from the configuration menu we used — now accessible with ctrl-a o.)
2.2.2 Windows Terminal
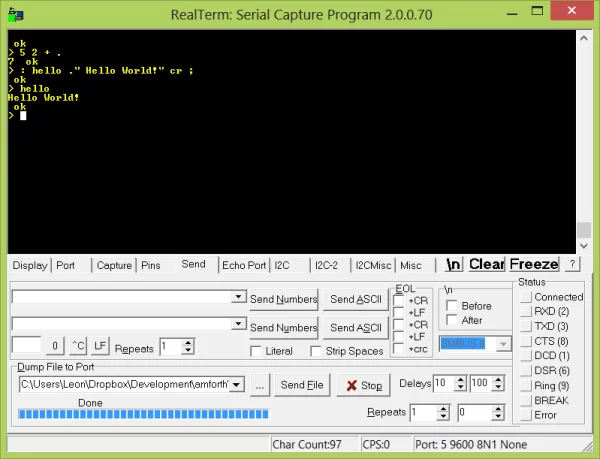
Figure 2 An example Real Term session, after a Hello World program file has been uploaded and ran.
I think Real Term[19] is the serial terminal to use on Windows. See Fig. 2↑. It requires some setup:
- On the Display tab, select Ansi; backspace didn’t work for me with ASCII. Also enable Scroll back, so you can see text that’s off the screen.
- On the Port tab, make sure it’s set to 9600 Baud, no parity, 8 data bits, 1 stop bit, and no flow control. You also need to select the appropriate port. (Check the Windows Device Manager — for whatever reason, mine was Port 5.)
- Hit the change button!
- To send a file, set the delays to 10 and 100 (10ms per character and 100ms per line) on the Send tab. These may need to be tweaked since this doesn’t look at the output from AmForth, so it’s possible to send the data too quickly. See 2.2.3↓ for more information and alternatives.
2.2.3 Non-Serial-Terminal Uploaders
There’s a Python[24] script — amforth-upload.py — that works on Linux and Windows [L] and looks at the output from AmForth, so it shouldn’t send data too fast for AmForth to handle. I’ve found the script in the most recent version of AmForth (5.1) is broken. However, older, working versions are available.[23] On Linux, it’s used like
amforth-upload.py -t /dev/ttyUSB0 /path/to/file.fth
where /dev/ttyUSB0 is the correct serial port. I imagine the script is used similarly on Windows, although I haven’t tried it.
Finally, you can use the ascii-xfr command on Linux:[25]
ascii-xfr -s -c 10 -l 100 /path/to/file.frt > /dev/ttyUSB0
This doesn’t look at the feedback from AmForth. The -c option is the delay between characters and -l is the delay between lines (both in ms). 10 and 100 are the settings from the AmForth FAQ, but they may need to be adjusted.
2.3 Executing more complex code
The above examples only show simple code running on AmForth, but it can handle as complex code as you want. Here’s an example of more complicated code — composed of simple-to-understand calls to other words — that’s part of amforth-float:4↓
: >float ( n-c-addr u-length — f true | false)
 [’] string>float catch
 0= if \ was there an error?
   true \ no error — we have a float
 else
   drop drop false \ couldn’t make a float; clear the two inputs off the stack
 then ;
This word tries to convert the string of length u-length at memory location n-c-addr to a floating-point number. If the string>float word can’t do this, it raises an error, which is caught by catch. If there is an error, false is left on the stack. Otherwise, the string can be covered to a float, so the float f and true are left on the stack.
See the amforth-float source code[5] for more examples of non-trivial code.
3 AmForth Board Design
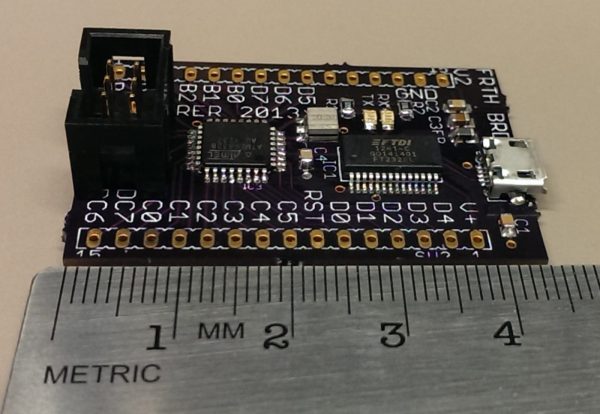 Figure 3 My AmForth Development Board
| Part | Part Number | Description | DigiKey Link and Price |
| IC1 | ATMEGA328-AU | microcontroller | 1x2.77USD |
| IC2 | FT232RL | USB to serial chip | 1x4.50USD |
| FB | MI0805K400R-10 |
ferrite bead to limit noise [M]
|
1x0.10USD |
| X1 | AWSCR-20.00CV-T | 20MHz ceramic resonator | 1x0.45USD |
| RX,TX | APT2012EC | Red LED | 2x0.16USD |
| R1,R2 | RMCF0805JT330R | 330Ω resistor | 2x0.03USD |
| C1 | C0805C103K5RACTU | 10nF capacitor | 1x0.10USD |
| C2,C4 | C0805C104Z5VACTU | 100nF capacitor | 2x0.10USD |
| C3 | CC0805ZRY5V6BB475 | 4.7μF capacitor | 1x0.10USD |
| 10118194-0001LF | micro B USB connector | 1x0.46USD | |
| 30306-6002HB | 6-pin ISP header | 1x0.64USD | |
| PCB from OSH Park[4] | 3 for $10.50 | 3.50USD each | |
| TOTAL PRICE: | 13.14USD |
Table 1 Bill of Materials for my AmForth Development Board
If you just want to play around with AmForth, a pre-made board like an Arduino will work fine. However, if you want to integrate AmForth into your own circuits, understanding a simple, bare-bones design is useful. To that end, I’ve made a simple board based around a ATMEGA328-AU[26] microcontroller — running at 20MHz — and a FT232R USB to serial IC.[32] See Fig. 3↑ for a view of the device and Table 1↑ for the Bill of Materials.
I’ve found the FT232R[32] — which converts USB to TTL level serial — is simple to use, and this board uses its default settings. However, a single FT232R costs $4.50 from Digi Key (as of 10/9/13) and takes up board space; if you start integrating AmForth into your designs, you probably don’t want a FT232R on every board. Instead, you could use a TTL-232R-5V[33] — a cable with an integrated FT232R. Then you would only need a 6 pin header on your board. Even better, you could make a small board with an isolator chip — like this[34] — and put that between the TTL-232R-5V (or an on-board FT232T) and your circuit. That way, if something goes wrong, you’re much less likely to fry your big computer.
Source: Floating Away with AmForth
- What is AmForth and why use it?
AmForth is an interactive Forth implementation for microcontrollers; it lets you develop directly on the device via a serial terminal, enabling immediate testing of small, testable subroutines. - Can I run AmForth on an ATmega microcontroller?
Yes; the article describes running AmForth on an ATMEGA328-AU and related ATmega-based boards like Arduino. - Do I need a programmer to install AmForth?
Yes; a programmer such as USBtinyISP or Pocket AVR Programmer is required because AmForth overwrites bootloaders. - How do I interact with AmForth from Linux?
Use a serial terminal like Minicom and tools like am4up to upload files while respecting AmForth output for safe transfer. - What serial terminal is recommended for Windows?
Real Term is recommended, with settings 9600 Baud, no parity, 8 data bits, 1 stop bit, no flow control, and appropriate send delays. - Does AmForth communicate at a fixed baud rate?
By default AmForth uses 9600 baud, 8N1; this can be changed before compilation but usually need not be. - How can I enable deletion support in AmForth installations?
Add .include "dict_wl.inc" to dict_appl.inc to include assembly words needed for deletion and include the Forth-written MARKER words as described. - What upload methods avoid sending data too fast to AmForth?
am4up and amforth-upload.py watch AmForth output and send data when ready; ascii-xfr can be used with suitable delays but does not read feedback. - What components make up the example AmForth development board?
The board uses an ATMEGA328-AU, FT232RL USB-serial, ferrite bead, 20MHz resonator, LEDs, resistors, capacitors, micro USB connector, 6-pin ISP header, and an OSH Park PCB. - Can AmForth run complex code like floating point routines?
Yes; the article shows an example word that uses string>float and catch to convert strings to floats, illustrating non-trivial AmForth code.