Summary of How to interface Servo Motor with AVR Microcontroller (ATmega16)
This article details interfacing a hobby servo motor with an ATmega16 microcontroller using Pulse Width Modulation (PWM). It explains that servos require three wires (power, ground, signal) and rotate to specific angles based on pulse ON time duty cycles. The text provides calibration data for VS2 servos, noting the specific microseconds required for -90 and +90 degree rotations while maintaining a constant OFF time.
Parts used in the Servo Motor Interfacing Project:
- Servo motor
- ATmega16 microcontroller
- Pulse Width Modulation (PWM) signal generator
- Three-wire connection (positive supply, ground, control signal)
Servo motors find huge applications in industries in the field of automation, control & robotics. The servo motors are well known for their precise control and work on the principle of servo mechanism. The servo motors can be made to run at precise angle using PWM. The PWM (pulse width modulation) is the basic working principle behind a servo motor (For more details about PWM refer Phase correct PWM mode). This article explores the interfacing of servo motor with ATmega16. Also to know more about servo mechanism see Interfacing Servo Motor with 8051.
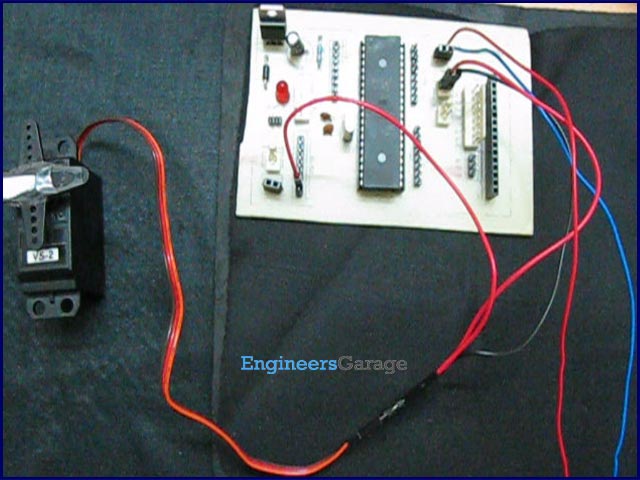
There are different types of servos available in the market. This article bounds its scope to interfacing a commonly available servo, widely used by hobbyist with ATmega16. Such a servo consists of three wires positive supply, ground and a control signal. Unlike other motors, Servo motors don’t require any driver. When a PWM signal is applied to its control pin the, the shaft rotates to a specific angle depending on the duty cycle of the pulse.
In the above figure the ON time for pulse is 1ms and off time pulse is 18ms this rotates the shaft to -90 degree. Similarly if the on time of pulse is 1.5ms and the off time of pulse same the servo rotates to 00 and if ON time pulse increases to 2ms it rotates to +900. This gives a complete 180 degree rotation. The motor maintains its position for every corresponding signal.
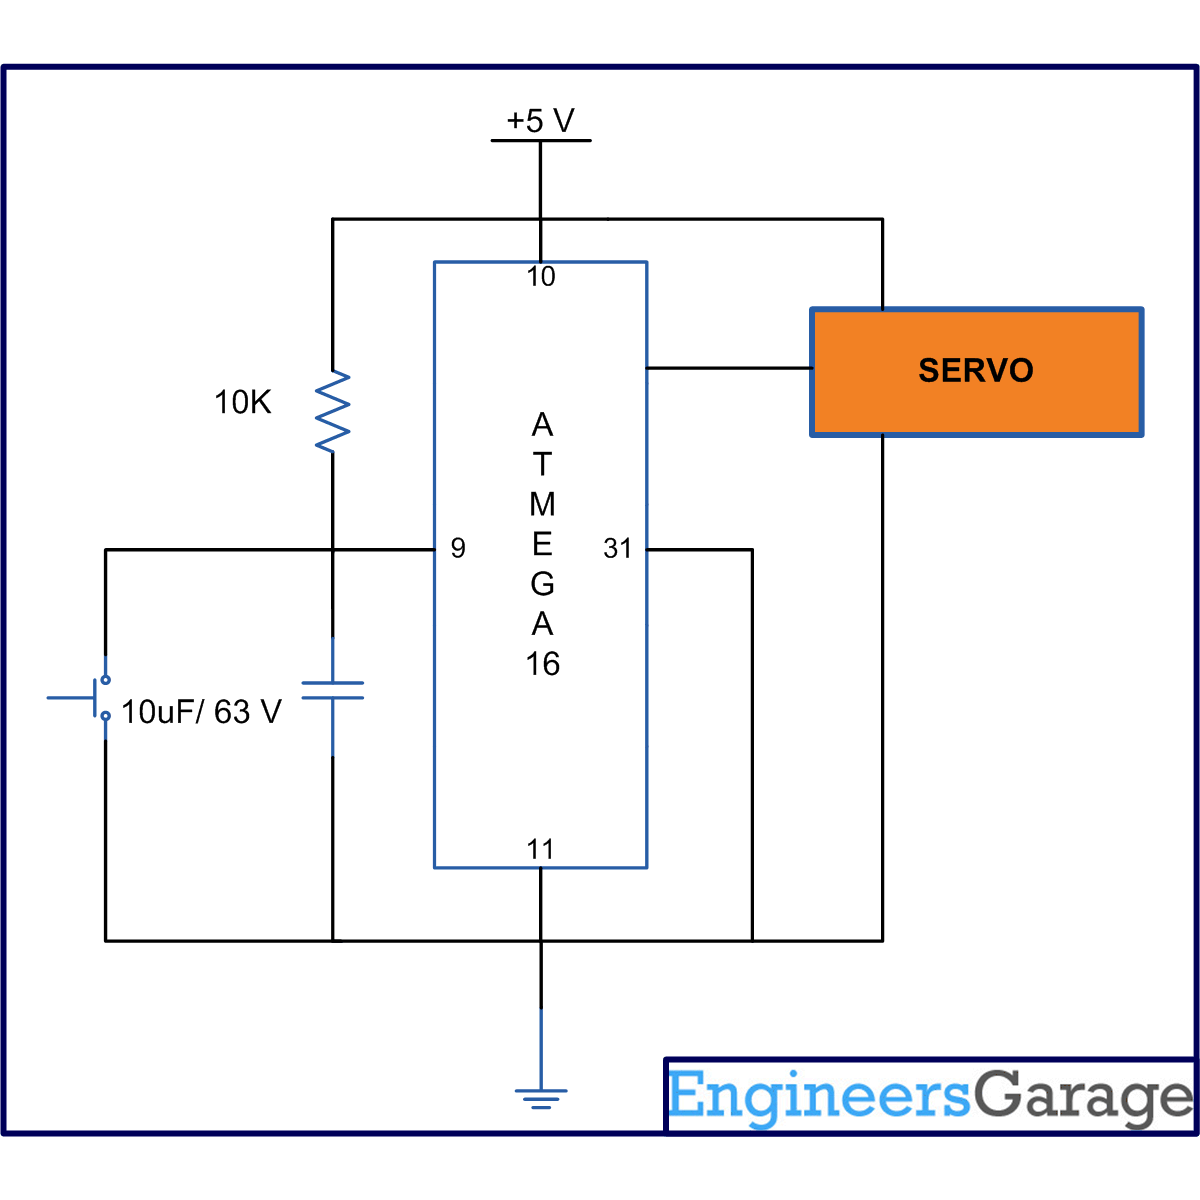
Note: Before starting with servo first check the lowest ON pulse which rotates servo to -90 degree and the highest ON pulse which rotates the servo to +90 degree while keeping the OFF pulse constant. While experimenting with VS2 servo motors it was found that for -90degree the ON pulse required was 50us and OFF pulse was 18ms. And for +90 degree the ON pulse was 2050us and keep the OFF time same as 18ms. Things may differ on the type and quality.
For more detail: How to interface Servo Motor with AVR Microcontroller (ATmega16)
- What is the basic working principle behind a servo motor?
The basic working principle is Pulse Width Modulation (PWM). - How many wires does a commonly available hobby servo consist of?
It consists of three wires: positive supply, ground, and a control signal. - Does a servo motor require any driver circuit?
No, unlike other motors, servo motors do not require any driver. - What determines the angle at which the servo shaft rotates?
The duty cycle of the PWM pulse applied to its control pin determines the rotation angle. - What happens if the ON time of the pulse is 1ms with an 18ms OFF time?
This configuration rotates the shaft to -90 degrees. - How much total rotation range does the described PWM method provide?
It gives a complete 180 degree rotation. - Why must one check the lowest and highest ON pulses before starting?
To determine the specific values needed for -90 and +90 degree positions as these vary by type and quality. - What were the specific timing values found for a VS2 servo at -90 degrees?
An ON pulse of 50us and an OFF pulse of 18ms.