Hall sensors works on the principle of Hall Effect proposed by Edwin Hall in 1869. The statement proposed says, “The Hall effect is the production of a voltage difference (the Hall voltage) across an electrical conductor, transverse to an electric current in the conductor and to an applied magnetic field perpendicular to the current.”
So, what could be simplest form of the statement to understand it in a better way? In this tutorial it will be explained step by step with practical example. Here Hall sensor will be interfaced with Atmega16 microcontroller and One LED will be used to show the effect when magnet will be brought nearby the Hall Sensor.
What is Hall Effect?
Hall Effect is related with moving charge in a magnetic field. To understand in a practical way, connect a battery to a conductor like shown in image (a) below. The current (i) will start flowing through the conductor from positive to negative of the battery.
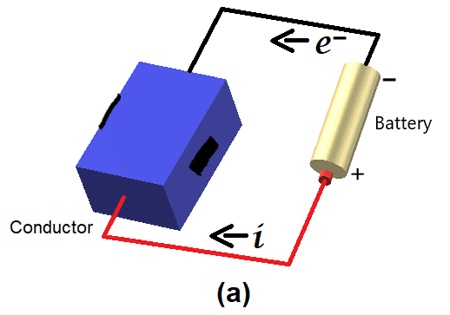
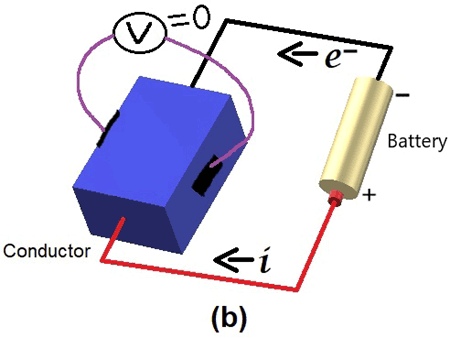
The flow of electrons (e–) will be in opposite direction of current i.e. from negative terminal of battery through conductor to positive terminal of battery. At this moment when we measure the voltage between the conductor as shown in below Image (b) below, then voltage will be zero i.e. potential difference will be zero.
Now bring magnet and create magnetic field between the conductor like Image (c) below.
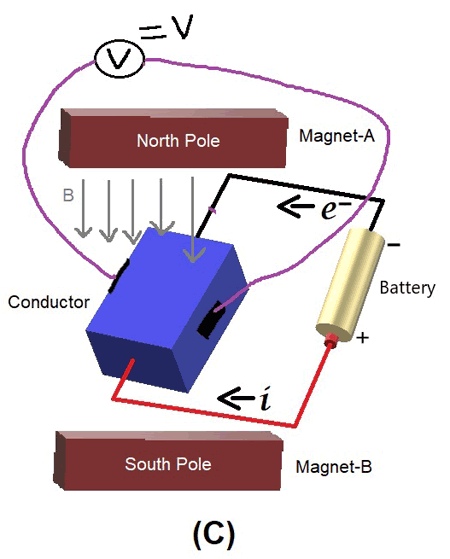
At this condition when voltage is measured across the conductor then there will be some voltage developed. This developed voltage is known as “Hall Voltage” and this phenomenon is known as “Hall Effect”.
We have used Hall sensor with many microcontrollers to build interesting applications like speedometer, door alarm, virtual reality etc, all the links can be found below:
- Magnetic Door Alarm Circuit using Hall Sensor
- DIY Speedometer using Arduino and Processing Android App
- Virtual Reality using Arduino and Processing
- Digital Speedometer and Odometer Circuit using PIC Microcontroller
Components Required
- A3144 Hall Sensor IC
- Atmega16 Microcontroller IC
- 16Mhz Crystal Oscillator
- Two 100nF Capacitors
- Two 22pF Capacitors
- Push Button
- Jumper Wires
- Breadboard
- USBASP v2.0
- Led(Any Color)
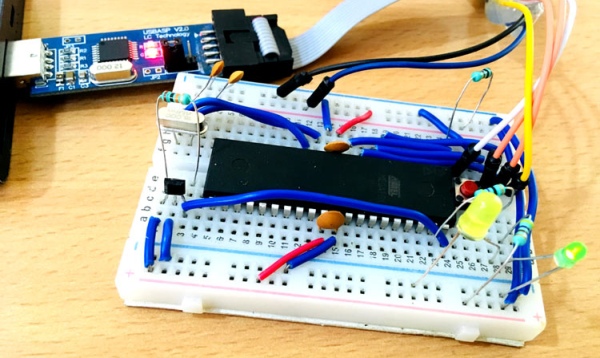
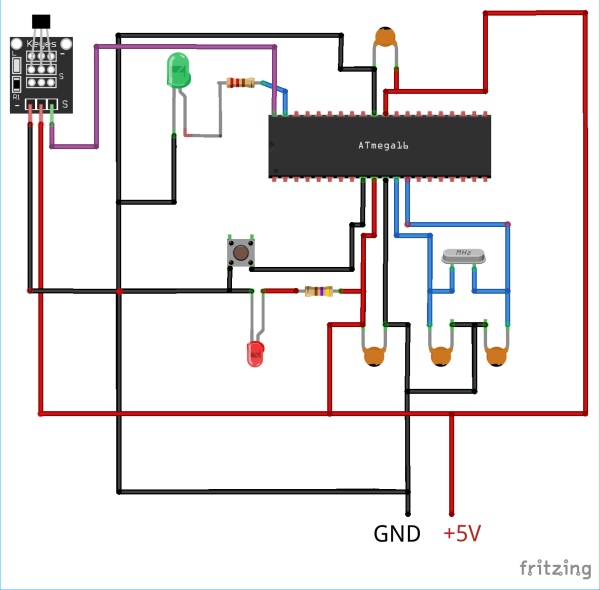
Circuit Diagram
Programming Atmega16 for Hall Sensor
Here the Atmega16 is programmed using USBASP and Atmel Studio7.0. If you don’t know that how Atmega16 can be programmed using USBASP then visit the link. Complete Program is given at the end of the project, just upload the program in Atmega16 using JTAG programmer and Atmel Studio 7.0 as explained in previous tutorial.
Programming Atmega16 will be easy and only two PORT pins will be used. One PORT pin will be used to take the readings from Hall sensor. Other PORT pin will be used connect one LED. Firstly, include all necessary libraries in program.
Define Input pin for Hall sensor reading.
#define hallIn PA0
Here the hall sensor is connected at PORTA0 of Atmega16 and it is initialise for reading the status.
DDRA=0xFE;
PINA=0x01;
If magnet is nearby the sensor then turn on LED or Turn Off LED. The detection is based on the status change of PORT pin.
      if(bit_is_clear(PINA,hallIn)){
             PORTA=0b00000010;
               }

        else{
             PORTA=0b00000000;
        }
Applications of Hall Sensor
Hall sensors are used widely wherever there is a need to measure magnetic field strength or to detect the pole of the magnet. Other than this, there are plenty of applications which can be found in general. Some of the Applications are listed below:
- As Proximity Sensor in Mobile Phones
- Gear Shifting Mechanism in Automotive Vehicles
- Rotary Hall effect sensor
- Inspecting materials such as pipes and tubes
- Rotation speed detection
To know more about Hall sensors, Please explore our previous tutorials based on Hall Sensors.
Code
/* Interfacing Hall Sensor with Atmega16
Circuit Digest(www.circuitdigest.com) */
include
define hallIn PA0 //Connect Hall Sensor Output At PA0
int main(void)
{
DDRA=0xFE; // make PA0 as input for hall sensor and PA1 output for LED
while(1)
{
PINA=0x01; //initialize PA0
if(bit_is_clear(PINA,hallIn)){ // check if Magnet is nearby
PORTA=0b00000010; // Turn ON led}
else // if not nearby
{
PORTA=0b00000000; // Turn OFF LED
}
}
}
Video
Source: How to Use Hall Sensor with AVR Microcontroller ATmega16