There are really several reasons why this project came into existence:
1. As an author of cooperative multitasking library TaskScheduler I was always curious how to combine the benefits of cooperative multitasking with the benefits of pre-emptive one. There are benefits to both and both have shortcomings. Combining the two allows a unique opportunity to leverage benefits and play down issues of either based on a particular use-case. Interesting? Read on…
2. The very fact that ESP32 is a multi-core microcontroller is fascinating. I was always curious if I can take advantage of that feature. So the experiment here was: can ESP32 stream video smoothly using one core while doing something else (meaningful and reasonably intensive something else) on the other core. Even more interesting?? Read on…!
3. I needed a testing ground for my recent projects around OTA firmware provisioning and configuration management…
4. I had purchased two LED Dot Matrix modules some time ago and could not figure out what to do with them…
5. My son is a Minecraft gamer, and as any small boy loves to decorate his door with “Do not enter” posters…
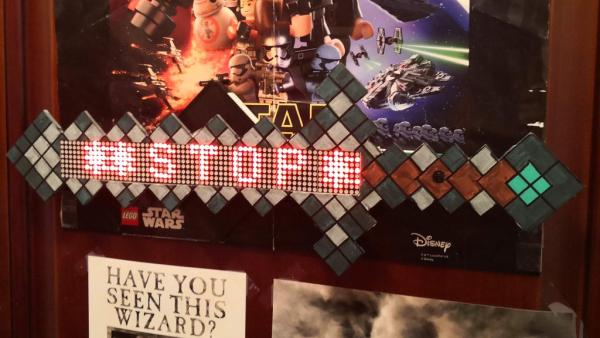
So here you go – all good reasons for: Interactive Do Not Enter door sign with ESP32-CAM streaming of a video feed “from behind the closed door” – or “Who is coming to my room?“
So… what is it all about?
If you have the patience to read the whole story you realize that this is not really about a Minecraft sword. This project is a proof of a lot of concepts:
- Coexistence of Preemptive and Cooperative multitasking
- Selective use of ESP32 cores
- Use of new Dictionary and EspBootstrap libraries
- OTA firmware provisioning
- Configuration management
- Video streaming to multiple clients
and a lot more.
Enjoy!
Supplies:
- ESP32-CAM
- MAX7219 Dot Matrix Module 4-in-1 LED Display Module Geekcreit for Arduino
- Attom Tech 2500mAh Power Bank
Step 1: Final Product
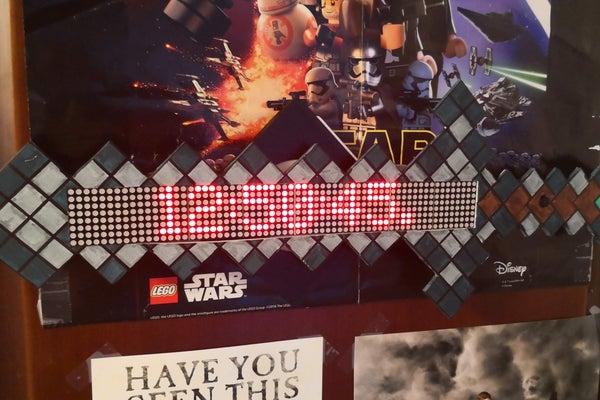
I’ll start with how the final product looks like, and then explain how it was built and how to control it.
It seems more engaging this way…
Step 2: Sword Faceplate
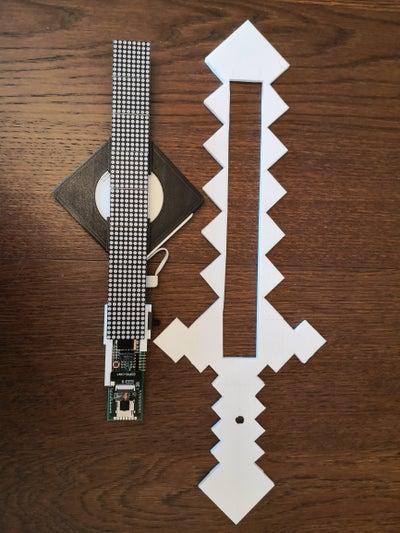
The sword faceplate is made from the whiteboard, marked with a pencil, and colored with Crayola markers. This alone could be an interesting project with your kid:
- Mark up a sword on a whiteboard
- Cut out the faceplate
- Mark up the squares (or blocks)
- Color them individually
- Add black lines with a sharpie.
I included an open office document with a sample picture of a diamond sword that you can glue on top of the whiteboard if you prefer shortcuts…
Once everything is done you can either hot-glue the faceplate to the rest of the assembly or use double-sided tape.
Step 3: Dot Matrix LED Display
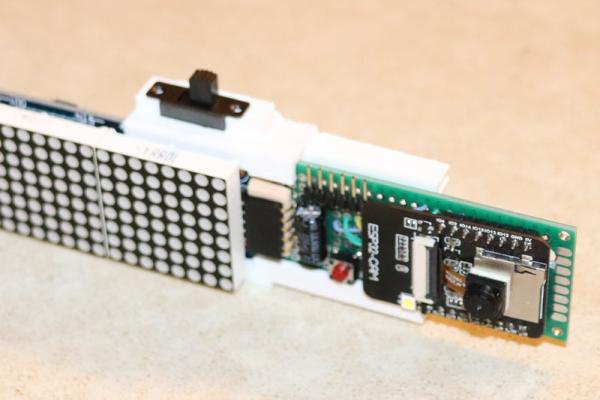
I had 2 of them, 4 segments each, so I decided to make one 8-segment one.
Conveniently there is a 5-pin male header on one side, and matching 5 holes on the opposite side. Bending the male header into a staple-like ] shape, I was able to connect the two modules both electrically and mechanically! Killed two birds with one stone (or two flies with one swat, to stop two mouths with one morsel, to make two friends with one gift, to have two strings to one bow, what are other idioms to that matter – have you thought? Sorry, I digressed).
The opposite male header will be used to connect a matching female header from the veroboard with ESP32-Cam and other components.
The two components are connected with a 3d-printed bridge, which also houses a switch to turn the power on and off.
3d STL files for bridge and other components are located in the files/3d folder on GitHub.
Step 4: Power

The Sword is powered by a 2500 mAh USB power bank – the smallest and thinnest I could find. Powerbank slides into a 3d-printed case, which also attaches to the dot matrix modules, thus holding the entire thing together.
There are two round magnets glued to the power bank case, and that is how the sword is attached to the door (so it could be as easily detached for maintenance).
Step 5: Schematic
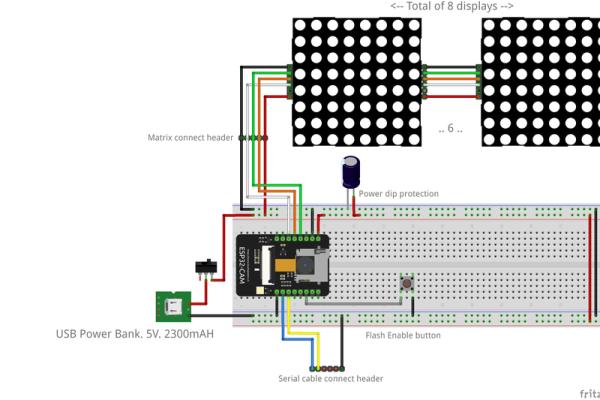
The real schematic is located on GitHub, but a picture is worth 1000 words (1024 in Information Technology), so here you are:
This is fairly straightforward if you know your way with a soldering gun.
NOTE: The 3d bridge part is designed for a very specific veroboard size: 30 x 70 mm. Should you decide to use a different one, you need to re-design the bridge component.
Step 6: 3d Printing
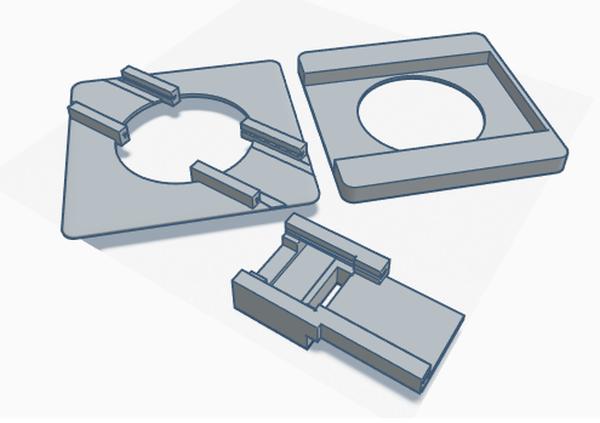
The battery case and a bridge connecting ESP32-CAM veroboard to the dot-matrix display assembly were 3d designed and printed.
The battery case comes in 2 parts, that need to be glued together after printing to create a “pocket” for the battery. The bridge just needs to be cleaned of all the support structures (there is no good orientation really that minimizes them, unfortunately). STL files are on GitHub and TinkerCad originals are located here.
The 3D design on TinkerCad also includes the simulated assembly schematic of how the parts fit together and should be connected.
Step 7: Programming
Multi-multitasking
This design uses FreeRTOS for preemptive multitasking and TaskScheduler library for cooperative one. Sword’s behavior and messages are controlled via Blynk App.
After setup (pins, camera and dot-matrix initialization, connecting to WiFi, etc.), two main RTOS tasks are created:
- Video streaming RTOS task, pinned to the Application Core of ESP32 (core 1)
- Text display and Blynk control RTOS task, pinned to the Power Core of ESP32 (core 0), which also is responsible for all WiFi-related tasks. Text and Blynk related execution is managed via TaskScheduler tasks.
I found out that 4K of stack space is enough for RTOS tasks, but there is a possibility of running out of stack, so if you prefer, make it 8K – there is plenty of RAM on ESP32.
All video capturing and streaming happens on Core 1. Everything else – on Core 0.
ESP32 has enough power to handle all of that with breaking a little sweat (the board does get hot when streaming video).
THIS was the main goal of the project: peaceful and productive coexistence of preemptive and cooperative multitasking!
Source: Interactive Minecraft Do Not Enter Sword/Sign (ESP32-CAM)