Summary of Interactive Sound Poster for Kids
This article details the creation of an interactive Halloween poster for children using a Makey Makey and Raspberry Pi. The project transforms a static poster into a guessing game where tapping foil-backed buttons triggers animal sounds via Scratch programming. It guides users through designing the poster, applying conductive tape, wiring the circuit, connecting hardware, and coding sound events to create an engaging educational experience.
Parts used in the Interactive Sound Poster:
- Foam Board
- Aluminum Foil or Copper Tape
- Makey Makey
- Computer or Raspberry Pi
- Speaker
- Poster Design
- USB Cable
- Micro USB Port (for power)
Things to Prepare:
– Foam Board
– Aluminum Foil or Copper Tape
– Makey Makey
– Computer ( Or Raspberry Pi & Speaker)
– Poster Design

Step 1: Design a Poster With a Tappable Button.
I created a poster for Halloween event for kids. It can be a guessing game about what kind of animal they are pretending to be by looking at the mask or by clicking the button next to the animal to hear the sound of a animal on the mask.

Make the button big enough so kids can tab on it easily.
Step 2: Tape the Foil(or Any Material That Conduct Electricity) on the Back Side of the Poster
In order to connect the button to Makey Makey, first cutout the button part from the poster. And on the back side of the poster, tape the foil from button part to near Makey Makey. (Make sure the foils doesn’t overlap each other.)
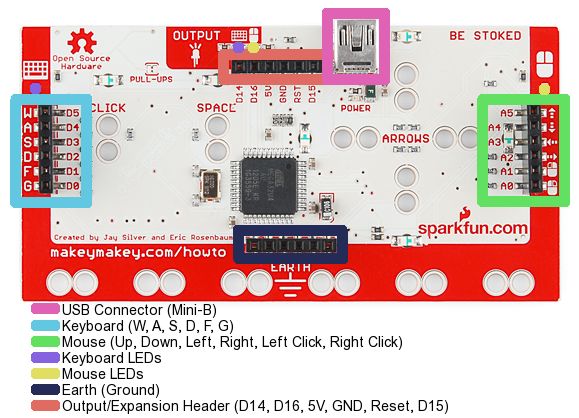
Select a keys to connect from Makey Makey for each buttons. I chose “w, a, s, d, f, g” keyboard keys from left side(Blue Section from image) of the Makey Makey.
Plug the wire to all 6 holes and tape each wire to the tip of the each tin foils.
Last but not least, plug one wire to bottom side (Ground Section from image) on Makey Makey, so this will be the button that kids will press or hold while they tap the buttons in the poster with other hand. This last wire will allow to close the circuit, which means you will be able to transfer electricity from Makey Makey to all the buttons.
Step 3: Connect Rasberry Pi and Speaker (or Computer)
In order to play the animal sound we need connect Makey Makey to power source like computer or we can use Raspberry Pi (mini computer) and small speaker to fit in back side of the poster like in the image. I used black foam board to make a space where I could place the Raspberry Pi and a speaker.
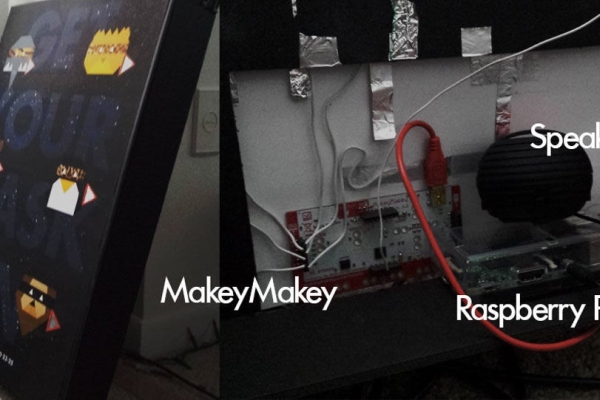
Connect the USB cable from Makey Makey’s USB connector (Pink section) to Raspberry Pi’s USB port (top right section from image)
Connect the speaker to Raspberry Pi’s audio jack.
Step 4: Program to Play a Animal Sound With Scratch
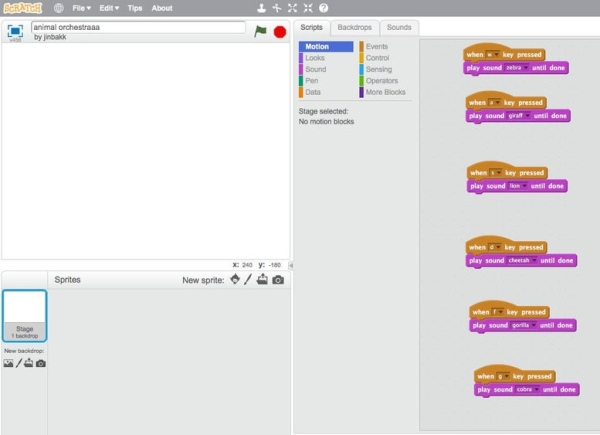
I used simple visual programming tool called scratch.
In Scratch, I just dragged “Event” and “Sound” Blocks to connect keyboard keys to sound, so for example if “w” is pressed then play a sound “zebra”. (I uploaded all the animal sound to Scratch before I made the command.) Download the project from Scratch.
> My Scratch Project: https://scratch.mit.edu/projects/34531204/#editor
After the setting up Raspberry pi, connect to computer. Next, boot Raspberry Pi and go to Menu>Programming>Scratch and open the scratch project.
> How to Setup Raspberry Pi
https://www.imore.com/how-get-started-using-raspberry-pi
After Scratch project is uploaded or selected from Raspberry Pi’s browser, you can unplug the computer and just use USB charger for power source by connecting to micro USB port of Raspberry Pi.
Step 5: Done!

Source: Interactive Sound Poster for Kids
- How do I make the button easy for kids to tap?
Make the button big enough so kids can tap on it easily. - Can I use materials other than aluminum foil?
Yes, you can use any material that conducts electricity like copper tape. - Which keys did the author select on the Makey Makey?
The author chose w, a, s, d, f, g keyboard keys from the left side blue section. - What is the purpose of the wire connected to the bottom ground section?
This wire closes the circuit allowing electricity to transfer from the Makey Makey to all buttons when held. - How do I connect the speaker to the Raspberry Pi?
Connect the speaker to the Raspberry Pi audio jack. - What programming tool was used to play the animal sounds?
The author used the simple visual programming tool called Scratch. - How can I run the project without a computer plugged in?
You can unplug the computer and use a USB charger for power by connecting it to the micro USB port of the Raspberry Pi. - Where should I place the Raspberry Pi and speaker?
Use black foam board to make a space on the back side of the poster to place them.