I was trying to figure out what game would work well on a 5×5 LED array like the Micro:Bit has, and came across Lights Out. The idea is very simple: you start with a pattern of lights on a 5×5 grid, and you select a point on the grid. When the point is selected, the lights at that point and at the neighboring points (up to four of them) are toggled. The object is to clear all the lights.
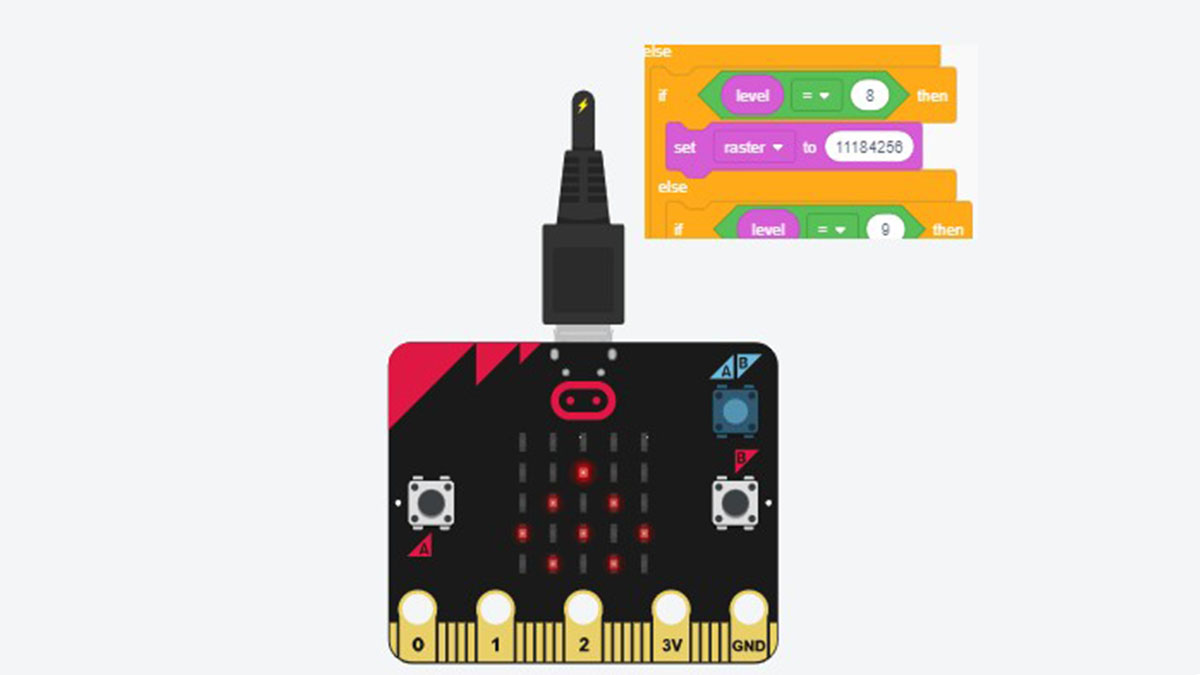
I wanted to implement it in Tinkercad’s circuit design with no components other than the Micro:Bit itself.
The Micro:Bit has two buttons, but one can distinguish short from long presses. So for the main game, I opted for a user interface where the A button moves the cursor horizontally, the B button moves it vertically, and a long press of the B button selects the point. There was also going to be a display of how many moves you took, and a level selection screen.
I took the 50 classic levels from a web-based version here.
Here is the final code.
I don’t own a Micro:Bit so I only tested on Tinkercad’s simulator.
Step 1: Game Play
To play online, go here and click on “simulate” and then “start simulation”. To get the javascript for a Micro:bit, click on “Code” and then use the download button.
When the game starts, you are at level 1 (you will see an L and then a 1 on the screen).
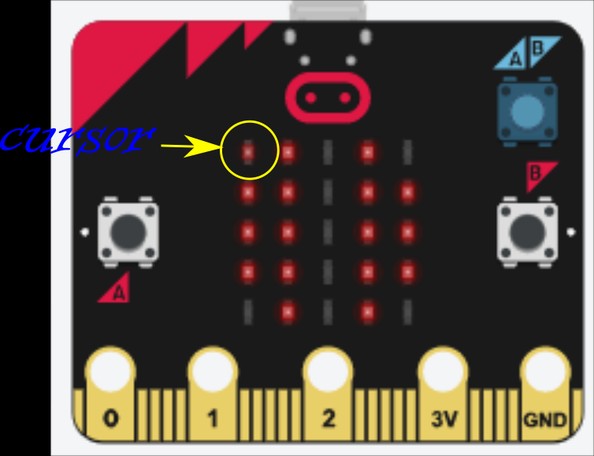
The game lights are indicated by LEDs at half brightness. The cursor is moved with short presses of the A and B buttons. When the cursor goes on top of a lit location, the LED goes to full brightness. When the cursor is on top of an unlit location, a very dim LED should result. (Since I don’t have a Micro:Bit, if you want to run this on the actual hardware, you might want to tweak the brightness settings.)
To select a point, long-press (half a second) the B button.
To restart the level, long-press the A button.
After you finish a level, you will be shown a checkmark followed by how many moves you took, and then you will automatically move to the next level. But you can also long-press the A button to go to a level-selection screen when you’ve just started or reset a level. (So, if you’ve played a level some ways and want to go to the level-selection screen, long-press A to reset the level, and then long-press again to go to the level-selection screen.)
When you go to the level-selection screen, you will see a question mark appear, and then a digit indicating the level, or its ones digit. Once the level gets above 9, you will also see a dot on the left side of the screen indicating the tens digit (at the top, it indicates a 1, then in the second row, it’s a 2, and so on). The display is bright if you haven’t done the level yet and dim if you have done it (since turning on the Micro:bit).
Short-press A and B to switch levels, and long-press B to play the selected level.
The screenshots above show the game screen for Level 3 and the level selection screen for Level 23.
From the level selection screen, you can also long-press A to play randomly designed levels (you will see an R appear). These levels are guaranteed to be solvable in 8 or fewer moves.
Step 2: Code: Overview
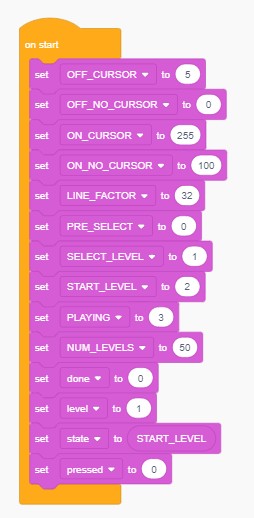
Tinkercad’s block code does not have any facility for subroutines or custom blocks like Scratch does. Thus, there is a relatively piece of setup code in an on start block which sets up all the global variables, and a gigantic piece of code in a forever block that runs over and over. The global variables include a number of constants (in all-caps) for readability. You can tweak the variables starting with OFF_ and ON_ to adjust the brightness of the LEDs on their own and as combined with the cursor.
The code in the forever consists of a combination of button-handling code, raster display code, and a state machine (state held in the state variable) with the following states:
- PRE_SELECT: shows a question mark before the level-select screen
- SELECT_LEVEL: the level selection screen
- START_LEVEL: initialize a new level
- PLAYING: game play progresses.
In the following, I will describe the trickier parts of the code.
Step 3: Code: Button Handling
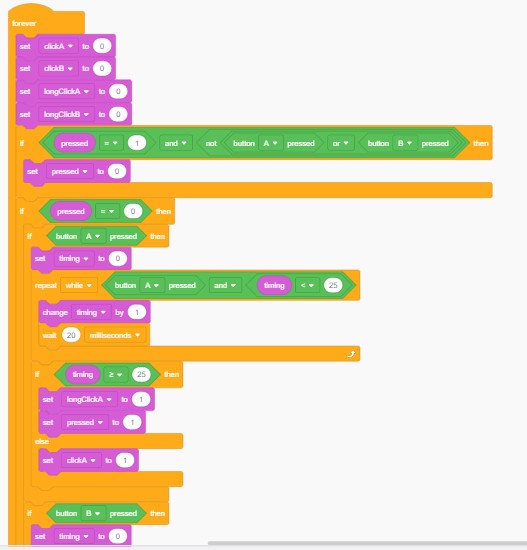
The button handling code uses the following variables, which are equal to 0 for false and 1 for true:
- clickA/clickB: button A/B was short-clicked
- longClickA/longClickB: button A/B was long-clicked
- pressed: we are in the middle of a long click.
Each loop of the forever code first clears all the click variables. Then it unsets pressed if no key is pressed.
If pressed is set, we are (probably–there are some complications in case of simultaneous presses) in the middle of an already-handled long button press, and so we ignore the keys.
If pressed is not set, we first check if the A button is down. We wait 500 ms to see if it goes back up. If it does, we have a short click and we set clickA. Otherwise, we have a long click and we set longClickA and pressed. Then we do the same for the B button.
Step 4: Code: Display
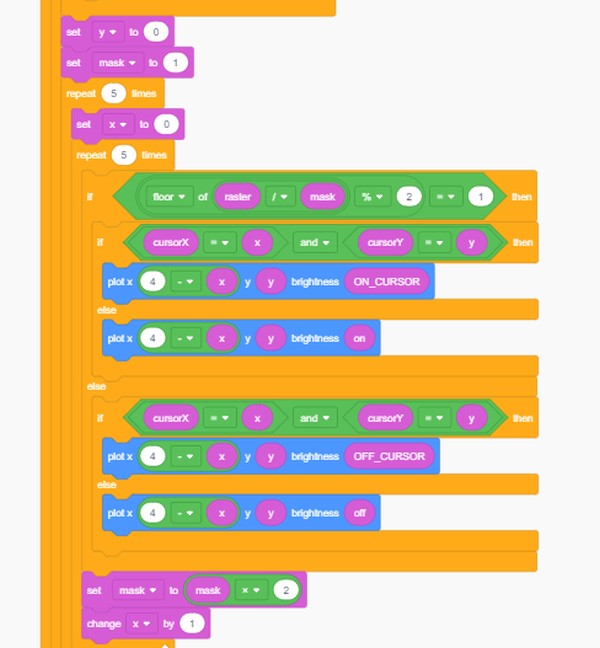
In the SELECT_LEVEL and PLAYING states, display is handled by a bitmapped 5×5 raster, stored in a single raster variable, together with cursorX and cursorY variables (set to -1 and ignored in SELECT_LEVEL). For instance, if raster=1, the upper-right (for convenience) light is on and nothing else is; if raster=33, the upper-right light and the one just below it are on (33 = binary 100001).
There is a loop that goes through all the coordinates and sets the LEDs in accordance with the raster and cursorX/Y variables. Tinkercad doesn’t provide any bit manipulation functions. The way the display works is that there is a mask variable that starts at 1 when we are handling the upper-right LED, and is doubled each time we got to the next LED. We then check if raster has a 1 in the same binary place as mask by checking whether floor(raster/mask)%2=1.
In PLAYING mode, raster stores the actual current state of the gameboard.
In SELECT_LEVEL mode, raster is made by a big if…then… block, using decimal conversions of binary bitmaps of digits, plus an extra pixel for the tens digit. Additionally, the brightness is set based on whether the done bitmap says that the level was already completed by the player.
The rest of the display code is handled with the Tinkercad show number/string blocks.
Step 5: Code: PLAYING
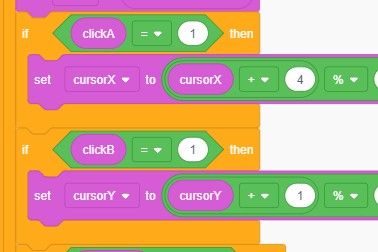
If the state is PLAYING, we have to use the clickA/B and longClickA/B variables as our user interface. The clickA/B buttons move the cursor. See the first image.
The longClickA variable resets the level (by going back to the START_LEVEL state), or if the level has just been reset, it goes to SELECT_LEVEL.
The longClickB variable is the main tricky part of the PLAYING handler. We first increment the number of moves. Then we set up a mask variable that is a 25-bit binary value with a 1 in the place corresponding to the cursor position: mask=2^(cursorX+5*cursorY). We can now flip the binary value in raster corresponding to mask. To do this, we check if the bit corresponding to mask is on by checking whether floor(raster/mask)%2=1. If the bit is on, we turn it off by subtracting mask from raster; if it is off, we turn it on by adding mask to raster. (It would be a lot easier if Tinkercad had bit operations.)
Then we repeat this for the neighboring four places, checking for edges as needed. We can compute the masks for the neighboring places from the original mask by multiplication and/or division by appropriate powers of two.
The screenshot above shows how this was done for the central point and the point to its left (for technical reasons, the bits show up right-to-left in raster).
And at the end of the forever block, we check if raster=0 (i.e., if all the lights have been turned off), display the number of moves this took, and then go to the next level.
Source: Lights Out Clone for Micro:Bit in Tinkercad