Summary of Micro:Bit Puppet “Text Messaging”!
This project creates a wireless text messaging system using two Micro:Bit microcontrollers. One unit sends messages via radio waves, while the other triggers a servo motor to animate a cardboard puppet and displays the received text on its LED screen. The system allows bidirectional communication between two users, turning digital messages into physical alerts.
Parts used in the Micro:Bit Puppet Text Messaging Project:
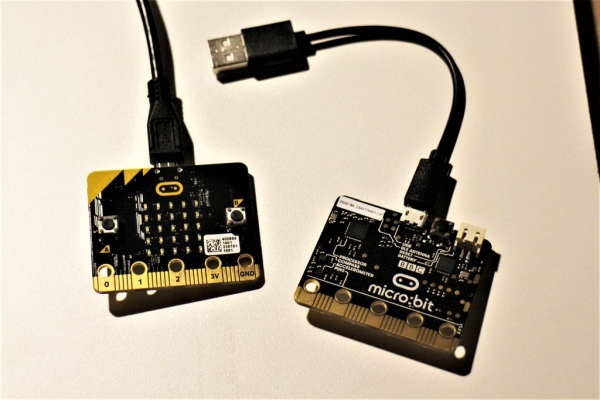
- Micro:Bit microcontroller (x 2)
- Servo Motor (x 2)
- Alligator Clips to Breadboard Wires
- Cardboard (approx. 2 ft. x 1 ft.)
- Paper Fasteners (13 or more)
- Skewers (5 or more)
- Magnets (optional for attachment)
Nearly all of our wireless communication is done using radio waves*, including phone calls, text messages, and WiFi. With its built-in radio transmitters and receivers, the Micro:Bit microcontroller makes it super easy to build all sorts of projects with radio communication.
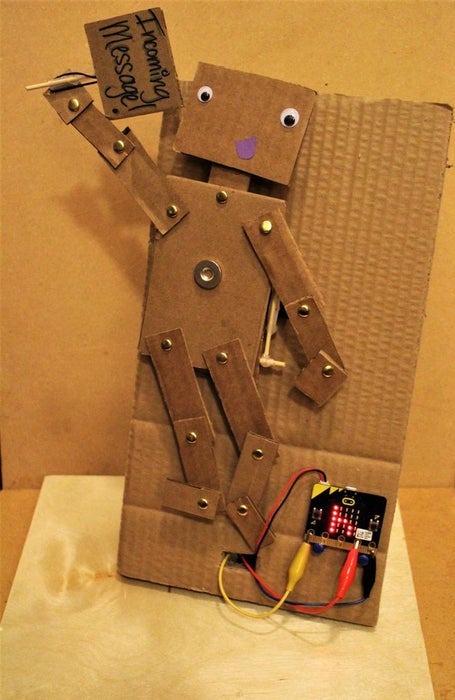
This particular project is a simple & quick way to send text messages between two Micro:Bit** microcontrollers – the sender writes a (short) message that is transmitted via radio to the receiving Micro:Bit, which shakes a lil’ puppet using a servo motor, and then displays the message on the Micro:Bit LED screen. Each Micro:Bit can be both a sender and receiver.
It’s sort of like a two-person Twitter.. if the tweet notified you via dancing cardboard robot puppet!
*Radio waves are long-wavelength light waves. Check out the electromagnetic spectrum here!
**A huge THANK YOU to Adafruit for donating the Micro:Bit microcontrollers used in this project for educational purposes! yayy thank you for supporting this educational endeavor!! 😀
Step 1: Materials & Tools
Electronics
Micro:Bit microcontroller (x 2)
Servo Motor (x 2)Alligator Clips to Breadboard Wires
Puppet (or other Message Alert System) Materials
- Cardboard (approx. 2 ft. x 1 ft.)
- Paper Fasteners (13 or more)
- Skewers (5 or more)
Tools
- Hot Glue Gun
- Scissors and/or utility knife (e.g. exacto knife)
- Pencil
- Ruler or other straightedge
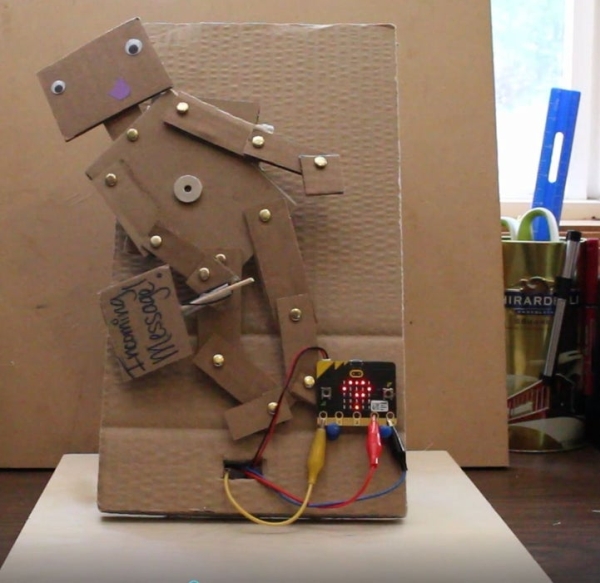
Step 2: Build the Incoming Message Alert Puppet!
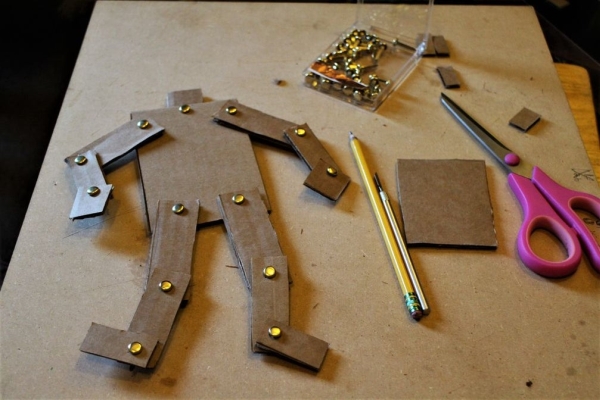
Step 1: Build a cardboard puppet like the one shown in the photo or create your own! Use the paper fasteners to make joints.
Step 2: Build a mounting system to attach the puppet to the servo with skewers and cardboard.
I used a magnet to attach the puppet to the servo mounting system because magnets are awesome, but you can also use glue, tape, velcro, or a variety of other adhesives!
Step 3: Build a stand for the puppet.
- On an approx. 6 in. x 12 in. cardboard sheet, measure, mark, and cut a hole for the servo body so that the arms of the servo rest against the front of the cardboard sheet.
- Cut two triangles out of cardboard and glue them on the back of the stand so that the stand, well, stands upright!
- Cut a hole for the Micro:Bit wires to thread through and add two pushpins on the front to hold the Micro:Bit.
Step 3: Code the Two Micro:Bits!
To start, choose one Micro:Bit to be the sender and the other Micro:Bit to be the receiver. Once both are working as expected, add in the code for both roles.
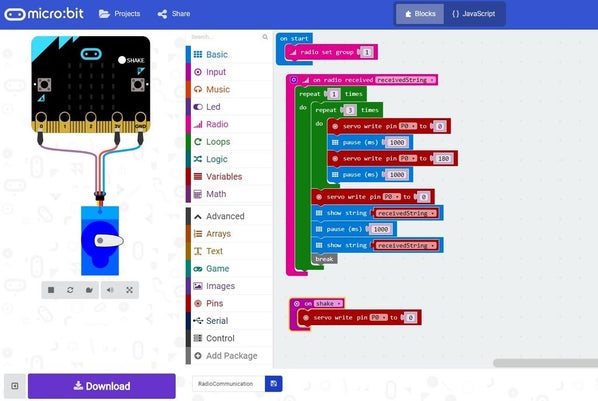
Use the Make Code Micro:Bit website to program each Micro:Bit. As this is intended as a beginner project, the whole system can be built using the block-based programming language, although adaptations are encouraged and appreciated!
If there is more than one pair of Micro:Bits in the room (i.e. in a classroom setting), remember to set different radio group numbers for each pair.
The sender sends a (short) text based on user inputs over radio, like the example above. Pretty simple!
The receiver moves the servo when an incoming text is received, then scrolls the message text on the LED screen, like in the example below.
Press the reset button to stop sending/receiving the incoming message.
Step 4: Connect the Servo!
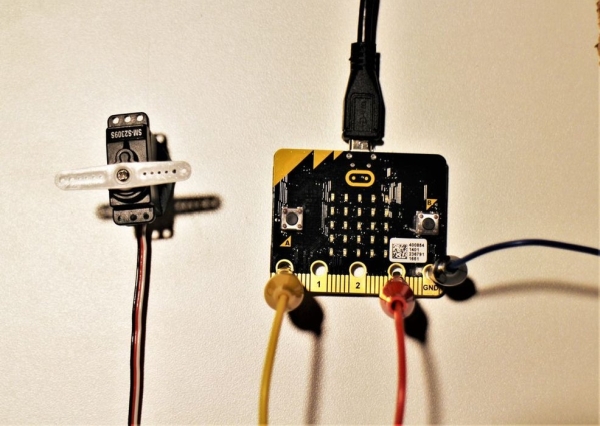
Connect the servo red wire to the Micro:Bit 3V power pin, the servo black wire to Micro:Bit ground pin, and the servo white (or yellow) wire to the Micro:Bit input pin P0.
Step 5: Send All the Messages!
Program both Micro:Bits to be both a sender and a receiver so you can communicate back and forth. Then switch power from the laptop to the battery pack and test out your wireless communication system! When the sender sends a message, the puppet will notify you to check the LED screen so that you can see the incoming message.
How far of a range can you get? Test it out!
There are tons of other extensions to this introductory project, here are some possibilities:
- Add more message options by adding more inputs or changing how those inputs are read;
- Instead of a table-top alert system, build a wearable alert system;
- Send voice messages and/or other sounds.
Happy building!
Source: Micro:Bit Puppet “Text Messaging”!
- How can I program the Micro:Bits?
You can use the Make Code Micro:Bit website with block-based programming language. - Can both Micro:Bits send and receive messages?
Yes, you can program both units to act as both a sender and receiver for back-and-forth communication. - What happens when the receiver gets a message?
The receiver moves the servo motor to shake the puppet and then scrolls the message text on the LED screen. - How do I connect the servo wires to the Micro:Bit?
Connect the red wire to the 3V power pin, the black wire to the ground pin, and the white or yellow wire to input pin P0. - What should I do if there are multiple pairs of Micro:Bits in a classroom?
You must set different radio group numbers for each pair to prevent interference. - How can I stop sending or receiving messages?
Press the reset button on the Micro:Bit to stop the transmission or reception process. - What materials are needed to build the puppet?
You need cardboard, paper fasteners for joints, and skewers to attach the puppet to the servo mounting system. - Can I extend this project to send voice messages?
Yes, the article suggests extensions like sending voice messages and other sounds.