Summary of NOKIA 3310 LCD interfacing with ATmega8
Using graphic LCD in a project gives it really a good look and flexibility of displaying different characters and shapes. But, the graphic LCDs are quite costly. The NOKIA 3310 LCD provides a really low-cost solution to add a small graphic display into your project and also good for learning purpose. The LCD is SPI bus compatible, saving many pins for other uses. It operates at 3.3v.Here is a small circuit for interfacing the 3310 LCD with AVR microcontroller ATmega8. The schematic includes LCD connection with SPI port of ATmega8 with other connections required by LCD. The 3.3v is generated using adjustable voltage regulator LM317 (I was not having any 3.3v regulator at the moment). An LED is also connected with microcontroller just for making sure that the controller is working, particularly when you don't see anything on the display! Here is the schematic and the pin details of the LCD (click on the image to enlarge it): The connector of LCD is 'touch' type. So, I made a small connecor PCB with tracks touching to the pins of LCD. The pcb was pasted at backside of LCD using cello tapes as shown in the back-view image Here is a testing with Proteus ISIS Simulation: The program routines are written in C with ICCAVR compiler. I've created a library for this display. The low-cost, easy availability has made me really like this display. Read More : NOKIA 3310 LCD interfacing with ATmega8


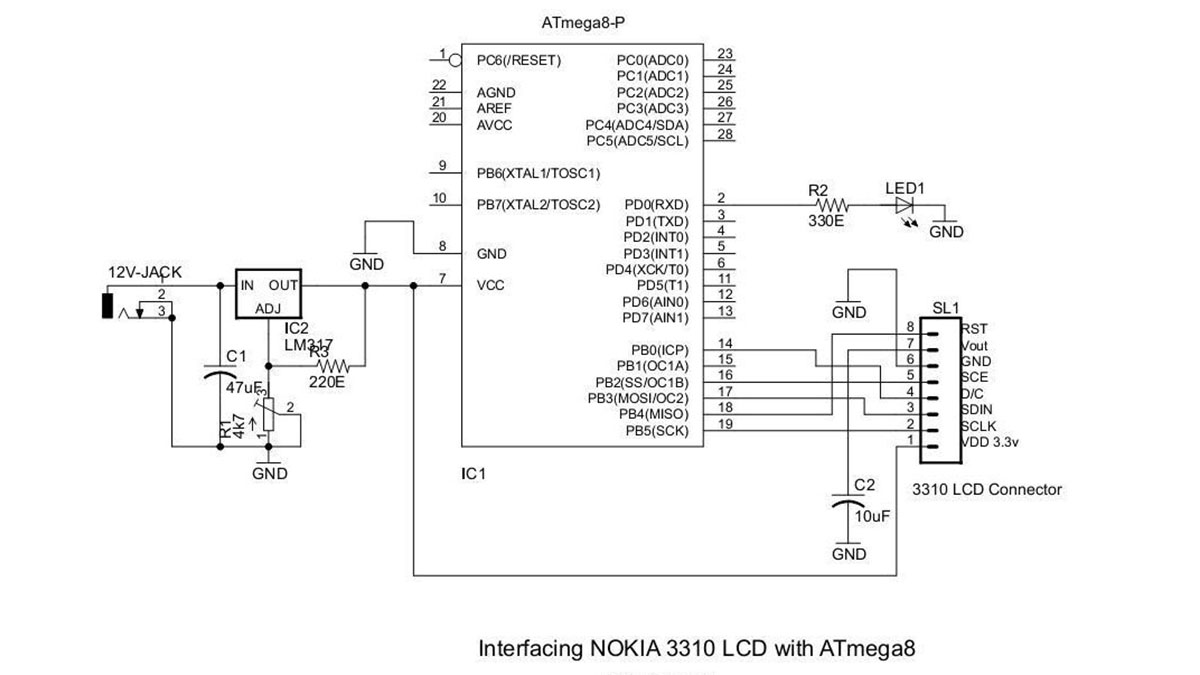
The NOKIA 3310 LCD provides a really low-cost solution to add a small graphic display into your project and also good for learning purpose. The LCD is SPI bus compatible, saving many pins for other uses. It operates at 3.3v.Here is a small circuit for interfacing the 3310 LCD with AVR microcontroller ATmega8. The schematic includes LCD connection with SPI port of ATmega8 with other connections required by LCD. The 3.3v is generated using adjustable voltage regulator LM317 (I was not having any 3.3v regulator at the moment). An LED is also connected with microcontroller just for making sure that the controller is working, particularly when you don’t see anything on the display!
Here is the schematic and the pin details of the LCD (click on the image to enlarge it):
The connector of LCD is ‘touch’ type. So, I made a small connecor PCB with tracks touching to the pins of LCD. The pcb was pasted at backside of LCD using cello tapes as shown in the back-view image

Here is a testing with Proteus ISIS Simulation:

The program routines are written in C with ICCAVR compiler. I’ve created a library for this display. The low-cost, easy availability has made me really like this display.
Read More : NOKIA 3310 LCD interfacing with ATmega8