KeeLog has decided to release an early version of it’s hardware keylogger family to the public domain, including full firmware & software source code, keylogger hardware electrical schematics, and documentation. This PS/2 key logger is a 100% operational and tested device, assembled and used by hundreds of people around the world. Operation of this hardware key logger is similar to the KeyGrabber PS/2. We provide the application KeyGrab for retrieve and analysis of recorded keystroke data. However, please note that this DIY hardware keylogger project is provided as is, with all faults, and with no warranty whatsoever.
Tools and components
Before you start, go down this list to check if you have all the tools and skills needed to accomplish this hardware keylogger project:
- some experience in electronics hardware
- a soldering iron
- a microcontroller programmer (supporting the Atmel AT89CXX51 family)
The following components are required for the hardware keylogger project:
- Atmel AT89C2051 microcontroller (or AT89C1051, AT89C4051)
- AT24C512 serial EEPROM chip (or compatible)
- 12 MHz crystal
- 2 x 33p capacitor
- 10 uF capacitor
- 10 k resistor
- small push-button

Put it together
Program the keylogger microcontroller firmware first. Start your programmer software, pick the AT89C2051, and burn the flash with the binary file or the hex version. You may also recompile the source using the source codeand an 8051 compiler.
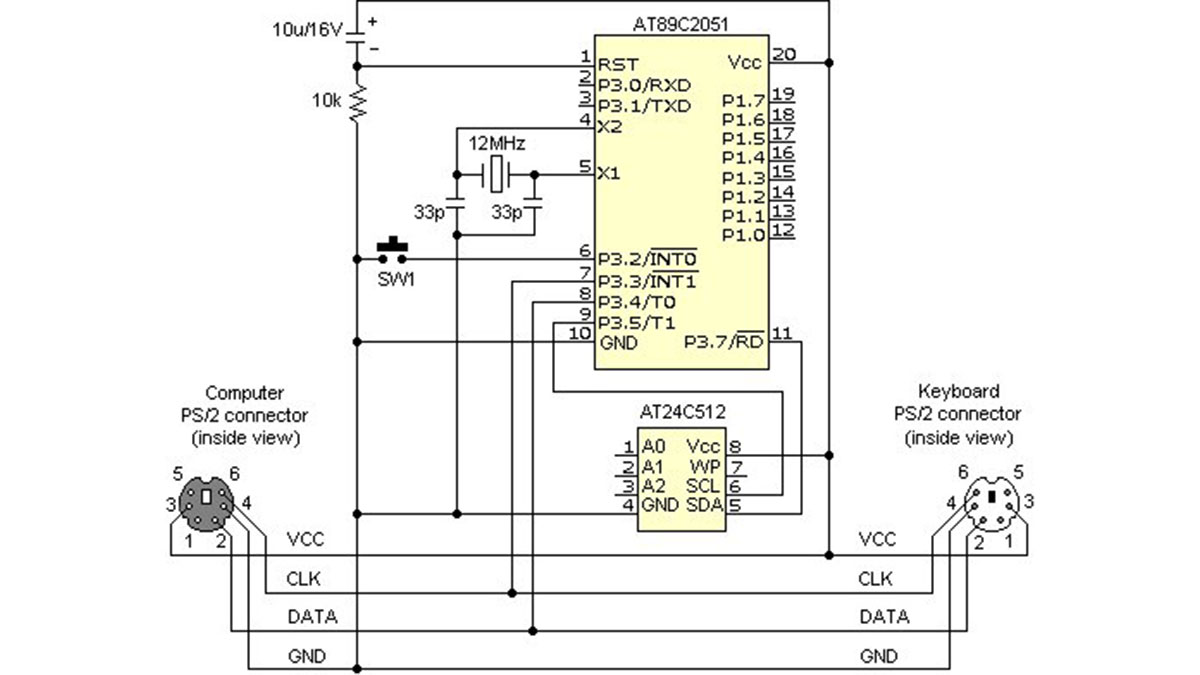
Soldering is probably the most difficult part of the project, as the keylogger hardware should be made as small as possible. The keylogger hardware schematics below show how connections should be made between components.
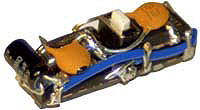
Solder the components together starting from the microcontroller and the EEPROM. Unused IC pins can be removed. Make sure the push button is accessible. When mounting the capacitor, make sure it’s biased correctly.
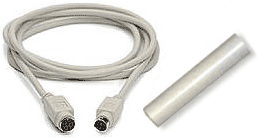
Before pulling the thermal tubing around the hardware keylogger, a good idea is to let some glue or resin in between the components, to make the device more rigid. Finally pull the thermal tubing on, heat it until it wraps around the soldered components, and cut out a small hole so the button is accessible.
Record mode
The hardware keylogger starts recording key data once plugged between the keyboard and the computer. The keylogger is completely transparent for computer operation and cannot be detected by software in record mode. All key data sent by the keyboard will be recorded to 64 kB hardware non-volatile EEPROM memory. Record mode is completely independent from the operating system installed on the computer.
| Find the PS/2 connector at the computer. |  |
| Disconnect the keyboard. |  |
| Connect the hardware keylogger in place of the keyboard. |  |
| Connect the keyboard to the keylogger. On computer power-up data will start recording. |  |
Playback mode
Once the hardware keylogger has recorded key data, it can be retrieved to any PC running Windows 9X/Me/XP/2000. The hardware keylogger does this by simulating keyboard keystrokes. The transmitted keystroke data is acquired by a the KeyGrab application. Once this data has been transmitted to the computer, it can be processed and analyzed. Follow the instructions for initiating data download.
| Run the KeyGrab application. |  |
| Connect the hardware keylogger instead of the keyboard. Do not connect the keyboard. |  |
| Click on the KeyGrab title bar to make it the active application. |  |
| Disconnect the hardware keylogger and plug your PS/2 keyboard back in. |  |
Data analysis
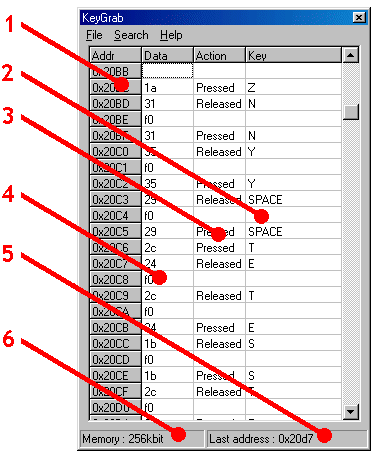
When downloading keystroke data to the KeyGrab main table, it’s automatically preprocessed to show key data that logged during recording. Data is transmitted in descending order, to show keys pressed recently first. Keystrokes that occurred a long time ago are transmitted later. You can analyze the table manually, or use some of the search options.

1 Position in keylogger hardware memory used by keyboard event (hex form).
2 Captured and logged keystroke.
3 Event that took place – a key press or release.
4 Keystroke scancode on PS/2 bus (hex form).
5 Last memory position written during recording (hex form).
6 Keylogger hardware memory size (in kilobits).
The only column that is of any interest to the user is Key (2) and Action (3). These columns code what keys have been pressed and released. Scroll the bar to see the keystroke history during recording. Keylogger data is transmitted in reverse chronological order (recent keystroke data first).
DownloadThe DIY hardware keylogger data retrieve and analysis application for Windows 9X/ME/2000/XP: KeyGrab.zip (0.7MB) The full source code for the AT89C2051 microcontroller: The precompiled AT89C2051 hardware keylogger firmware is also available: |
 |
Source : keelog.com/diy.html PS2 Keyboard Keylogger Circuit Atmel AT89C2051 schematic source code files alternative link: ps2-keyboard-keylogger-circuit-atmel-at89c2051.rar alternative link2alternative link3


