Summary of Temperature Sensor(LM35 ) Interfacing With ATmega32 and LCD Display| Automatics Fan Control
This article details a project to interface an LM35 temperature sensor with an ATmega32 microcontroller and a 16x2 LCD. The system reads analog temperature data via the ADC, converts it to Celsius and Fahrenheit, displays the values on the screen, and automatically controls a fan based on whether the temperature exceeds or falls below 30 degrees Celsius.
Parts used in the Temperature Sensor Interfacing Project:
- LM35 Temperature Sensor
- AVR ATmega32 Microcontroller
- 16x2 Alphanumeric LCD Display
- Fan (controlled by PORTB)
- LED Indicator

Step 1:
In this project, You will learn How to interface a Temperature Sensor(LM35 ) with AVR ATmega32 Microcontroller and LCD display.
Before This Project you have to need Learn about following articles
how to add lcd library in avr studio| avr microcontroller tutorial
introduction to ADC in AVR Microcontroller | for beginners
Temperature Sensor(LM35 ) is a popular and low cost temperature sensor. The Vcc can be from 4V to 20V as specified by the datasheet. To use the sensor simply connect the Vcc to 5V ,GND to Ground and the Out to one of the ADC (analog to digital converter channel).
The output is 10MilliVolts per degree centigrade. So if the output is 310 mV then temperature is 31 degree C. To make this project you should be familiar with the ADC of AVRs and also using LCD So The resolution of AVRs ADC is 10bit and for reference voltage you are using 5V so the resolution in terms of voltage is
5/1024 = 5.1mV approximately
So if ADC’s result corresponds to 5.1mV i.e. if ADC reading is
10 x 5.1mV = 51mV
You can get read the value of any ADC channel using the function adc_result(ch);
Where ch is channel number (0-5) in case of ATmega8. If you have connected the LM35’s out put to ADC channel 0 then call
adc_result0 = adc_read(0);
this will store the current ADC reading in variable adc_value. The data type of adc_value should be int as ADC value can range from 0-1023.
As we saw ADC results are in factor of 5.1mV and for 1 degree C the output of LM35 is 10mV, So 2 units of ADC = 1 degree.
So to get the temperature we divide the adc_value by two
temperature = adc_result0 /2;
Finally the microcontroller will display the temperature in degree centigrade in the 16X2 alphanumeric LCD.
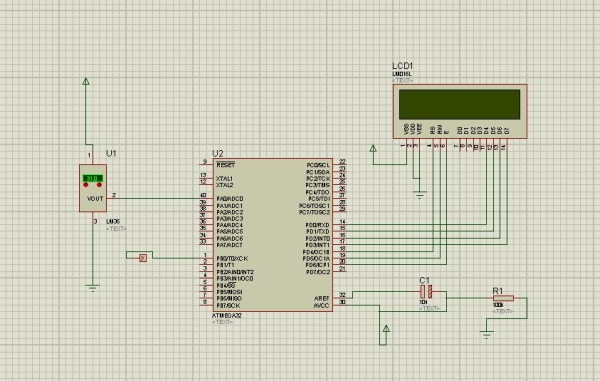
Step 2: Circuit Diagram
Step 3: Program
#ifndef F_CPU
#define F_CPU 1600000UL
#endif
#include
#include
#include “LCD/lcd.h”
void adc_init()
{
// AREF = AVcc
ADMUX = (1<
// ADC Enable and prescaler of 128
ADCSRA = (1<
}
// read adc value
uint16_t adc_read(uint8_t ch)
{
// select the corresponding channel 0~7
ch &= 0b00000111; // AND operation with 7
ADMUX = (ADMUX & 0xF8)|ch;
// start single conversion
// write ‘1’ to ADSC
ADCSRA |= (1<
// wait for conversion to complete
// ADSC becomes ‘0’ again
while(ADCSRA & (1<
return (ADC);
}
int main()
{
DDRB=0xff;
uint16_t adc_result0;
int temp;
int far;
char buffer[10];
// initialize adc and lcd
adc_init();
lcd_init(LCD_DISP_ON_CURSOR); //CURSOR
lcd_clrscr();
lcd_gotoxy(0,0);
_delay_ms(50);
while(1)
{
adc_result0 = adc_read(0); // read adc value at PA0
temp=adc_result0/2.01; // finding the temperature
//lcd_gotoxy(0,0);
//lcd_puts(“Adc=”);
//itoa(adc_result0,buffer,10); //display ADC value
//lcd_puts(buffer);
lcd_gotoxy(0,0);
itoa(temp,buffer,10);
lcd_puts(“Temp=”); //display temperature
lcd_puts(buffer);
lcd_gotoxy(7,0);
lcd_puts(“C”);
far=(1.8*temp)+32;
lcd_gotoxy(9,0);
itoa(far,buffer,10);
lcd_puts(buffer);
lcd_gotoxy(12,0);
lcd_puts(“F”);
_delay_ms(1000);
if(temp>=30)
{lcd_clrscr();
lcd_home();
lcd_gotoxy(0,1);
lcd_puts(“FAN ON”);
PORTB=(1<
}
if (temp<=30)
{
lcd_clrscr();
lcd_home();
lcd_gotoxy(7,1);
lcd_puts(“FAN OFF”);
PORTB=(0<
}
}
}
Step 4: Code Explain
I hope you Know you will know How to enable ADC and How to interface LCD with Avr Microcontroller in this code when temperature is more then 30 degree then fan is on and you can see on led Display FAN ON and when Temperature Less then 30 then fan is off and you can see FAN OFF
Step 5: You Can Download Full Project
Step 6: Video
Source: Temperature Sensor(LM35 ) Interfacing With ATmega32 and LCD Display| Automatics Fan Control
- How is the voltage resolution calculated for the AVR ADC?
The resolution is approximately 5.1mV, calculated by dividing the 5V reference voltage by 1024. - What is the output characteristic of the LM35 sensor?
The sensor outputs 10MilliVolts per degree centigrade. - How is the temperature value derived from the ADC reading?
The temperature is obtained by dividing the ADC result by two, as two ADC units equal one degree Celsius. - Which function is used to read the ADC channel value?
The function adc_result(ch) is used to read any ADC channel, where ch is the channel number. - At what temperature does the fan turn on in this project?
The fan turns on when the temperature is greater than or equal to 30 degrees Celsius. - What happens to the fan when the temperature is less than 30 degrees?
The fan turns off when the temperature is less than or equal to 30 degrees Celsius. - Can this project display temperatures in both Celsius and Fahrenheit?
Yes, the code calculates and displays the temperature in both degrees Celsius and degrees Fahrenheit. - What is the purpose of the F_CPU definition in the program?
The F_CPU is defined as 1600000UL to set the processor clock frequency for delay functions.