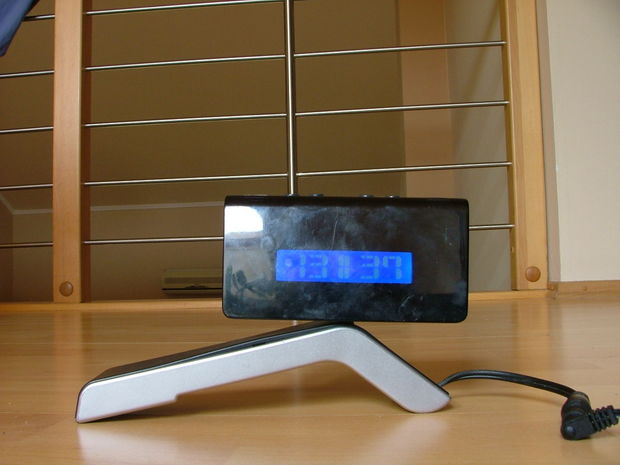
First, rise and shine, let me introduce you to my project. I’ve crafted an Alarm clock with extended functionality, including a thermometer and a humidity meter. Everything started when my friend (who used to bring me some old electronic rubbish and I used to check if there’s not something useful) brought me some cashing register display similar like that. When I first see them I knew that I will made from it alarm clock.
I’m programmer and I used to program in many programming languages but this year I started programming in C for Atmel microcontrolers (attiny 85, atmega 8, atmega 328, atmega329, atmega 128 etc…). When I discovered DHT11 (temperature and humidity sensor) I programmed simple clock with thermo&humidity meter. I haven’t got any case for my project so I imagine that when I cut off column from cashing register display case I will have the case of my dreams for my project.
As microcontroler I used Atmega329p because I have and few of them and they got enough pins for my project.
Step 1: Functionalities of my alarmclock
My alarm clock have many functionalities and I separated them into few menus (mods) you can change actual menu by pressing second button :
1.) Big clock
-Show big clock with real time
-You can there turn on/off display backlight by pressing first button
-There you can also setup hours and minutes (everytime where are minutes or hours set up seconds are set up to zero). To setup hours third button, to setup minutes fourth button
2.) Actual temperature and humidity
-Show actual temperature (°C) and humidity (%)
-Actual temperature and humidity are refreshed every 2 seconds
-You can there turn on/off display backlight by pressing first button
3.) Maximum values of temperature and humidity
-Show maximum measured values of temperature and humidity
-You can there turn on/off display backlight by pressing first button
4.) Minimum values of temperature and humidity
-Show minimum measured values of temperature and humidity
-You can there turn on/off display backlight by pressing first button
5.) Date and day of week
-Show name of the day of week (as you can seen on picture there are the they of week “Nedela” which in slovak language means Sunday)
-Show actual date
-You can set up actual date by pressing these button: first button to set up year, third button to set up day, fourth button to set up month. (Day of week is automatically calculated and refreshed)
6.) Alarm set up menu
-You can set up one alarm per each day of week (you can have turned on 7 alarms, one for each day)
-There you can list through days of week and check if the alarm is enabled or no, check the hours and minutes of alarm
-By long pressing (more than 1 second) of first button you go to the next day, by short pressing of first button you change state of alarm (enable/disable)
-By pressing of third button you set up hours of alarm & by pressing of fourth button you set up minutes of alarm
Step 2: Features of my alarm clock
My alarm clock contains real time chip (PCF8563) with backup battery so if once set up right time & date you can turn off alarm clock, leave them for a month without power and when you plugged into adapter again you will have still set right time & date. Each time you change state or time of alarm – alarms are backuped into EEPROM so if you plugged my alarm clock into adapter after long time your alarms are still set right.
Step 3: Parts which you need
You need following parts:
1.) Heart of alarm clock – Atmega 329p (You can also use atmega128 – cheaper equivalent but than you must ask me to recompile source code to that processor)
2.) Real time clock chip PCF8563
3.) LCD display (16 chars 2 rows) with HD47780 driver
4.) Buzzer (you want alarm to beep)
5.) CR2032 backup battery for real time clock
6.) 5 switches (4 are necessary, 5th works as reset button – you don’t need it)
7.) DHT11 temperature and humidity sensor
8.) 7805 linear stabilizer
9.) AVR ISP 10 pinheader (for programming, you can also buy from me preprogrammed atmel – then you don’t need it)
10.) 16MHz crystal, 32768Hz real time clock crystal
11.) Power DC jack
12.) Power supply (More than 5V, less than 20V) 12V adapters are good for that
13.) Capacitors (2x100uF electrolytic,4x100nF ceramic, 2x22pF ceramic)
14.) Diodes 1n4148 2 times (to separate backup battery from adapter voltage)
15.) Resistors 4x4k7, 1x10k, one potentiometer for adjusting contrast of display
16.) Double layer PCB
17.) Chemicals and materials for PCB etching
18.) Conductive silver to connect one side of PCB with the other side
19.) Enough time and dedication
Step 4: Printing foil for PCB

I designed PCB of my alarm clock to fit in my case from cash register display so if you want I can send you schematics and you can make your own PCB.
In case you want to etch the same PCB as I have I provide you these to files – toppcb.pdf and bottompcb.pdf in which are my PCB design.
You should print them to the transparent foil or to the very thin paper (Sorry but I really don’t know how it’s called in English).
If you can you should buy PCB with UV photoresist paint. If you can’t you can also buy an photoresist paint in spray and apply them to the cleaned PCB.
Then you should attach the printed foil or thin paper to the PCB with photoresistive paint and put in under UV lamp for the enough time – it really depends on UV lamp but it used to be around 1-2minutes.
After that you should put UV exposured PCB into chemical used for inducing of photoresist (again I really don’t know how to say it in English) it used to be 1% water solution of NaOH (sodium hydroxide).

Step 5: Etching the PCB
After that you should etch your PCB in some of the PCB etching solution. I used to etch in FeCl3 (ferric chloride).
For more detail: Atmega Alarmclock & Thermohumidity meter