
Summary of Automated Juice Mixer
The Automated Juice Mixer is a device that blends up to four ingredients using a user-friendly graphical interface. It utilizes an RS232 serial connection between a computer running Blender Pro software and a microcontroller unit. This setup allows users to dispense liquids, blend them with a spinning stick motor, and manage recipes via EEPROM storage. The project features handcrafted valves and prioritizes safety and budget over more complex mechanisms like shakers or parallel dispensing.
Parts used in the Automated Juice Mixer:
- Microcontroller unit
- Solenoid valves
- Motor for blending
- Revolving stick
- Blender cup
- Tubes for liquid transport
- EEPROM
- RS232 serial port connection
- C# Graphical User Interface (Blender Pro)
Introduction
Sound Bite
The Automated Juice mixer is a juice mixing device that allows user to create desired drinks with up to four different ingredients through a user friendly interface.
Summary
Mixing juices can be a very tedious job. We have created a juice mixer that allow user to mix drinks with desired amount and manage their recipes with ease. We use RS232 serial port connection between the computer and our unit so that user will be able to dispense/blend their desired recipe easily. The connection also allow user to upload/download recipes to the EEPROM embedded in the microcontroller.
High Level Design
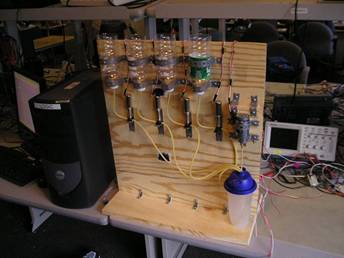
Idea
We decide to make a juice mixer after observing many people complaining how tedious it is mixing any kind of liquids. Many people would be happy to see a device that would allow the user to create drinks and manage recipes using easy to understand graphical user interface.
Background Math
The background math has to do with formulating the conversion between the time we open the valves for each of the bottles and the amount of liquid that comes out from the tubes. In order to do so, we need to record the time required to dispense a certain amount for each individual bottles due to the fact that each of our valves are handcrafted by us so that the dispensing rate might vary quite a bit and also due to the fact that we placed the blender cup at the very right edge of our machine and each tubes travels different distance to the cup. The final equation we formulated are based on the test result we use and linearizing them.
Logical Structure
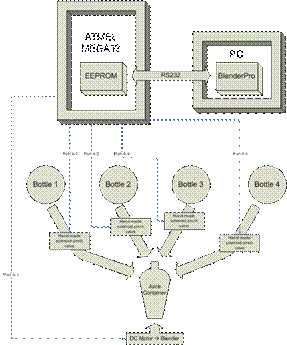
The diagram above shows our basic design. In our hardware design, signals are sending from the microcontroller unit to each solenoid and motor for dispensing/blending purposes. Much of our effort goes into building the valve and finding appropriate orientation allowing liquid to flow and stop smoothly though our tube. Our software design consists of two parts, a C code that takes appropriate command send via RS232 port. The C code will determine whether to dispense the liquids or store/load recipes to/from EEPROM. The second part of software deal with user interface. Graphical user interface software (Blender Pro) is designed in C#. It allows user to send commands or recipe data through the RS232 port without knowing how it works.
Tradeoffs
There are several tradeoffs we have throughout this project
- Hand-made valves VS pre-made valves. We took our time by doing trial and error while building our valves while we can actually purchase some machine made valves. The obvious advantage is that we save quite a lot of money (around 50 dollars or so) so our budget won��t exceed the limit but we encountered several hardships during our valve implementation. We have made several design changes along the way to compensate for our hand-made valves.
- GUI VS Simple Command line terminal. In order for user to control our device easily without knowing how everything works, we took our time learning how to write a simple GUI program using C# language. Although it takes much longer than doing HyperTerminal menu display, it makes the whole project look better and more complete.
- RS232 VS RF. We choose RS232 instead of RF transmitter/receiver since we know how it works already and the C# programming using serial ports are far easier than using RF signals. Using RS232 will not generate radio signals and cause any interference with other people��s project.
- Spinning Blender VS Shaker. We decided to use a revolving stick attached to the motor as our blender instead of motor that would move the bottle up and down. While the shaker seems like a very nice idea in the beginning, it requires motors with strong torque and by shaking the cup up and down might pour liquid out quite easily. We changed to the spinning stick design based on safety concern and budget concerns.
5. Parallel dispensing VS Serial dispensing. While dispensing the ingredients all at once might seem to be a favorable approach, it requires more power to manipulate and it��s not easy to implement in the lab since we don��t want to use more than one power supply. The circuitry might get really hot if all the valves are turned on at the same time.
For more detail: Automated Juice Mixer
- How does the device manage recipes?
The system uploads and downloads recipes to the EEPROM embedded in the microcontroller. - What interface is used to control the mixer?
A graphical user interface called Blender Pro designed in C# is used to send commands. - Why were hand-made valves chosen over pre-made ones?
Hand-made valves were selected to save money, though they required trial and error during implementation. - Does the mixer use radio frequency signals?
No, the project uses RS232 instead of RF to avoid interference and simplify programming. - What mechanism is used for blending the drinks?
A revolving stick attached to a motor is used instead of a shaker to ensure safety and reduce torque requirements. - How was the dispensing rate determined?
The team recorded time required to dispense specific amounts and linearized the data based on test results. - Why was serial dispensing chosen over parallel dispensing?
Serial dispensing was chosen because parallel dispensing would require more power and could cause circuitry overheating. - Can the user create drinks with multiple ingredients?
Yes, the device allows users to create drinks with up to four different ingredients.
