Summary of Single Chip Computer: Easy to Produce AVR BASIC Co
This project describes a standalone single-chip computer built around the ATmega 1284P microcontroller. It runs TinyBASIC, outputs RCA video, and accepts PS/2 keyboard input without requiring an Arduino board. The system operates on a 16MHz crystal, features low power consumption, and is designed for easy production on a single-sided PCB.
Parts used in the Single Chip AVR BASIC Computer:
- ATmega 1284P Microcontroller
- DIL 40 Pin 0.6" IC Holder
- 40 Pin Female Pin Header
- 16 MHz Crystal
- 22pF Ceramic Capacitors
- 2.1mm Barrel Jack
- L7805 Voltage Regulator
- 0.1uF Electrolytic Capacitor
- 0.33uF Electrolytic Capacitor
- RCA PCB Mount Socket
- PS/2 Mini Din PCB Mount Socket
- 470 Ohm Resistors
- 1k Ohm Resistor
- 0 Ohm resistors
- 3mm LED
- PCB / Strip-board / Matrix-board
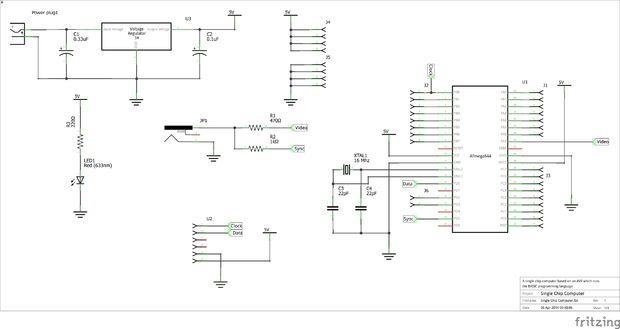
This instructable will document and explain my latest project, a standalone computer system based upon a single chip (IC); the ATmega 1284P. The 1284P is responsible for all aspects of the system, including running the BASIC interpreter, generation RCA video signals and reading keyboard input. This computer system runs TinyBASIC just like my Arduino BASIC Shield but this project is completely standalone meaning no Arduino is needed and only a single AVR is needed. 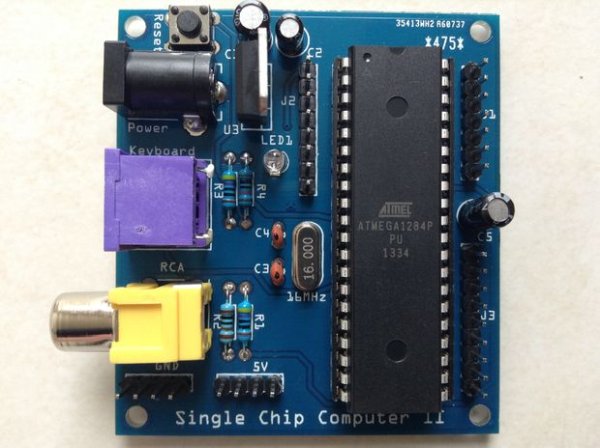
This single chip computer has a video output via RCA, allows a PS/2 keyboard to be connected, allows circuits and components to be connected using the IO headers and runs the TinyBASIC programming interpreter. All components are placed on a single sided PCB which has a simple layout and is easy to produce. The onboard ATmega 1284P is running on a 16MHz crystal. This computer is also low power (it does not draw large amounts of current as it uses a micro-controller which are generally low power devices and the circuit current draw is limited by the voltage regulator to 1A) and some of the PCB components are reusable (such as the ATmega 1284P and the resistors etc).
The images of the blue PCB are for the second version of this computer (details for this board can be found on Hackaday projects: https://hackaday.io/project/1260-single-chip-avr-basic-computer
Update (07/12/14): I updated the design of the computer by adding an additional EEPROM IC allowing full size BASIC programs to be saved. The new design of this computer is documented on Hackaday projects at the following link: https://hackaday.io/project/3537-avr-basic-computer-v01
I had PCBs for this new computer design created professionally at a board house and I am selling the remaining PCBs on eBay at the following link: http://www.ebay.co.uk/itm/121510974344
Update (28/07/14): I have ordered more PCBs (sent PCB files to the board house) and will be putting the boards up on eBay when I receive them (I will post the listing link when I receive the boards). I have slightly updated the design of the PCB to include a USBasp programming header, a few more GPIO pins and a header which allows a small PCB containing a 64Kbit EEPROM IC (an EEPROM storage card) to be connected (used for storing BASIC programs).
1 x ATmega 1284P Microcontroller
1 x DIL 40 Pin 0.6″ IC Holder
1 x 40 Pin Female Pin Header (to be cut down into smaller headers)
1 x 16 MHz Crystal
2 x 22pF Ceramic Capacitors
1 x 2.1mm Barrel Jack
1 x L7805 Voltage Regulator
1 x 0.1uF Electrolytic Capacitor
1 x 0.33uF Electrolytic Capacitor
1 x RCA PCB Mount Socket
1 x PS/2 Mini Din PCB Mount Socket
2 x 470 Ohm Resistors
1 x 1k Ohm Resistor
2 x 0 Ohm resistors (used as jumpers)
1 x 3mm LED
1 x PCB / Strip-board / Matrix-board (depending on how the computer is going to be constructed. If a PCB is not used, different components may be needed as some have footprints such as the RCA socket which cannot be placed on strip-board)
Additionally, tools are needed to construct the PCB including a soldering iron, solder, needle nose pliers and wire cutters.
To operate (use) the computer, a PS/2 keyboard, RCA enabled display (such as a TV) and a power source (such as a PP3 battery or wall mounted PSU) are needed. To bootload and program the 1284P, a programmer is needed (I used an Arduino UNO as an ISP).
- Does this computer require an Arduino board?
No, the system is completely standalone and only needs a single AVR microcontroller. - What programming interpreter does the computer run?
The computer runs the TinyBASIC programming interpreter. - Can I save full size BASIC programs on this device?
An updated design includes an additional EEPROM IC to allow saving full size BASIC programs. - What display type is required to use this computer?
You need an RCA enabled display such as a TV to view the video output. - How do I bootload and program the ATmega 1284P chip?
A programmer is needed, such as an Arduino UNO used as an ISP. - What is the clock speed of the onboard microcontroller?
The ATmega 1284P runs on a 16MHz crystal. - Can components like the microcontroller be reused?
Yes, some PCB components including the ATmega 1284P and resistors are reusable. - Does the circuit draw large amounts of current?
No, it is low power and the current draw is limited by the voltage regulator to 1A.