
Summary of Atmega 32u4 Based Wireless USB Mouse
This article details the design of a wireless USB mouse using an Atmega 32u4 microcontroller. The system comprises a transmitter circuit with an Arduino Mega and tactile switches, communicating via NRF24L01 to a receiver circuit. The receiver utilizes an Arduino UNO to relay data to an Arduino Pro Micro, which acts as the USB HID device using the LUFA framework. This setup replaces optical sensors with manual inputs for cursor movement and clicking.
Parts used in the Atmega 32u4 Based Generic USB Mouse:
- Arduino Pro Micro
- Arduino Mega
- Arduino UNO
- Breadboard
- Connecting wires
- Push buttons
- Micro USB cable
- 10K resistors
- NRF24LO1 Transmitter and Receiver
How a generic mouse is made was explained in the Atmega 32u4 Based Generic USB Mouse Project. In this project a wireless mouse will be designed. For making a wireless mouse, there will be two circuits involved in the project – a transmitter circuit which will have a keypad included for getting the user input and a receiver circuit that will connect with the PC through USB port. The two circuits will connect wirelessly using NRF24lO1 module. The NRF module is a Wireless Transceiver that works on 2.4 GHz ISM (Industrial Scientific Medical) band. It is manufactured by Nordic Semiconductors. The transmitter section will have Arduino Mega as the controller board. At the receiver section, the computation will be handled by two controller boards – Arduino UNO and Arduino Pro Micro, each having their own computational roles. At the end Arduino Pro Micro will connect with the USB port of the PC where the 8-bit USB AVR – Atmega 32u4 will work as the USB controller chip. The Arduino Pro Micro will use AVR based Lightweight USB Framework (LUFA) as the firmware for implementing the USB protocol in the end phase of the project execution.
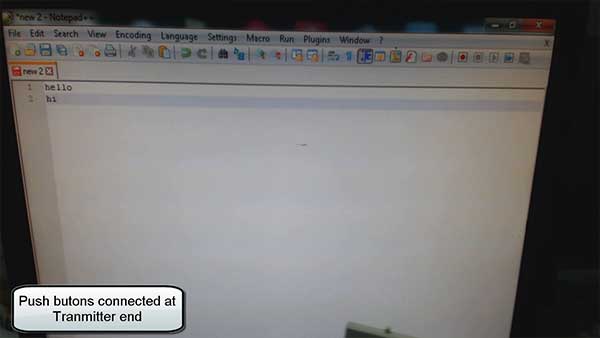
Usually the USB mouse has optical sensor to detect the desired direction of navigation across the screen. Instead of using optical sensor, the project will use tactile switches to input direction of cursor movement and mouse click. The Arduino Pro Micro will use HID device driver class of LUFA framework for mouse which will be modified to implement the project. With the use of LUFA firmware on Arduino Pro Micro, the device driver code to implement USB protocol is not needed to be written explicitly. The project works similar to any USB mouse having wireless connectivity and has buttons for the following Inputs – :
• Move Pointer Left
• Move Pointer Right
• Move Pointer Upwards
• Move Pointer Down
• Right Click
• Left Click
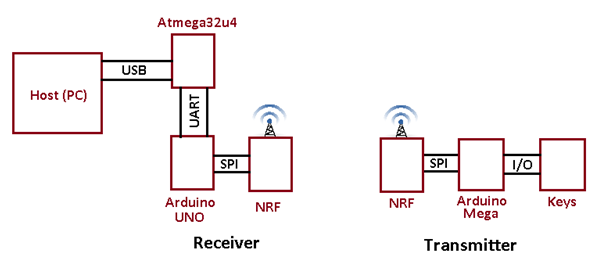
The transmitter circuit of the project uses tactile switches for mouse inputs, Arduino Mega for generating HID data of mouse device and NRF24LO1 for wireless connectivity. The receiver circuit of the project will use NRF24LO1 for receiving HID mouse data wirelessly, Arduino UNO to fetch and pass the HID data forward, Arduino Pro Micro to analyze HID data and prepare HID mouse specific data reports, and USB cable to connect with the personal computer.
PREREQUISITES
This project is based on Arduino Pro Micro, Arduino Mega and Arduino UNO which have AVR microcontrollers on board. In order to understand this project, one must have basic knowledge of the AVR microcontrollers and the embedded C programming for AVRs. WinAVR Studio is used to write, edit and compile the project code, so closely following the project shall require familiarizing with the above stated IDE as well. Though LUFA framework takes care of implementing the USB protocol on Arduino Pro Micro and has APIs to abstract the lower level codes, understanding USB protocol is recommended to understand how actually the project is working. In fact, if anyone has already worked on some other microcontroller and have some experience of working on electronic circuits, it will not be much pain to understand and follow this project. The project is based on getting input from the GPIO pins of AVR MCU, transmitting data through SPI, interfacing wireless module with Arduino(s) and modifying the LUFA device driver for mouse functionality.
COMPONENTS REQUIRED
1. Arduino Pro Micro
2. Arduino Mega
3. Arduino UNO
4. Breadboard
5. Connecting wires
6. Push buttons
7. Micro USB cable
8. 10K resistors
9. NRF24LO1 Transmitter and Receiver
SOFTWARE TOOLS REQUIRED
1. WinAVR Studio
2. AVR Dude
3. LUFA Firmware
BLOCK DIAGRAM
CIRCUIT CONNECTIONS
The project will have two circuits – Transmitter Circuit and the Receiver Circuit. The Transmitter will have following hardware blocks – :
• Keys – The push buttons will be used for getting directional and button press inputs. There will be six switches for the following functions – Left Movement, Right Movement, Upward Movement, Downward Movement, Right Click and Left Click. The Push buttons will be attached to Arduino Mega via Digital Input/Output pins. The switches will be interfaced to the pins of the Arduino Mega in the following manner.
Read More: Atmega 32u4 Based Wireless USB Mouse
- How does the transmitter circuit generate input?
The transmitter uses tactile switches connected to Arduino Mega digital pins to generate HID data for mouse movement and clicks. - What module is used for wireless connectivity?
The project uses the NRF24L01 module, a wireless transceiver operating on the 2.4 GHz ISM band. - Which controller handles USB protocol implementation at the receiver end?
The Arduino Pro Micro connects to the PC and implements the USB protocol using the AVR based Lightweight USB Framework (LUFA). - What software tools are required to compile the code?
WinAVR Studio is used to write, edit, and compile the project code. - Can this mouse work without an optical sensor?
Yes, the project replaces the optical sensor with six tactile switches for directional and click inputs. - What role does the Arduino UNO play in the receiver circuit?
The Arduino UNO fetches the HID data from the NRF24L01 and passes it forward to the Arduino Pro Micro. - What programming language knowledge is needed for this project?
Basic knowledge of embedded C programming for AVRs is required to understand and follow the project. - Does the project require writing explicit USB driver code?
No, the LUFA firmware provides APIs that abstract lower-level codes, so explicit device driver code is not needed.
