
Summary of Chain Reactions With Strawbees and Makey Makey
This article details a project where users gamify a chain reaction using Strawbees and Makey Makey. A conductive egg is grabbed to start a Scratch timer, then dropped on a roller coaster track; the timer stops when the egg lands in a designated drop zone. The project integrates physical engineering with digital coding to measure the time taken for the egg's journey.
Parts used in the Chain Reaction with Strawbees and Makey Makey:
- Makey Makey Classic
- Strawbees components (for roller coaster and mechanical arm)
- STL File to hold Makey Makey onto Strawbees inventions
- Copper tape or aluminum foil with double stick tape
- Scratch Game environment
- Alligator clips
- Foil for hands and landing pads
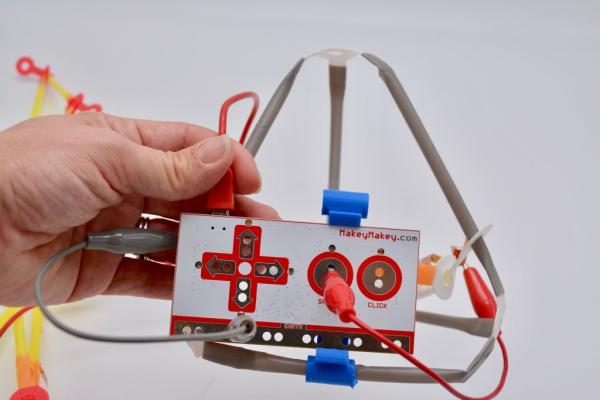
Gamify your chain reaction by using a Strawbees grabber connected to Makey Makey to start a timer in Scratch when you grab a conductive egg. Drop the egg on the Strawbees roller coaster track. When the egg rolls into the egg drop, it stops the timer.
Here is what our full project in action looks like!
Supplies:
- Makey Makey Classic
- Strawbees
- STL File to hold Makey Makey onto Strawbees inventions (Thank you Erik T for creating this!)
- Copper tape (or aluminum foil and double stick tape)
- Scratch Game for the Chain Reaction where Makey Makey starts and stops the timer.
Step 1: Build Strawbees Inventions
Build a roller coaster track and mechanical arm or grabber with Strawbees!
Here are some resources to get you started playing with these chain reaction elements:
- The Strawbees roller coaster track tutorial
- Make sure you’ve printed this STL File to hold Makey Makey onto your Strawbees inventions. (Thank you Erik T for creating this 3D printing file!)
Step 2: Code a Timer in Scratch and Recorder Variable
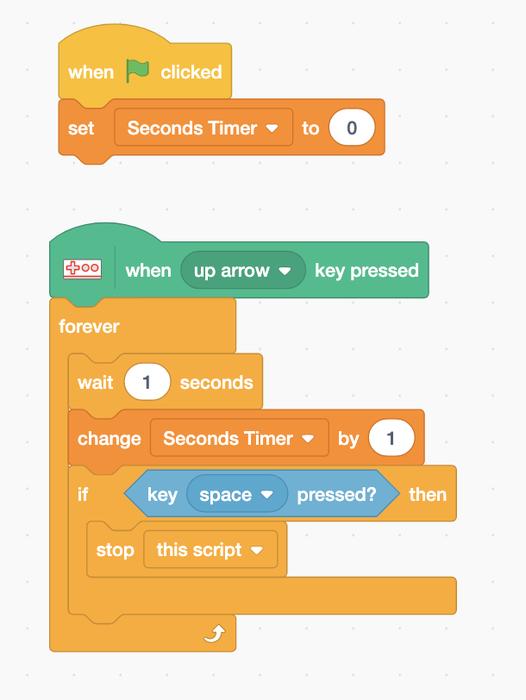
To create a timer in Scratch, you’ll want to create a variable and name it “Seconds timer.” You need to code your timer to “set to 0” when the green flag is clicked.
To have the timer start with a key press, use the “When up arrow is pressed” hat to trigger the timer. Place a “wait 1 sec” stacking block from the control palette in side a “forever” loop and attach a “change seconds timer by 1” to the “wait 1 sec block. Now Scratch will count up by 1 second forever! This is one quick and easy way to code your own timer.
You’ll want to use another key press to stop the timer. By placing the “if __ then” block underneath the “change timer by” block, you can tell Scratch what to do if another key is pressed. Find the “key pressed” sensing block in the sensing palette. This block checks to see if a specific key is pressed.
So our code in the first image is triggered by the up arrow and changes the timer by 1 every second forever unless the “space” key is pressed. If the “space key is pressed” then the timer script is stopped.
To record the time it takes for your egg to drop, you need the following code to set the “record time.” For fun we also added a cloud variable, so for now, our way to check if we need to “record the time” is set to record if it is less than the current longest time of our “longest time variable.” (This is the code in the second picture)
See our full Scratch game here, and use the code pictures below to help you with your Scratch project.
Step 3: Make Strawbees Grabber Into a Makey Makey Switch
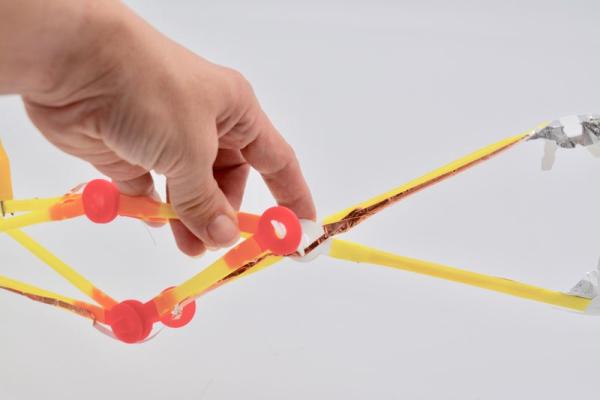
In this step, you are going to make your grabber into a Makey Makey switch! You’ll wire one grabber to the “up arrow” to start the timer, and the other side of the grabber to “EARTH.” When the two sides pick up the foil covered egg (or ball) it will complete the circuit and start the timer in Scratch.
To wire the grabber, you’ll use foil for the hands, and some conductive copper tape to create your wiring. Make sure the two copper traces never touch or you will accidentally set off your circuit. For the hinges, we left the backing on our tape so it could be flexible. (Like a bandaid!)
Then hook one alligator clip to your straw and the “up arrow” and one alligator clip to the other connection and “EARTH.”
Step 4: Create an Egg Drop Landing Switch
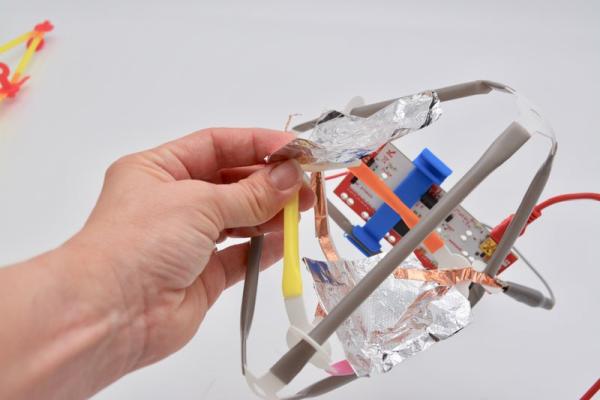
Build your Egg drop lander however you want! Ours was designed by an 11 YO. To wire the landing bed as a switch, use two copper tape traces and connect some foil to the edge of your Strawbees landing pad. Make sure there is an air gap between the two flaps of foil. When the egg lands on the foil, it will press the two pieces together and trigger the “space key” on your Makey Makey.
We used this STL file from Strawbees Inventor Erik Thorstensson to attach our Makey Makey to the Strawbees Egg drop landing pad.
Step 5: Connect Makey Makey to Scratch
Plug in your USB and test your start and stop timer! Here is the whole project described and played during our webinar with Strawbees!
We’d love to see your projects! Share what you made with an “I made it!” or tag us on social!
Source: Chain Reactions With Strawbees and Makey Makey
- How do I start the timer in Scratch?
The timer starts when the up arrow key is pressed, which is triggered by completing a circuit via the Strawbees grabber touching the conductive egg. - What happens when the egg drops into the landing pad?
The egg presses two pieces of foil together, closing the circuit to trigger the space key and stop the timer. - Can I use aluminum foil instead of copper tape?
Yes, the article states you can use aluminum foil and double stick tape as an alternative to copper tape. - How does the code record the best time?
The code checks if the current time is less than the longest time recorded in a cloud variable to decide whether to update the record. - Does the copper tape need to touch itself?
No, the article warns that the two copper traces must never touch, or the circuit will be accidentally set off. - What is the purpose of the STL file mentioned?
The STL file is used to hold the Makey Makey securely onto the Strawbees inventions and the landing pad. - How is the timer logic structured in Scratch?
The timer uses a forever loop containing a wait 1 sec block and a change variable by 1 block to count seconds continuously. - Can I modify the starter and stopper keys?
The example code uses the up arrow to start and the space key to stop, but the sensing blocks allow you to check for specific key presses.
