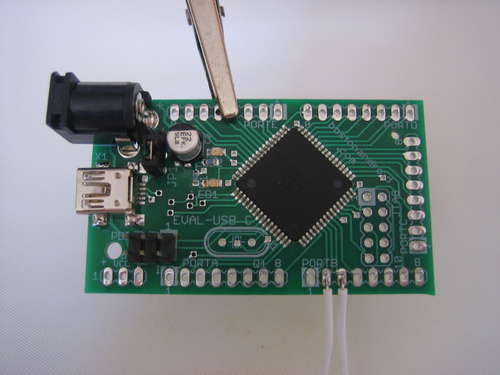
This instructable walks you through programming and using the Boston Android Xmega evaluation board to work as a simple arbitrary waveform generator taking advantage of the integrated 12bit DAC and high speed DMA controller. I have provided precompiled firmware as well as source code which can be loaded onto the device and configured via a USB port on your PC or laptop.
You will need a computer (mac, pc, linux all supported) with an available USB port, free driver for the USB-Serial adapter. A Boston Android Xmega EVAL-USB-64 development board ($31.99) and an open source AVR chip programming utility called AVRDUDE.
Once set up, you can generate sine, ramp, triangle, square or any waveform you define from 5 to 20KHz with amplitude of up to 3.3Vp-p. It is possible to generate faster waveforms with the arbitrary waveform feature (up to 500KHz).
What you need
1) Boston Android Xmega EVAL-USB-64 (or comparable) Development Board
2) PC with USB port
3) AVRDUDE (free AVR programing software)
Also recommended:
Oscilloscope (to view waveforms)
Headphone or small speaker (to listen to waveforms)
WINAVR and AVRSTUDIO to modify the source code and built your own version of the waveform generator software.
Although this example walks through programming and using the EVAL-USB-64 board. You can use any of the EVAL-USB boards from Boston Android. And if you’re very experienced you can download the example source code and build for other target hardware such as the Atmel XPLAIN evaluation board, or the Xmega boards available from chips45 and Mattair, Megavore. The xmega family allows effortless migration of code from one chip to another.
Solder lead wires (optional)
Although not necessary, it is helpful to solder lead wires to your board to make it easy to connect an oscilloscope or frequency counter to observe the waveform output. The waveform output is on PORTB pin 2 and pin1 is configured as GND.
Installing AVRDUDE
AVRDUDE is available as a standalone source distribution which you can compile with the GCC compiler on a number of operating systems (namely Linux).
However, if you use a PC running Windows there is a complete binary distribution (no compiling needed) called WINAVR which includes AVRDUDE, along with the AVR-GCC compiler which will allow you to modify and compile your own version of the waveform generator.
Download WINAVR (includes AVRDUDE)
Then install it.
Install USB/Serial Drivers
The EVAL-USB-64 board includes a built in usb/serial bridge IC which creates a virtual serial port on your PC. Most Windows, Linux (and probably Macs) include the necessary drivers and you don’t need to do anything. However, if your system complains it needs drivers go here and download the VCP drivers for your platform:
Download VCP Drivers
Download Waveform Generator Application
If you are using the EVAL-USB-64, you can download the waveform generator .hex fileand move on to the next step
Alternative Path:
If you are using an alternative platform you will need to download and compile the source code. All the code is in a single .c file which is written to be compiled with AVR-GCC. If you are running on a Windows PC you can download the following two packages and compile and program the application on to your board.
1) Download WINAVR.
2) Download AVR Studio IDE.
3) Create new avr-gcc project in AVR Studio and paste the source code into the initial .c file.
4) Compile (creates .hex file to load onto target device).
Step 6Program Board
The EVAL-USB-64 board contains a serial bootloader which allows your board to be programmed with avrdude.
1) Plug your board into the usb port of your PC.
2) Open a command line window.
3) Locate the hex file you downloaded xmega-waveform-serial.hex.
4) Within 10 seconds of plugging in your board, execute the following command to load the program image.
avrdude -p x64a3 -c avr911 -P COM5 -b 57600 -e -U flash:w:xmega-waveform-serial.hex
Your com port may be different. To be sure, in windows go to the Device Manager and check “com ports” to see what port your board is connected to. It is almost always the highest numbered com port on your system since the builtin com ports are assigned COM1-4 typically. On my laptop it comes up as COM5 but your computer will likely be on another numbered port.
Alternative Paths:
If you have an Atmel AVRISP mkii or JTAGICE mkii or compatible device you can use Atmel’s AVRStudio to program the .hex file you downloaded in the previous step. See Atmel’s documentation for using this utility.
For more Detail: Atmel Xmega USB/Serial Arbitrary Waveform Generator

