
Summary of A digital DC powersupply
This article introduces a simplified, feature-rich microcontroller-based DC power supply design using an Atmega8. Unlike its complex predecessor, this version reduces hardware complexity by shifting analog functions to software, utilizing only standard, cheap components and a single power source. It features simultaneous voltage/current display, PC or standalone control, and compact size. The project emphasizes understanding the underlying electrical design while preparing readers for future articles on software implementation and digital-to-analog conversion techniques.
Parts used in the Microcontroller based DC powersupply:
- Atmega8 microcontroller
- Transistor
- Z-diode
- Analog to digital converter
- Digital to analog converter
- Operational amplifiers (replaced by microcontroller)
Introduction
In 2002 I wrote a linuxfocus.org article about a Microcontroller based DC powersupply (LF November2002 article251) The article received a lot of interest as I noticed from emails which I received on this subject. The design of this powersupply was however something for advanced hobby electronic fans due to the complexity of the circuit.
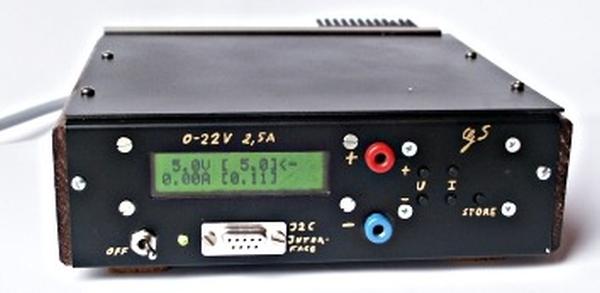
So here is now a new design which is less complex but has a lot more features.
- Only cheap and standard components are used.
- Only one power source is needed (no separate negative supply voltage for operational amplifiers)
- The display shows pre-set and actual values for voltage and current at the same time.
- You can completely control the powersupply via your PC or you can use it standalone.
- It is very small and very powerful.
How was it possible to remove components and add more features? The trick is to move functionality which was previously based on analog components like operational amplifiers into the microcontroller. In other words the complexity of the software and algorithms is higher but hardware complexity is reduced. This reduces the overall complexity for you as the software can just be copied. It has also helped that the Atmega8 can do much more than the now phased out AT90S4433 microcontroller.
In this article you will also learn new things about the Atmega8. You have seen how to use the analog to digital converter. Now we will add a very fast digital to analog converter which can be useful for a lot of other circuits.
In this article we will discuss the hardware and electrical design. There will then be two more articles where I explain the software. We will also gradually add more features. However adding those will require only software changes.
The basic electrical design idea
I could of course give you just the circuit diagram and some instructions on how to build it. It will probably work but you will not know how it works. Most hobby electronic kits are like that.
The idea of the shop.tuxgraphics.org online shop is however to provide good and free documentation together with the development kits. In the documentation (e.g this article) we explain really how things work and why it was designed that way. I find it much more fun to build something that I understand and I hope you like it too.
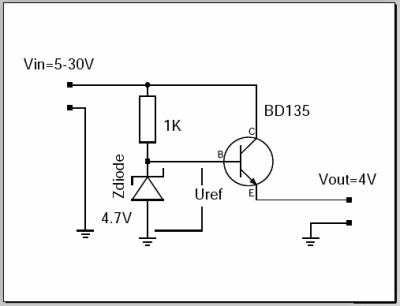
Let’s start with the simplest possible electronically stabilized powersupply. It consists of 2 basic parts: a transistor and a reference voltage generated with a Z-diode.
Read More: A digital DC powersupply
- What is the main advantage of this new power supply design?
The design is less complex than previous versions but offers more features by moving functionality from analog components to the microcontroller. - How many power sources are required for this project?
Only one power source is needed as there is no separate negative supply voltage required for operational amplifiers. - Can the power supply be controlled via a computer?
Yes, the unit can be completely controlled via a PC or used as a standalone device. - Which microcontroller is used in this design?
The project utilizes the Atmega8 microcontroller, which performs better than the older AT90S4433. - Does the display show pre-set values?
Yes, the display shows both pre-set and actual values for voltage and current simultaneously. - What components are replaced by the microcontroller?
Functionality previously handled by analog components like operational amplifiers is now managed by the microcontroller. - Will future articles cover software details?
Yes, two subsequent articles will explain the software and how to gradually add more features through code changes. - Are expensive or rare parts required for this build?
No, the design uses only cheap and standard components.
