Summary of How to disable JTAG of AVR microcontroller
This article explains how to disable the JTAG interface on an ATmega16 microcontroller to free up PC2-PC5 pins for general I/O. It details two methods: a temporary software approach using the MCUCSR register and a permanent hardware configuration method using Avrdude to modify fuse bits. The guide includes specific command-line instructions, code snippets, and circuit requirements for successfully disabling JTAG.
Parts used in the Disable JTAG of AVR Microcontroller:
- ATmega16
- LED
JTAG stands for “Joint Test Action Group” which was standardized as the IEEE 1149.1 Standard Test Access Port and Boundary-Scan Architecture in 1990. JTAG is generally used in IC debugging and device programming. Atmega16 consists of one JTAG port which shares four pins with PORTC. Until JTAG port is not disabled, these pins can’t be used as normal I/O pins. This article explores the methods for JTAG disabling.

JTAG interface shares PC2, PC3, PC4 and PC5 of ATmega16. To use these four pins for general I/O operations, JTAG must be disabled. There are two methods for disabling JTAG:
1. By programming
2. Using Avrdude
1. Programming method:
There is a register in atmega16 MCUCSR (MCU control and status register). It consists of JTD (JTAG disable) bit as 7th bit of register. JTAG can be disabled by writing 1 to this bit.
MCUCSR|= (1<<JTD);
This command must be written twice to disable JTAG. This is a temporary method of JTAG disabling because using this method, it is required to write the above command in every program. For permanent disabling next method can be used.
2. Using Avrdude:
JTAG can be permanently disabled by configuring two fuse bits, OCDEN and JTAGEN (must be disabled). This is done by using Avrdude software. The following instruction should be followed carefully to disable the JTAG
1. Connect your microcontroller burner circuit to your system.
2. Go start>run and write “cmd”.
3. Write command “avrdude –p <microcontroller code> –c <programmer type> -t” in Command window
Commands -p to select microcontroller
-c to select programmer type
-t to enter in AVRDUDE’s interactive window.
Microcontroller code m8 for ATmega8
m16 for ATmega16
m32 for Atmega32
Programmer types are bsd for parallel port programmer (Brain Dean’s programmer)
usbasp for USB programmer (USBasp)
The following picture shows the output of above command.
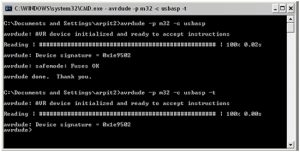
4. Write command “d lfuse” and “d hfuse” at avrdude interactive window to get values of low Fuse byte and high fuse byte.
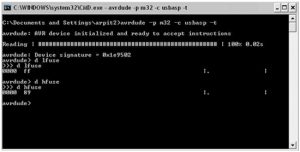
5. As shown in above picture the value of Fuse bytes is 0x89FF. This value shows that JTAG port of the microcontroller is enabled. To disable JTAG, the value of fuse bytes must be 0xC9FF.
6. To write 0xC9 in higher fuse byte the command “w hfuse 0 0xc9” is written. Lower byte will remain same.
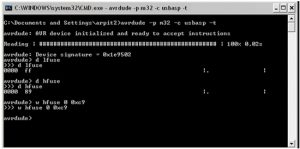
7. Write “d hfuse” command again to make it confirm that value is written or not.
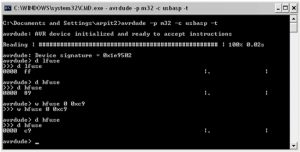
8. For terminating this window by type “quit”.
By this operation JTAG will be disabled and PORTC will work as normal I/O port.
Project Source Code
###
//Program to disable JTAG of AVR microcontroller
#define F_CPU 12000000UL
#include<avr/io.h>
#include<util/delay.h>
int main(void)
{
int i=0;
DDRC=0xFF; // Port C as output port
PORTC=0x00;
/* JTAG port is enabled*/
while(i<=10)
{
PORTC=~PORTC; // toggle all bits of port C
_delay_ms(1000); //1 sec delay
i++;
}
/*Now diable JTAG port*/
MCUCSR|=(1<<JTD); // sendig 1 to JTD
MCUCSR|=(1<<JTD);
while(1)
{
PORTC=~PORTC;
_delay_ms(1000);
}
}
###
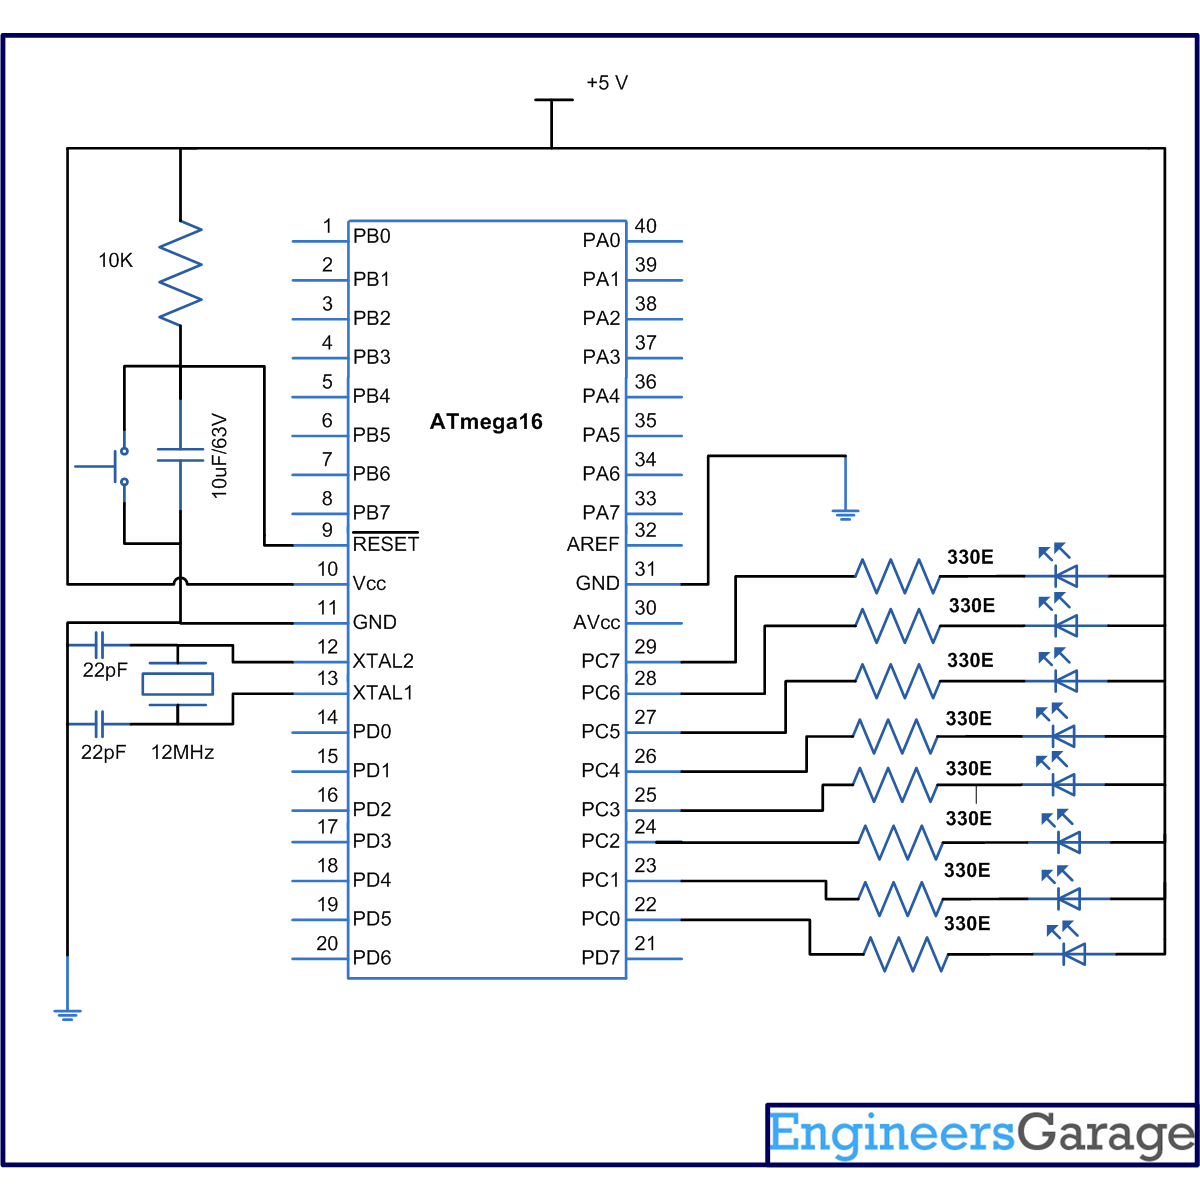
Circuit Diagrams
| Circuit-Diagram-of-How-to-disable-JTAG-of-AVR-microcontroller |
For more detail: How to disable JTAG of AVR microcontroller
- Which pins does the JTAG interface share on the ATmega16?
The JTAG interface shares PC2, PC3, PC4, and PC5 of the ATmega16. - How can I temporarily disable JTAG using programming?
You must write 1 to the JTD bit in the MCUCSR register twice in your code. - What is the best way to permanently disable JTAG?
The best way is to configure the OCDEN and JTAGEN fuse bits using Avrdude software. - What command enters the Avrdude interactive window?
The command avrdude with parameters -p, -c, and -t enters the interactive window. - How do I check the current fuse byte values?
Write the command d lfuse and d hfuse inside the Avrdude interactive window. - What fuse byte value indicates that JTAG is enabled?
A fuse byte value of 0x89FF shows that the JTAG port is currently enabled. - What value should be written to the high fuse byte to disable JTAG?
You must write 0xC9 to the higher fuse byte while keeping the lower byte the same. - Why must the JTD command be written twice?
The command must be written twice to successfully disable the JTAG port via the register.