
Summary of Dot Matrix Arduino Clock using ATMega168
This article details a DIY binary clock project using an ATMega168 microcontroller and a DS3232 real-time clock chip. The author highlights the first use of a dot matrix display and surface-mount soldering techniques. The clock displays time in binary across five rows representing month, day, hour, minutes, and seconds. Time synchronization requires a serial connection, though manual buttons can be added. A time-lapse video covers the two-hour assembly and coding process on breadboards.
Parts used in the Dot Matrix Arduino Clock:
- ATMega168 (or any other AVR) running the Arduino bootloader
- 16MHz crystal + 2 22pF caps or ceramic resonator
- 10k resistor for reset
- Push button for reset
- DS3232 real-time clock chip
The great adventure that is building clocks continues. Points of interest in this build is that it was the first chance I got to play with the dot matrix display I picked up over winter break, and it’s the first time I’ve soldered and used a surface mount package (albeit I soldered it to a DIP breakout board so that I could plug it into a breadboard; I know, very meta).
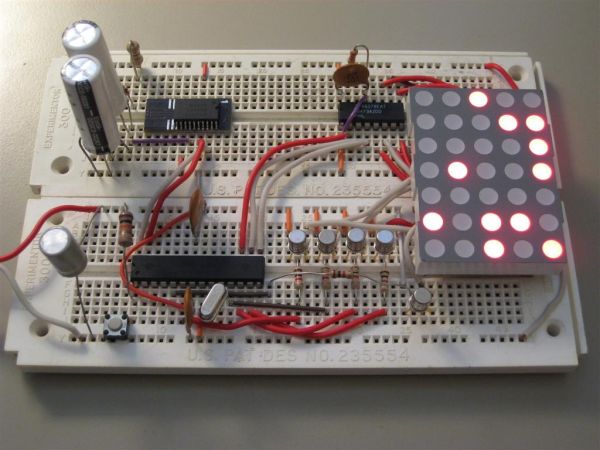
This clock displays all of its values in binary, which means that each row, from bottom to top, is worth one, two, four, eight, 16, and 32, and as each LED is lit, you add them together to get the final value. From left to right is the current month, current day of the month, hour (twelve hour based with PM indicator top center), minutes and seconds. There is currently no way to set the time short of plugging the board into a computer over a serial port to talk to the ATMega, but since these clocks rarely last longer than a few weeks, this isn’t of much concern. Feel free to add buttons to set the date and time manually.
The time is kept by a DS3232, which is a very cool chip in that it has a built in temperature sensor, which it uses to compensate the crystal to try and keep better time, and the crystal itself is built into the package, which is an advantage since I’m using this on a breadboard, and crystals don’t seem to like the stray capacitance on the boards that much. This chip is quite a bit more expensive than the DS1307 I’ve usually been using for these projects, but both use the same address over I2C, so replacing one with the other is simply a matter of connecting the correct pins.
Also new in this project is a time lapse video of start to finish! This is me assembling all of the parts on a pair of breadboards, as well as me writing all of the source code to get it running. Total work time was approximately two hours, with a break in the middle which was edited out. Enjoy!
Parts list:
- ATMega168 (or any other AVR) running the Arduino bootloader ($4.32 Digikey)
- 16MHz crystal + 2 22pF caps or ceramic resonator ($0.54 Digikey) I skimped and just used a 16MHz crystal I salvaged by itself.
- 10k resistor for reset ($0.064 Digikey)
- push button for reset ($0.23 Digikey)
- DS3232 ($7.63 Digikey)
For more detail: Dot Matrix Arduino Clock using ATMega168
- How does the clock display values?
The clock displays all values in binary where each row from bottom to top represents one, two, four, eight, 16, and 32. - What components are used to keep the time?
The time is kept by a DS3232 chip which has a built-in temperature sensor to compensate the crystal. - Can I set the time manually with buttons?
There is currently no way to set the time short of plugging into a computer, but you can add buttons to set the date and time manually. - Does the DS3232 work on a breadboard?
Yes, the DS3232 is advantageous for breadboards because the crystal is built into the package avoiding stray capacitance issues. - Is the DS3232 compatible with previous chips like the DS1307?
Both chips use the same address over I2C, so replacing one with the other is simply a matter of connecting the correct pins. - How long did it take to assemble the project?
Total work time was approximately two hours, excluding a break that was edited out of the video. - What microcontroller runs this project?
The project uses an ATMega168 or any other AVR running the Arduino bootloader.
