Summary of Make your own AVR JTAG debugger
Summary: This article explains how to build an inexpensive AVR JTAGICE-compatible debugger/programmer from open-source schematics, using a USB-to-serial TTL converter (avoiding MAX232) and PCB boards designed in EAGLE, enabling stepwise code execution and register read/write for supported AVR MCUs.
Parts used in the AVR JTAGICE-compatible Debugger:
- ATmega16(L) / ATmega162(L) / ATmega169(L or V) / ATmega32(L) / ATmega323(L) / ATmega64(L) / ATmega128(L) (compatible target devices)
- AVR microcontroller for the debugger (as per JTAGICE reference design)
- USB to serial TTL converter
- MAX232 level shifter IC (optional, if converter is not TTL compatible)
- PCB fabricated from provided EAGLE/ PDF board layout
- Connectors and header pins for JTAG interface
- Passive components as per schematic (resistors, capacitors)
- Crystal or oscillator as required by the debugger schematic
- Power supply components as per schematic
Tired of putting LEDs every time you want to check some value in the microcontroller? Well, its time to build yourself a debugger.
A debugger is a device which helps you run through your code in the microcontroller step by step and also gives you the ability to read or write the registers directly using the PC which means you can check the value of any register or any variable at any time without the need for any external components like LEDs or seven segment displays. A debugger will help you immensely when you’re in the prototyping phase of any project. Since I almost entirely use AVR, I’ll be showing you how to build an AVR debugger. AVR has many debuggers like the AVR Dragon, AVR One, AVR JTAGICE mkII etc. The problem is they cost hundreds of dollars and are hard to get in India. The AVR JTAGICE(not mkII) however, has been made open source by Atmel and therefore anyone can build it. The only drawback of this debugger is that it supports only a limited number of microcontrollers but hey its open source and dirt cheap to build, so what did you expect?
Compatible devices with AVR JTAGICE:
ATmega16(L), ATmega162(L), ATmega169(L or V), ATmega32(L), ATmega323(L), ATmega64(L), ATmega128(L).
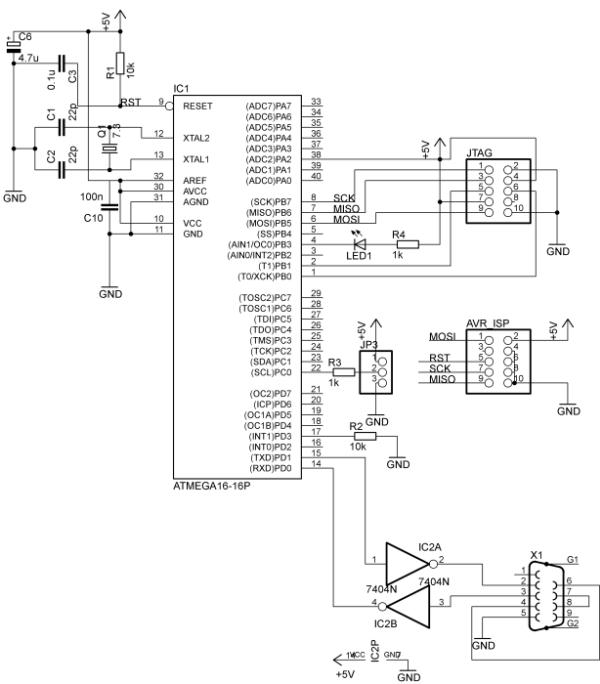
I borrowed the schematic from http://aquaticus.info/jtag
Since I don’t own an ancient PC, I was forced to use a USB to serial converter. If the converter is TTL compatible, which it will be in most cases, you won’t need the level shifter IC (MAX232). I also wanted the debugger to act as a programmer for non-JTAG capable devices, so I had to create everything from scratch on EAGLE and make a board layout.
The EAGLE schematic and board files can be downloaded here.
If you don’t have EAGLE, download the files in PDF format here.
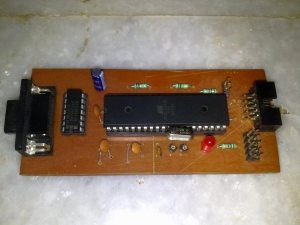
Etch the PCB using the layout provided(If you don’t know how to etch a PCB, see this tutorial). You can also try the circuit on a breadboard but if you’ll be using it all the time it’s better to make it on a PCB since it’ll be much more compact and robust.
Read More: Make your own AVR JTAG debugger
- What is the purpose of building this AVR debugger?
The debugger lets you run code step by step and read or write registers from a PC, removing the need for external LEDs or displays while prototyping. - Which devices are compatible with the AVR JTAGICE design?
Compatible devices listed are ATmega16(L), ATmega162(L), ATmega169(L or V), ATmega32(L), ATmega323(L), ATmega64(L), and ATmega128(L). - Do I need a MAX232 level shifter for USB connection?
If your USB to serial converter is TTL compatible, you do not need the MAX232; otherwise use a level shifter. - Where did the schematic come from?
The schematic was borrowed from http://aquaticus.info/jtag as stated in the article. - Can this debugger also program non-JTAG devices?
The author modified the design so the debugger can act as a programmer for non-JTAG capable devices. - Are EAGLE files and board layouts available?
Yes, the EAGLE schematic and board files can be downloaded, and PDF versions are available for those without EAGLE. - Can I try the circuit on a breadboard?
Yes, you can try it on a breadboard, but the article recommends making a PCB for compactness and robustness if used frequently. - Is the AVR JTAGICE design open source?
Yes, the AVR JTAGICE (original, not mkII) was made open source by Atmel and can be built by anyone.