Summary of Make an Oscilloscope Using the SainSmart Mega2560 with the TFT LCD shield and the 3.5 "color touch screen
This article details building a portable, low-cost oscilloscope under $40 using an Arduino Mega 2560 and a Sainsmart TFT LCD touch shield. It covers hardware assembly, library installation (UTFT/UTouch), and software configuration to visualize time-varying signals up to 1 kHz. The project allows users to adjust sweep speed, vertical sensitivity, and trigger levels via the touchscreen interface.
Parts used in the Portable Touch Screen Oscilloscope:
- Sainsmart mega2560 board with 3.5" tft lcd touch module display and shield kit
- A PC with the arduino IDE and a free USB port
- A USB cable
- Jumper cables
- UTFT library from Henning Karlsen
- UTouch library from Henning Karlsen
This instructable will show you how to build a portable Touch Screen
Oscilloscope for less than 40 U$!
The oscilloscope is one of the most powerful electronic instruments that
is available to electronics hobbyist, experimenters, and engineers. It is
mainly used to measue time-varying signals. Any time you have a signal
that varies with time( slowly, quickly, and /or periodically ) you can use
an oscilloscope to measure it , visualize it, and to find any unexpected
features in it.
We can use an oscilloscope to observe and study signal characteristics
that we could otherwise not see .
You will learn about the Arduino mega analog to digital converter( ADC).
We will be using the Arduino analog A0 input to sample and capture time
varying signals by Writing a program that will also display those signals
in a 3.8″ TFT LCD touch display, and we will input data to modify the
oscilloscope behavior, using the touch capabilities of the screen display.
Before we start building and programming, lets review some basic
characteristics of an oscilloscope.
These are functions you can control on most oscilloscopes:
Sweep speed. Sweep speed is usually measured in units of time per distance,
like milliseconds/centimeter or milliseconds per division.This might also
be referred to as the horizontal sensitivity.
Vertical sensitivity. That’s the measure of how sensitive the display dot
is to voltage applied to the input terminals. It is usually measured in
volts/centimeter or volts per division.
A trigger signal can be generated when the signal value reaches some
particular level – the trigger level. In most cases you can set the trigger
level to a voltage value of your choosing. A trigger is used to capture and
stabilize the waveform on the screen, or to wait for an event before
capturing the data
The oscilloscope, like my 4 channel DC DVM, will not be as accurate as
a commercial unit, but it works pretty good for low voltage and low frequencies.
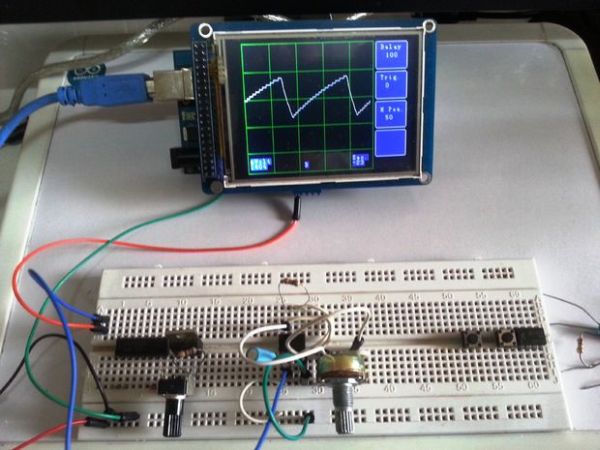
Step 1: Parts list
You will need :
- A Sainsmart mega2560 board with 3.5″ tft lcd touch module display and shield kit
- A PC with the arduino IDE and a free USB port.
- A USB cable
- Jumper cables
- UTFT library and the UTouch library from Henning Karlsen. web: http://www.henningkarlsen.com/electronics
Step 2: Build the hardware.
Construction of the Oscilloscope is fairly simple. You just have to put the parts of the Sainsmart kit together. All you need to do is add two jumpers; one for ground, and the other to use as your oscilloscope test probe.
You will need to bend the pins on one side of the jumper wires, and insert them into the A0 pin and GND pin of the Arduino (see pictures for detail), before installing the display shield, as the display shield will cover the ports once it’s in place.
Plug the Shield into the Arduino , then plug the display into the shield, and you’re done!!!
Now let’s test the display before we turn it into an oscilloscope.
Step 3: The software: UTFT library test.
If you finished putting your kit together, plug it into the USB cable that connects to your PC running the Arduino IDE.
If you haven’t done so, download the UTFT and UTouch Libraries, and copy them to the libraries folder where you have the arduino IDE installed.
If the libraries installed properly, you will see the UTFT and the UTouch options when you click on the Files option, and scroll down to examples.
If the UTFT option is in your menu list, select it, then select arduino, and finally, UTFT_Demo_320x240. This will load the cool demo program.
With the program loaded in the IDE, scroll down to view the following code:
// Uncomment the next line for Arduino 2009/Uno
//UTFT myGLCD(ITDB32S,19,18,17,16); // Remember to change the model parameter to suit your display module!
// Uncomment the next line for Arduino Mega
UTFT myGLCD(ITDB32S,38,39,40,41); // Remember to change the model parameter to suit your display module!
Comment out the command for the UNO , and uncomment the command for the Mega ,as I did.
Now, go to the tools menu, click on board, and select Arduino Mega 2560 or Mega ADK , if not already selected.
Click on verify to compile the program. If there are no errors, click on upload to load and execute the program.
If everything is Ok, you will see a cool demo program running. Pictures in this step, show screenshots of the demo running.
Step 4: The software: UTouch library test.
Now we need to test the Utouch Library
Go to the files menu and select ; Examples>UTouch>Arduino>Utouch_ButtonTest and load the program to the IDE.
Verify and run the program.
You should see a keypad show up in the display, and, as you press the number keys, they should show up at the bottom of the screen.
If all went well, we are ready to load the Oscilloscope software.
Step 5: The Oscilloscope
Below, you will find the sketch for the Oscilloscope. Before we copy and paste the program, let’s review some limitations and explain the program.
I’ve had to do a fair amount of research to come up with the code, and many snippets have been “borrowed” from several sources.
I divided the program into several subrutines to make it easier to understand. The code is well documented, but, if you have trouble understanding it, leave a comment and I’ll try to explain it.
The Oscilloscope bandwidth is limited to about 1 khz, but there is room for improvement.
The input is limited to a 5volt peak to peak waveform, unless you use a voltage divider at the input, and also limited to positive waveforms from 0 to 5 volts.
For more detail: Make an Oscilloscope Using the SainSmart Mega2560 with the TFT LCD shield and the 3.5 “color touch screen
- What is the primary function of the built device?
The device measures, visualizes, and analyzes time-varying signals for electronics hobbyists and engineers. - How do you test the display before turning it into an oscilloscope?
You load the UTFT_Demo_320x240 example program from the UTFT library into the Arduino IDE. - Can this oscilloscope measure negative voltage waveforms?
No, the input is limited to positive waveforms ranging from 0 to 5 volts. - What is the maximum bandwidth of this oscilloscope?
The bandwidth is limited to about 1 khz. - Which specific pins are used for the ground and test probe connections?
Jumpers are inserted into the A0 pin and GND pin of the Arduino. - Does the device require a voltage divider for inputs over 5 volts?
Yes, a voltage divider must be used at the input if measuring waveforms exceeding 5 volts peak to peak. - How can users modify the oscilloscope behavior?
Users input data to modify behavior using the touch capabilities of the 3.8 inch screen display. - What libraries are required to run the software?
The project requires the UTFT library and the UTouch library downloaded from Henning Karlsen.