Introduction
For my ECE 476 Design Project, I built Missile Command using the Atmel Mega 32 microcontroller. My version of Missile Command is based on Ataris 1981 version. After looking at some of the past ece476 final projects, I noticed no one had tried to build Missile Command. This game was one of my favorites games of all time and I thought it would be fun to recreate the game after more than two decades after the original came out.

I decided to display the game on a television screen, which can produce unwanted flicker or artifacts when the timing is off. I used the television because I assumed that the implementation of the game would not be too difficult since most of the animated graphics are lines and dots. It proved to be a lot more complicated.
The game takes place during the Cold War era of the 1980s. Major cities are being attacked from the sky by falling nuclear warheads. You are a pilot who has to target the warheads so that your base command on the ground will be able to fire a rocket to intercept these warheads. If you are too slow and allow the warheads to destroy all your cities, the world is destroyed and the game is over.
High Level Design
Rationale
After being stuck doing a project without a partner at the last minute, I could not think of any original ideas at the time that I felt one person could do. My limited experience with hardware made me look more towards a project that was manly software oriented, like a video game. After looking at previous video game ece 476 projects, the first idea that came to mind was to create Missile Command. To my knowledge, no one had done it recently in the past and it is a fun game, and contains simple graphics. I figured using a TV to display the game would be the best way to simulate the original and was a cheap source of hardware.
The Game
The game starts with an introduction screen, which displays the game title and my name. A short little song will play repeatedly while this screen is displayed. Once the start button is pressed, the player will enter the first level. The first level will have 7 objects drawn at the bottom representing six cities and a missile base command. Up to six, seemingly random lines (Warheads) will slowly be drawn downward from the top of the screen. The player is able to move around a small rectangle (ship) to intercept the lines and fire missiles at it from the missile base command. Once the fire button is pushed, a small dot (missile) travels from the missile base command all the way to the exact point where the ship was located when the fire button was pressed. Upon reaching its destination, the missile will grow slowly into a large ball and then disappear, simulating the missile exploding. If the front of the Warhead is anywhere inside the explosion, it is erased (destroyed). The player can only fire three missiles at a time and receives 50 points for every warhead he destroys. If a Warhead makes its way all the way down to the city, the city will be replaced by a destroyed city. The player only gets a limited supply of missiles that are stored in four cargo holds that look like four small dots below the missile base command. For every Warhead that hits the missile base command, a cargo hold will be destroyed. For example, if four warheads hit the missile base command, the player will be unable to fire any more missiles for the remainder of the level. After a certain number of warheads have been drawn, the level will end and display the number of the next level. After each level, the player is given 500 points for every city that remains undestroyed. The player will then press start to proceed to begin the next level. Unlike the original Atari version of the game, a player may pause the game at anytime by pressing the start button. Upon the completion of each level, the speed of the Warheads increases. If at any time, at least one city is not still standing, the game will end and GAME OVER will be displayed on the screen.
Video
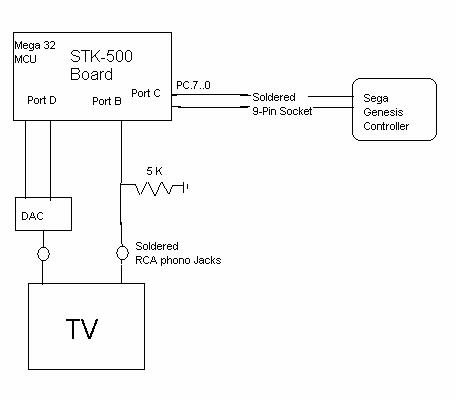
The Television screen was used to play the game. I had had experience using the TV in Lab 4, and new it could be used to display the output of a video game. The television uses the NTSC standard, where black=0.3V and white = 1.0V. The TV input requires sync pulses to be generated every 63 micro seconds, to draw each line on the screen and then a series of inverted sync pulses to reset each screen frame. RCA video composite phono jack cords were used to connect the MCU to the TV.
Controls
Originally, I was going to implement a keypad to control my game, since I had had experience using it in Lab 3 of ece 476. I then realized how much diagonal and non-linear movement that my game would require and considered using a gamepad or joystick. I finally picked the Sega Genesis game pad because it uses basically the same logic as the push buttons on the DSK-500 board. All button are logically high when unpushed and logically low when pushed. The Up, Down, Left, and Right buttons control the ships movement and buttons B and C will pause the game and fire a weapon, respectively.
Logical Structure
A state machine was used in the program to help organize the games. Below is a basic state diagram used in the code to build Missile Command. The Intro State initializes all the variables and prints out the game title and my name. The Ships and Cities State draws all the cities and initially draws the ship. The Missile State is the main state of the game. Most of the actual game movement and game algorithms are in this state. In this state Warheads begin to be drawn and the player can begin firing at these Warheads. If a City is hit by a warhead, the City Destroyed State will replace the city with a damaged one. The Paused State freezes the game if the start button is pushed. Game Over is the final state, after all cities are destroyed.
Hardware/Software Tradeoffs
To make programming more simplistic and faster, I implemented my code completely in C instead of assembly. Using assembly would have decreased the amount of frames required to do all the computations.
Intellectual Property
Missile command is copyrighted by Atari, 1981. All ideas for my version of Missile Command were taken from Ataris version and therefore all credit to its creation is given to them.
|
Part |
Quantity |
Vendor |
Part # |
Cost |
|
Atmel Mega32 CPU |
1 |
Supplied by Lab |
$8.00 |
|
|
330 resistor |
1 |
Supplied by Lab |
$0.01 |
|
|
1K resistor |
1 |
Supplied by Lab |
$0.01 |
|
|
75 resistor |
1 |
Supplied by Lab |
$0.01 |
|
|
5K resistor |
1 |
Supplied by Lab |
$0.01 |
|
|
RCA phono jack cord |
2 |
One Dollar Store |
$1.00 |
|
|
Phono Jacks: solder terminals |
2 |
Radio Shack |
274-346 |
$2.00 |
|
9-pin socket |
1 |
Basement of Clark Hall |
$0.50 |
|
|
Genesis controller |
1 |
Provided by a TA |
$3.00 |
|
|
Total |
$14.54 |
For more detail: MISSILE COMMAND Using Atmel Mega 32