
Summary of Origami 3D Beating Heart
This article guides readers in creating a 3D origami heart that glows like a beating heart when touched. Using a printed red paper template and electronic components, the project involves assembling two halves with an internal circuit powered by batteries. A touch sensor made of transistors detects hand contact to activate LEDs, while an ATMEGA328 microcontroller controls the blinking pattern. The final assembly includes a switch for power management and external charging capabilities via female headers.
Parts used in the Origami 3D Beating Heart:
- Printed template on red paper
- Ruler
- Pen or Pencil
- Paper cutter
- Zero PCB
- Batteries
- Hard Wires
- C1815 transistors
- Resistors and Capacitors
- ATMEGA328 IC and its base
- Crystal Oscillator
- Switch
- Female headers
- Soldering iron
- Glue gun
- LEDs

It is a 3D paper heart which starts Blinking (Glowing) when someone holds it. To surprise someone, this gift is a perfect idea as it looks like a simple origami heart but it starts blinking just like a beating heart when someone touches or holds it.
This Origami beating heart can be easily made in very less time.
So Lets make it !!!!!
Step 1: Getting Things Ready !

Download this template and print it in red paper.
Things Required:
Craft items:
- Template which was printed in red paper
- Ruler
- Pen/Pencil for marking
- paper cutter
Electronic items:
- zero PCB
- Batteries
- Hard Wires
- C1815 transistors
- Resistors and Capacitors
- ATMEGA328 IC and its base
- Crystal Oscillator
- Switch
- Female headers
Tools:
- Soldering iron
- Glue gun
Rub the head of led with sand paper to avoid light focusing on a particular point.
Step 2: Print the Template and Cut It

Cut the template and lightly fold along the internal lines.
Step 3: Make Two Halves

Glued both the parts. On the bottom of the second half, paste the grid of two wires (as shown in picture) such that they should not touch each other.
To complete the circuit one should hold the heart.
Step 4: Circuit & Programing
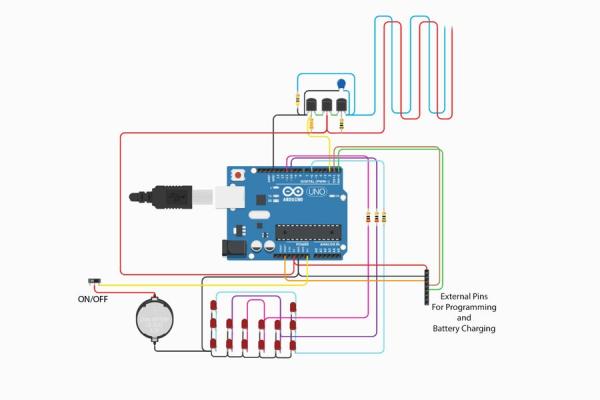
Upload the program on ATMEGA328 micro-controller using Arduino and solder all the components on zero PCB according to the circuit provided.
The circuit consist of a micro-controller for blinking the LEDs in a specific pattern. I have used combination of 3 c1815 transistor as a touch switch which will activates even if the impedance is very high (hands). Now, when someone holds the heart, both the two wires at the back side gets in contact with hands which turn ON the LEDs .
Also, solder the wires from pin1(RST), pin2(Rx), pin3(TX) , Vcc and Gnd so that we can modify the program and charge the battery externally, if required.
Add a switch to save the power as some components always consume small amount of electricity.
Step 5: Join the Two Half
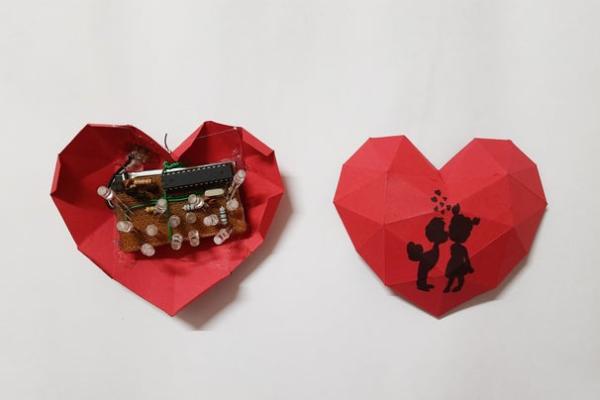
Place the circuit inside the bottom part of the heart.
Make small holes at the back side for female header and switch.
At the back side, connect one wire with positive power supply of the battery and other with the base terminal of transistor.
Now, test the circuit if everything works fine then glued both the half to make a complete heart.
Source: Origami 3D Beating Heart
- How do I prepare the LED heads?
Rub the head of the LED with sand paper to avoid light focusing on a particular point. - What is the best way to make the heart beat?
Upload a program on the ATMEGA328 micro-controller using Arduino to blink the LEDs in a specific pattern. - Does the heart turn on without touching it?
No, the circuit activates only when someone holds the heart so the two wires at the back get in contact with hands. - What type of transistors are used as a touch switch?
The project uses a combination of three C1815 transistors which activates even if the impedance is very high. - Can I modify the program after assembly?
Yes, you can solder wires from pin1, pin2, pin3, Vcc, and Gnd to modify the program and charge the battery externally. - Why should I add a switch to the project?
A switch is added to save power because some components always consume a small amount of electricity. - Where should I place the circuit inside the heart?
Place the circuit inside the bottom part of the heart before gluing both halves together. - How do I ensure the wires on the second half do not short circuit?
Paste the grid of two wires on the bottom of the second half such that they should not touch each other.
