Introduction
We developed a new way for student groups to chalk advertisements for events. This project is a radial printing device for drawing with chalk/markers on flat surfaces.
High-Level Design
dea Rationale and Sources
Anyone who has done any sidewalk chalking knows that it is one of the few tasks that humans were not designed to do well. Fingers, backs and legs get cramped. Chalk gets all over clothes. Doing the same design multiple times is very difficult. And writing neat text takes lots of experience. So we thought, why not make a robotic chalker to do the job? We wanted to do a project that used the microcontroller as a key component, but where hardware was a critical part. Both of us have plenty of experience with electronics and will only get more; we wanted to try applying it to something that neither of us would normally do. So this project fit our requirements well.
The final device must be able to accurately position a marking device (chalk, marker, etc., hereafter denoted as “pen”) and control whether or not the pen contacts the target surface. There are three possible approaches: a free-moving robot, a fixed x-y plotter (Cartesian coordinates), and a radial plotter (polar coordinates). We considered the trade-offs between all three approaches in our initial design.
Advantages of the free-moving robot option include the ability to draw an arbitrarily large design. Disadvantages include the difficulty of precision position control, exacerbated by the possibility of wheel slippage. Also, a robot is far more complex than the other two options, and we decided the trade-off for limitless size wasn’t worth the problems. The fixed Cartesian plotter seemed the most straightforward of our ideas. The design would have independent x and y position controls meeting at a point where the pen would be mounted. Disadvantages include the need for a complex physical structure and the size limitations imposed by the size of the machine that severely limit the image size. We decided to use a design that is a hybrid of the two, using polar coordinates instead.
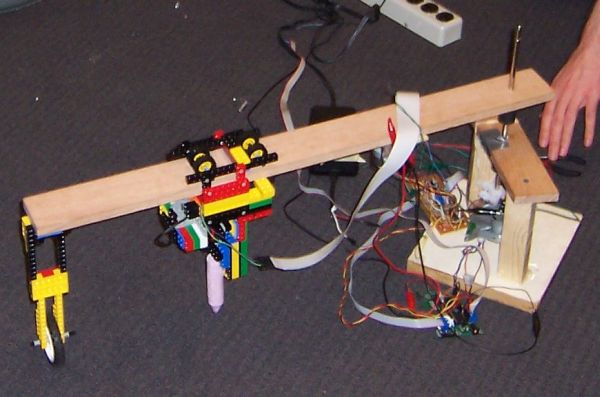
In the radial plotter design, a fixed base supports a rotating arm. A cart holding the pen moves along the length of the arm. The cart includes an up-down track to engage and disengage the pen from the drawing surface. The control maps directly to polar coordinates: the rotation of the arm is theta, and the distance moved is r.
The radial design has advantages over the other designs in both design and utility. The fixed portion can be just the center base, which can be much smaller than the fixed parts of a Cartesian system. It also only needs one arm instead of two. Also, the fixed positions allow for a much higher precision than the robot option. Finally, the final product can be easily scaled to mark a larger area by replacing one pulley and one plank with larger variants.
Background Math
The only relevant math is the transformation from rectangular to polar coordinates. This was accomplished satisfactorily for us by the polar coordinate filter plug-in included with The GIMP.
Logical Structure
Base and theta motor/optical reader
The challenge for designing the base is that it needs to support the fragile theta motor in an orientation different from one one it was intended for. The design problem was to impede all directions of movement except for the rotation necessary. A big hurdle was that the side we were using for a bottom could not rest on a flat surface without damaging the opto-reader disk. Our original idea was to use a stone-henge type setup where the top would have a hole in it and a stopper on either end of the hole would keep it suspended. The new problems this brought up were how to keep the theta motor from rotating itself, what to make the leg supports from, and how to attach the rod to the top part without impeding spin. We decided on wood for the leg supports, but our initial design could not solve the other two requirements. Our solution was (upon suggestion from John Son, another 476 student) to screw the metal piece that holds the motor and optical reader together directly to the leg support. This solved the problem of how to prevent the theta motor from spinning itself and we no longer needed to keep it suspended. We still keep the top and other leg pieces of the stone-henge structure to support the motor and have a rubber band that supports the non-screwed in side of the motor assembly. We then screwed the legs to a wooden base-board for further stability. The screws that attach the wooden base-board to the legs were countersunk with a Dremel® to maintain the levelness.
The theta motor and opto-reader control the theta movement of the chalker. It is the motor/optical reader from the paper-feed of the printer. We liked it for its precision (1800 ticks per rotation) and the fact that it already had a reasonably powerful DC motor included in the assembly. Unfortunately, it was not designed for the orientation in which we used it, so it is fragile, and a lot of planning of the superstructure design went into engineering around it.
(The images above are from before construction was complete. A rubber band was added to add vertical support, and a wooded base was attached beneath to add stability and rigidity. The final structure is visible in the pictures of the final structure.)
Radial motor and optical reader
This unit needs to move the chalk over precise distances of the arm. One of us envisioned a device that slid like the track of a silverware drawer with the pen fixed at one end. The other envisioned a trolley that would roll along the top of the arm and hang a pen below. Inside the scanner was the perfect solution. We found a motor/optical reader that rotated a toothed tread around a pulley. The tread moved a plastic cart along a metal support bar which was meant to move the scanner under the paper. We removed the entire assembly from the scanner and suspended it under the plank. We attached a trolley that rolls along the top to the plastic cart with LEGO® bricks. The trolley design is described below.
The radial motor and optical reader we use is from the scanner positioning assembly from our HP OfficeJet. It moves the chalk radially along the plank into position for up/down movement. It has precision of ~250,000 ticks over the reach of the plank.
Radial arm
We use an oak plank of wood for our radial arm. Deciding on it took a surprising amount of planning. We initially intended to use a ~12 pound aluminum U-bar. After getting our donated HP officejet we realized using such a heavy bar with our limited power motors was unrealistic. Looking for a new arm we made a list of what we liked about our aluminum bar and what we didn’t like about it. We liked having a U-shape to hide a shaft for radial movement and we liked that it was sturdy and rigid. We decided to use a PVC pipe with a square cross-section that we could cut in half long-ways. Unfortunately, our resources offered things that were either not u-shaped (planks of wood) or not rigid (gutters). After dissecting the scanner and discovering our radial movement system we decided on a wooden arm. The wood had to be wide enough to allow a trolley to roll along the top and long enough for the full extension of the radial system. The plank is 26″x4″x.5″. We chose Oak for it’s rigidity. Because of it’s rigidity, holes needed to be pre-drilled for any screws.
Parts List:
| component | cost |
| solder board | $2.50 |
| ATMEL ATMega32 | $8 |
| last year’s custom PC board for Mega32 | $2 (no serial link) |
| oak plank from Lowe’s | $5 |
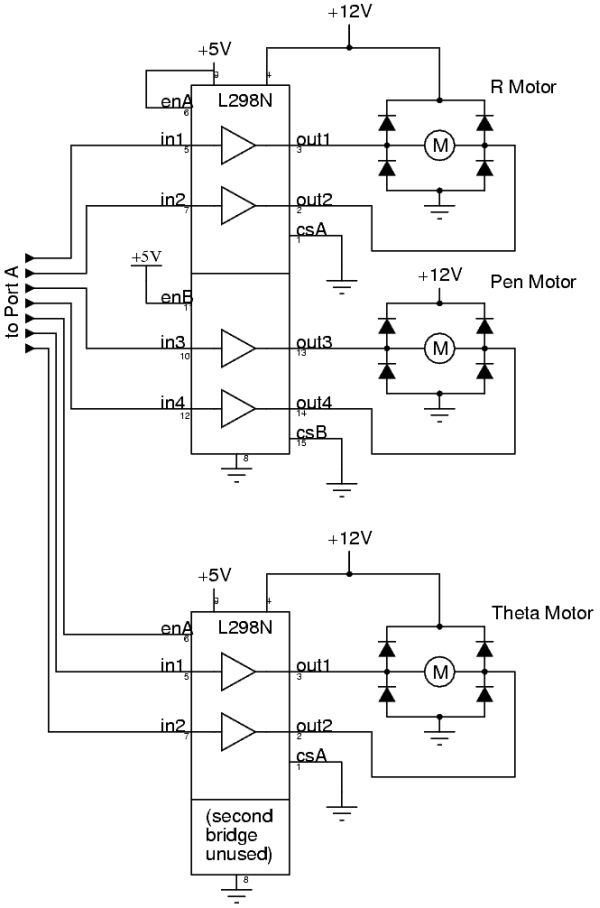
| 3x L298N Dual Full Bridge driver | 3 x $3 = $9 (but we only used 2) |
| total budget | $26.50 |
For more detail: Radial Chalker Using Atmel Atmega32