Summary of Reducing Arduino Power Consumption
This article details methods to drastically reduce power consumption in ATmega328P-based Arduino projects, aiming for under 10uA. Key strategies include removing unnecessary hardware like the USB programmer IC, power LED, and linear voltage regulator to eliminate wasted heat and current. Additionally, reducing the microcontroller's clock speed from 16 MHz to 8 MHz lowers active current draw, while optimizing software by utilizing built-in timers instead of processor-intensive interrupts further enhances efficiency.
Parts used in the Low Power Arduino Project:
- ATmega328P microcontroller
- Battery (for 5V supply)
- 3x AA batteries
Story
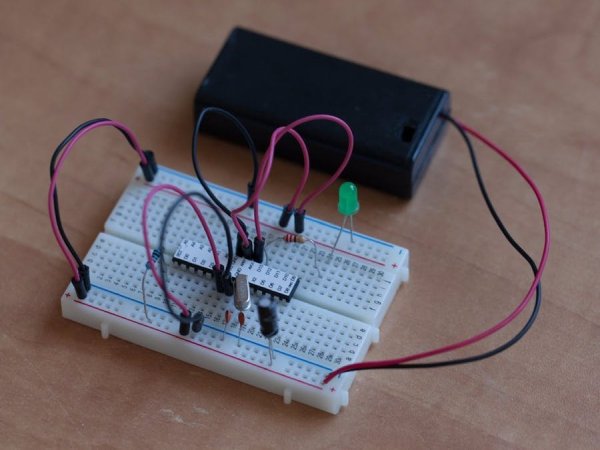
Removing the extra hardware!
Making it seems to be difficult having a lot of components. No, actually most of the components of a Arduino board are for preventing short circuiting, damage control, etc. But, if you have basic knowledge and experience of working with Arduino then, you can avoid those parts and can check the circuit for any mishap.
So, let’s see what can we remove to lower the power consumption on our homemade Arduino.
Remove the programmer IC
Every integrated circuit (IC) needs power to function. By reducing the number of ICs needed, you can save a bit of power. The Arduino Uno has a USB bridge that converts the USB signals to signals that the Arduino’s Universal Asynchronous Receiver Transmitter (UART) can use. This alone draws around 10mA. I will tell you other alternatives for programming the micro-controller later on.
No power LED!
We can also remove the power LED. It is just to show that arduino is on or off. So, it will not reduce the functionality of the arduino.
Ditching the Linear Voltage Regulator
Linear regulators are great. They’re cheap and can regulate a higher voltage to a lower voltage with as few as 3 pins (Vin, ground Vout). The downside of a linear regulator however is they can get pretty hot when you have a large difference between the input and output voltage, or if you’re drawing a lot of current. You can calculate the power that gets wasted in the form of heat with a simple equation:
Pwasted = (Vin - Vout) * I
For 5V output, 7V in given as input to to regulator. Means that Vin – Vout is 2V and the usual current drawn is 1A. Pwasted is 2 watt.
Linear regulators are, at best, only around 70% efficient. The more current you draw, the lower the efficiency.
For, supplying the 5V and 1A supply, we can use battery mentioned in the list above or we can also use 3x AA battries. This makes 4.5V and ATmega328 can work on 1.8 V to 5.5 V.
Reducing the clock speed
In projects where the Arduino doesn’t need to execute a large number of instructions in a short amount of time or in projects where timing isn’t an issue, reducing the clock speed of the micro-controller can shave a few milliamps off the supply current. For example, running the Arduino at 5V and reducing the clock speed from 16 MHz down to just 8 MHz can drop the current needed from 12 mA down to about 8.5 mA.
To better understand the relationship clock speed has with the microcontroller, let’s look at the graph below.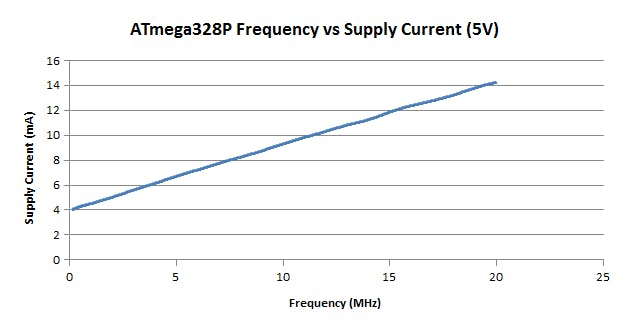
As you can see, reducing the clock speed can triple the battery life. The trade off of course is that you won’t be able to execute as many instructions per second, and for some applications, this solution isn’t an option.
To know, how it can be done, click here.
Saving Power with Software
So far we’ve talked about how to reduce the power of the Arduino, but we haven’t talked about why it uses the power it does. Inside the ATmega328P, lies a series of circuits that work together to offload work from the processor, and each of these draws some amount of power.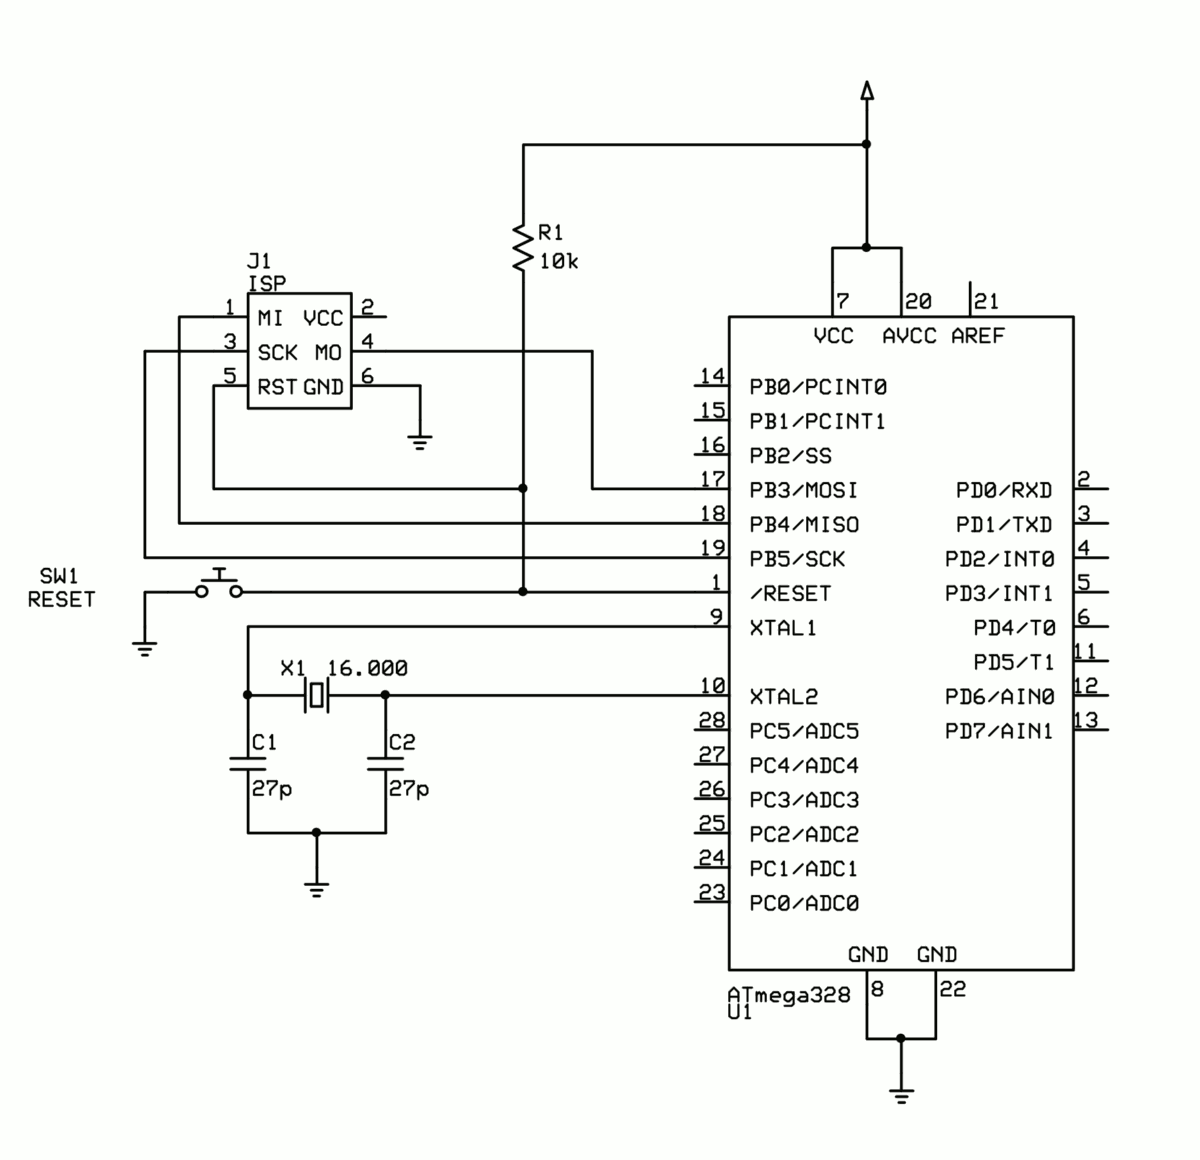
The Arduino’s analogWrite() function, for example, doesn’t have the processor create a PWM signal by counting the clock cycles itself. Instead, the Arduino uses one of the built in timers to count clock cycles and send an interrupt request to the processor. From there, the processor stops what it’s doing and handles the interrupt by switching the pin’s state. By offloading some of the work, the micro-controller is able to do multiple things at the same time.
Foe more detail: Reducing Arduino Power Consumption
- How much current does a standard Arduino Uno draw?
An Arduino Uno draws around 15mA minimum. - What is the main function of the USB bridge on an Arduino Uno?
The USB bridge converts USB signals to UART signals for the microcontroller. - Does removing the power LED affect Arduino functionality?
No, removing the power LED does not reduce the functionality of the Arduino. - Why are linear voltage regulators considered inefficient for high current?
Linear regulators can get hot and waste power as heat when there is a large difference between input and output voltage or at high currents. - How does reducing clock speed affect battery life?
Reducing the clock speed can triple the battery life by lowering the current needed. - What happens to current draw when reducing speed from 16 MHz to 8 MHz?
Current drops from 12 mA down to about 8.5 mA when running at 5V. - How does the analogWrite function save processor power?
It uses built-in timers to count cycles and send interrupts rather than having the processor create the PWM signal itself. - What voltage range can the ATmega328P operate within?
The ATmega328P can work on voltages ranging from 1.8 V to 5.5 V.