Summary of Stand Alone Arduino ATmega328p
Summary: This guide explains building a standalone Arduino using an ATmega328p-pu. It covers selecting the correct microcontroller version, drawing and printing the PCB layout, transferring the toner to copper using a PNP sheet and an iron, fixing track defects, and etching the board in ferric chloride with safety precautions.
Parts used in the Stand Alone Arduino ATmega328p:
- ATmega328p-pu microcontroller
- PNP sheet (press-n-peel)
- Laser printer (for printing the PCB)
- Copper clad board (fiberglass sheet)
- Alcohol, kerosene distillate oil, or degreaser (for cleaning copper)
- Sandpaper (optional, for surface preparation)
- Iron (for toner transfer)
- Piece of fabric (between iron and PNP)
- Permanent marker (for repairing tracks)
- Ferric chloride (FeCl3) etchant
- Plastic container (for ferric chloride bath)
- Gloves and safety glasses
- Acetone (to remove toner/blue film)
Step 1: Components and Where to Start
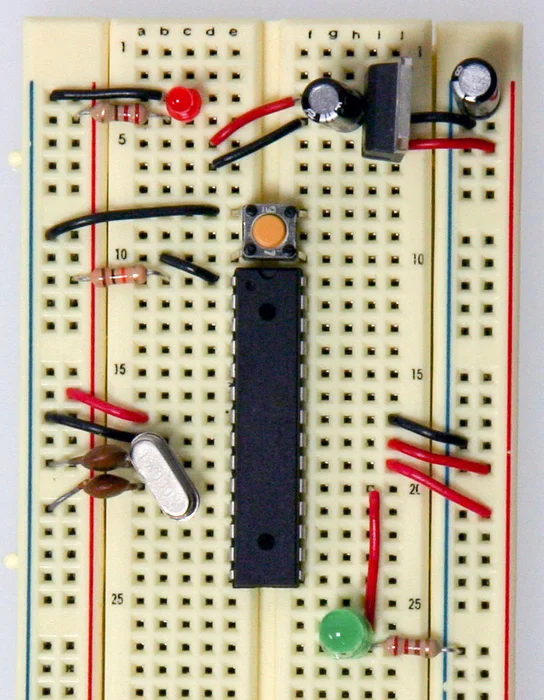
https://www.arduino.cc/en/Main/Standalone
where I’ve taken this picture, and where there is the list of all the components that you have to buy. Just the components that are showed in this picture.
( At the link, there are also others steps after this picture, that show you how to add the electronic part to program the ATmega328p, but because you can use yours Arduino board to program the Atmel, they are not important in this guide)
!!! PAY ATTENTION !!! : when you buy the ATmega328, it has to be a final “p” after the number like this:
ATmega328p-pu
This because there is another version of the component, without the final p,
that is less expensive, but it has some differences:
– the “p” stands for Pico Power, and it means that the microcontroller works at very low energy consumption
– but more important, the signature inside the microcontroller are different between the two versions, the one with final P and the one with no P, that makes an error during the programmation. This error could be bypassed, but in order to make all the things easier, buy the ATmega328p version.
Step 2: The Schematic Draw
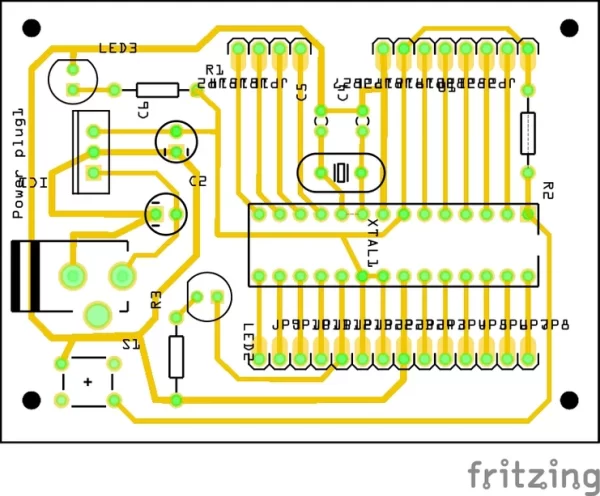
I’ve drawn the schematic with Frizzing, then I have printed on paper some prototypes to see if the circuit tracks were correct.
Here there is the pdf of the printed circuit board.
Attachments

Step 3: Scissors, Alcool and Iron
Now the print: you need the PNP sheet (press-n-peel) and a LASER PRINTER (the ink printer can’t be used)
After printing the circuit on a PNP, you have to clean the copper with alcohol or kerosene distillate oil or a good degreasing as you prefer. You can also prepare the surface sanding it with sandpaper.
!!! PAY ATTENTION !!! : because it will be ironed onto the copper, that is the bottom surface, you DON’T HAVE TO FLIP the image I’ve posted in the previous step. Just print and put it on the copper.
The iron must not be too much hot: 1/2 or 3/4 of the scale will be enough, otherwise the circuit tracks will blend together over the copper surface. I say it for the experience.
Put a piece of fabric between the copper and the iron, push and make warm to the surface evenly for a minute or two. Then let cool the copper before touch it and then gently and carefully remove the blue sheet to reveal the blue drawn on the copper.
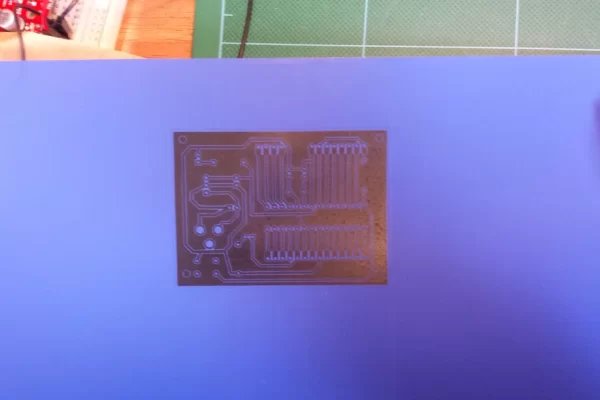
If there are some spots or interruption on the tracks, use a permanent pen to draw and repair the circuit.
You can see in the pictures the different color of my reparations. I think there were many because I haven’t cleaned properly the surface.
Step 4: A Bath Into Ferric Chloride (FeCl3)
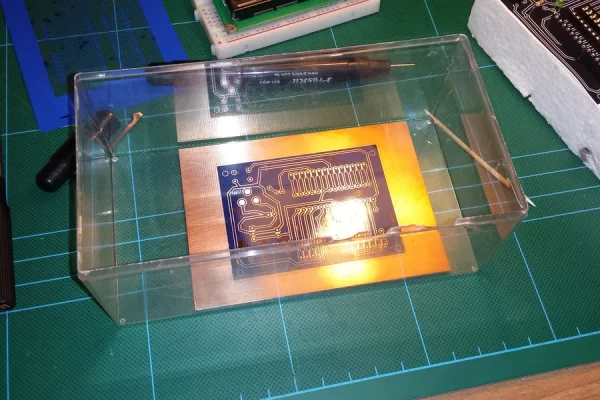
Now the chemical part:
You must buy a bottle of Ferric Chloride (FeCl3) to remove the copper from the surface.
!!! PAY ATTENTION !!! : Use glasses and gloves When You use this substance, Because It’s corrosive to the skin, and watch out your clothes, Because if even a single drop goes on them, they will be permanently ruined.
Put it into a plastic recipient copper, not aluminum or other metal, and then put as much FeCl3 until to submerge the copper.
The chemical reaction ( FeCl3 + 3Cu -> 3CuCl + Fe(s) ) will be faster with agitation and making warmer the solution.
When the reaction will be completed, and all the copper will be gone, wash the fiberglass sheet with water.
Now you can remove the blue that covers the tracks with acetone, revealing the copper, as in the picture.
- Which ATmega328 version should I buy?
Buy the ATmega328p-pu version because the p variant has different signatures and lower power consumption; the non-p version can cause programming errors. - Do I need to flip the PCB image before printing on PNP?
No, you should not flip the image; print and place it directly on the copper as provided in the guide. - Can I use an inkjet printer for the toner transfer?
No, the guide requires a laser printer; inkjet cannot be used for PNP toner transfer. - How hot should the iron be for transferring the PNP image?
Set the iron to about half to three quarters of its scale; too hot will cause tracks to blend together. - What should I use to clean the copper before ironing?
Clean with alcohol, kerosene distillate oil, or a good degreaser; sanding with sandpaper is optional. - How do I fix interruptions or spots in the transferred tracks?
Use a permanent marker to draw and repair the circuit tracks where needed. - What chemical is used to etch the copper?
Use ferric chloride (FeCl3) to remove the unwanted copper. - What safety precautions are needed for etching?
Use gloves and safety glasses and avoid letting ferric chloride contact skin or clothes because it is corrosive and can permanently ruin clothing. - What container should I use for the ferric chloride bath?
Use a plastic container; do not use aluminum or other metal containers. - How do I reveal the copper tracks after etching?
Wash the board with water, then remove the blue toner film with acetone to reveal the copper.