Intro Summary
Thinking about what a CDE (culminating design experience) should be, we devised a project that combines the microcontroller programming principles learned in ECE 476: Microcontroller Design with the control theory concepts learned in ECE 472: Feedback Control Systems to create an academically viable stationary helicopter. The device consists of a lever with a DC-motor-driven propeller attached to one end. The angle of the lever is determined by an accelerometer-based PID (proportional-derivative-integral) feedback-controller. The accelerometer signal is fed into a Mega32 MCU (microcontroller unit) that the user interacts with, using push-buttons to set the desired angle and to adjust control parameters.

High Level Design
Rationale
With the purpose of using microcontrollers to solve a control problem, we intended to construct an inverted pendulum before learning that motors with sufficient response times were outside the scope of our budget. Professor Land suggested a stationary helicopter, as he has been considering creating a similar 476 lab in the future, and so our project was born.
Logical structure
The main structure of our design is a feedback control system, as illustrated:
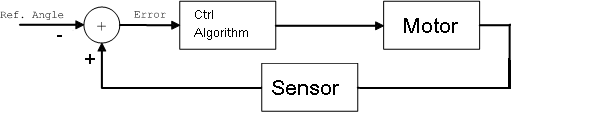
Error is calculated from subtracting current angle obtained from the accelerometer from the reference angle. PID control is used to general an output that will be used for motor control. Another separate control algorithm separate from PID is also implemented but only executed when certain flags are set. Timer 2 from the MCU produces a pulse width modulated signal. And based on the duty cycle of the PWM signal, the amount of current going through the motor can be controlled. Various buttons control the gain constants for the PID control as well as set flags for other operations such as on/off. A LCD output was also implemented so that the status of the system can be viewed easily. The setup illustrated:

Background Math
The Proportional-Integral-Derivative (PID) control is used to calculate how much power outputs to the motor. Below shows the general equation:
![]()
The sum of all three terms produces a value that is used to control the PWM duty cycle. Gain constant KP produces a term that is proportional to the error. This term affects the response time of the system. Higher KP is, quicker the response time with the expense of stability since overshoot likely occurs. Derivative constant KD produces a term that�s proportion to change in error. As the lever moves toward the reference angle, it slows it down and vice versa. This term smooth out oscillation but reduces response time. The integral term sums all the error from the start and provides a push towards reference angle. However, it is fairly easy to get an unstable system if the integral constant, KI, is set too high. In practical applications, the integral term is set to zero when error crosses zero and there is also a cap on its value.
Hardware/Software Trade-offs
Most of the hardware trade-offs come from cost. The hinges for rotation of the lever are mere 2 screws. This created more friction and instability for the lever�s movement. The decision to implement LCD to display various values makes our life much easier when during debugging and testing. For practical purposes, it also makes sense to have the display for control. However, along with the small white board it�s on, it counts $7.50 towards our budget.
Another significant trade off is using Timer 2 as the pulse width modulator. This PWM (pulse-width modulator) is easy to implement and to debug. However, with the 256 values determining the duty cycle, only about 50 values are useful. The rest of them either do not generate enough power to lift the lever, or generates too much power that the lever shoots up. Therefore, it can take a while for the lever to settle since the motor can only get discrete power output.
Relationship to Known Standards (IEEE, ISO, ANSI, et. al.)
We did not encounter any situations where we needed conform to standards. The nature of our design is independent of standards such as the IEEE standards that govern RF (radio frequency) communication or ISO/ANSI standards that govern video display conventions.
Relevant Patents, Copyrights, and Trademarks
The academic nature of the project, that is, the goal to demonstrate control and microcontroller principles instead of constructing a device with exceptional functional value takes us away from the realm of intellectual property. A helicopter-like device constructed out of an off-the-shelf propeller and a $4 DC motor from Radio Shack is irrelevant in the world of patents, s, and s.
Program/Hardware Design
The 3 elements to the detailed design: mechanical design, software design, and electrical design.
Mechanical Design
The key to the mechanical design is rigidity. We ensured the stand to be as stiff as possible, such that the relevant forces generated by the propeller get translated to the lever only, and do not result in disturbance that would cause the stand the oscillate, disturbing the lever and the accelerometer. As illustrated, the stand is built on a heavy wooden block (>10x heavier than the lever). A metal stand, constructed out of shelving material, is attached to the wooden block via 2 large metal hinges. The lever, made of lightweight balsa wood, is attached to the stand via 2 oiled screws, acting as the hinge. The small propeller, small so that response times are minimized, is hot glued to the motor shaft. The motor is securely taped into a semicircular groove cut into one end of the wooden lever. The accelerometer circuit mounted on a solder board, is securely screwed onto the opposite end of the lever. A dead 9V battery counterweight is taped onto the same side of the lever as the accelerometer. A threaded metal rod is attached halfway up the metal stand, providing additional rigidity, and allowing the width of the metal stand to be finely adjusted to minimize friction between the stand and the lever. The setup illustrated:

Parts List:
| Parts | Quantity | Cost |
| Atmel Mega32 Microcontroller | 1 | 8.00 |
| Small White Board | 1 | 2.50 |
| Large White Board | 1 | 5.00 |
| Large Solder Board | 1 | 2.50 |
| LCD | 1 | 5.00 |
| 12V DC Motor (273-255) from RadioShack� | 1 | 4.00 |
| Graupner 5×2 2 blade prop | 1 | 3.20 |
| Metal Frame | 2 | 6.00 |
| Hinges | 2 | 2.00 |
| 4N35 Optoisolator | 1 | Free (lab) |
| LMC7111 Op-Amp | 1 | Free (lab) |
| ADXL202E Accelerometer | 1 | Sampled |
| TIP31C Transistor | 1 | Free (lab) |
| 2N3904 Transistor | 1 | Free (lab) |
| Wood Base | 1 | Free (scrap) |
| Wood Lever | 1 | Free (scrap) |
| 12V Power supply | 1 | Free (owned one) |
| Various bolts and screws | Scrap | |
| Various resistors and capacitors | Free (lab) | |
| TOTAL COST | 38.20 |
For more detail: Stationary Helicopter