Summary of Using Atmega32 with Arduino IDE
Over 100-word summary: This article explains how to use an ATmega32 microcontroller with the Arduino IDE by adding board support files so you can program a standalone ATmega32 (in through-hole or custom board) with any Arduino-recognized programmer. It details required hardware, how to install a provided boards.txt and pins_arduino.h into the Arduino hardware folders, select the board and programmer, and notes key pin mappings and required code fixes (SDA/SCL definitions and HardwareSerial.cpp edits) for proper serial and I2C behavior.
Parts used in the ATmega32 with Arduino IDE project:
- ATmega32 microcontroller
- Programmer (any programmer recognized by Arduino IDE, example: USBasp)
- Minimal power-up setup (breadboard, stripboard, or development board)
- Arduino IDE installation files (arduino-1.5.x folder)
- boards.txt file from provided zip
- pins_arduino.h file from provided zip
- HardwareSerial.cpp (Arduino core file to edit for serial fixes)
One of the most suitable was ATmega32. I have a small collection of development boards for Atmega32/16, some bought as-is, some made on stripboard.
Although the original Arduino boards offers a pleasant experience and a rapid development of the projects, when it was necessary to “extract” these projects to give them final shape I hit the well-known problem: arduino board must be “locked” in the project.
It is not only the price. Although a microcontroller in thru-hole package is significantly bigger than SMD version, it is still much smaller than an Arduino board.
And still I want to use the Arduino IDE to benefit from the collection of (very well made) (ready-to-use) libraries.
So I gathered together information useful for this purpose.
Step 1: Things you will need:
- Atmega32 microcontroller. 🙂
- Programmer (any programmer recognized by Arduino IDE). I use the USBasp programmer.
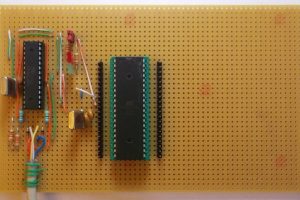
- Minimal setup for power-up Atmega32 microcontroller (breadboard, stribpoard or a classical development board).
We do not need all, photos above are for exemplification only.
Step 2: Software Set-up
- Download zip file attached to this instructables.
- Locate file boards.txt in arduino folder …arduino-1.5.2\hardware\arduino\avr\boards.txt
- Append information from zip archive boards.txt to original boards.txt
- Make a folder named mega32 in …arduino-1.5.2\hardware\arduino\avr\variants
- Copy file pins_arduino.h from the zip into folder created at step 4.
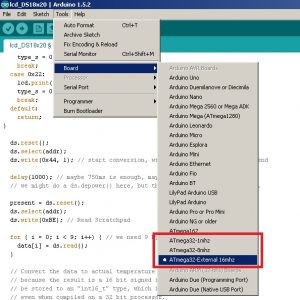
- Start Arduino IDE and select board.
- Select programmer
Later edit:
I removed link to github projet where I originally found. As long as there source changed and not fit this instructable.
After a message from the author: Eric Conner, I put back link to github project where I originally found this library:
https://github.com/eaconner/ATmega32-Arduino
Note: Zip file attached to this article is an older version of above library. This will work as this instructable was written.
Over time, after some feedback I noticed that source from github has changed.
Also, in comments you will see references to some errors, and how to to correct it.
This article and answers from comments is relate to version attached here, not github (newer) version.
Step 3: Done.
It’s done.
Now you can try some simple examples that are already in Arduino.
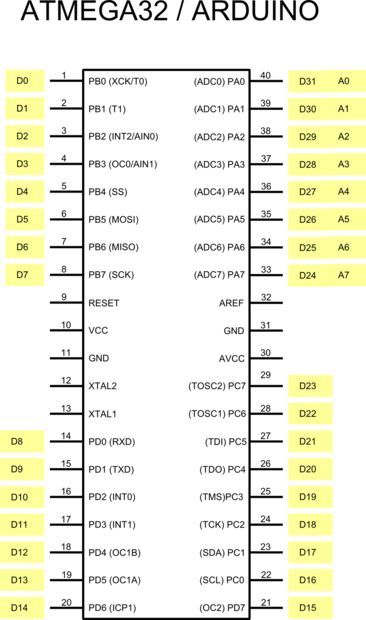
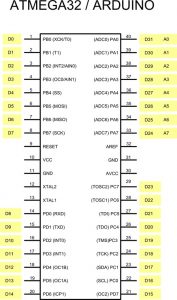
Be very careful about correlation between ARDUINO pin and microcontroller pin.
Here is blink example: Files->Examples->Basics->Blink
Pin13 Arduino == Pin19 (PD5) Atmega32
/*Blink
  Turns on an LED on for one second, then off for one second, repeatedly.
  This example code is in the public domain.
 */

// Pin 13 has an LED connected on most Arduino boards.
// give it a name:
int led = 13;

// the setup routine runs once when you press reset:
void setup() {
  // initialize the digital pin as an output.
  pinMode(led, OUTPUT);
}

// the loop routine runs over and over again forever:
void loop() {
  digitalWrite(led, HIGH);   // turn the LED on (HIGH is the voltage level)
  delay(1000);               // wait for a second
  digitalWrite(led, LOW);    // turn the LED off by making the voltage LOW
  delay(1000);               // wait for a second
}
After some comments I found two errors in the file pins_arduino.h
So I’ll post here the errors and correct values.
erroneous definition of SCL and SDA
const static uint8_t SDA = 8; //wrong
const static uint8_t SCL = 9; //wrong
must be changed in:
const static uint8_t SDA = 17; //correct
const static uint8_t SCL = 16; //correct
Since I am not the author of the project on github, it is subject to change beyond my control.
So please use code attached to this instructable and make above modifications.
UPDATE:
For Serial library to work properly must be made following changes to the file HardwareSerial.cpp
In …\arduino-1.5.8\hardware\arduino\avr\cores\arduino\HardwareSerial.cpp
will replace:
#if defined(__AVR_ATmega8__)
	config |= 0x80; // select UCSRC register (shared with UBRRH)
#endif
with:
#if defined(__AVR_ATmega8__) || defined(__AVR_ATmega32__) || defined(__AVR_ATmega16__)
	config |= 0x80; // select UCSRC register (shared with UBRRH)
#endif
- What hardware do I need to program an ATmega32 with the Arduino IDE?
An ATmega32 microcontroller, any Arduino-recognized programmer (example USBasp), and a minimal power-up setup such as a breadboard, stripboard, or development board. - How do I add ATmega32 support to the Arduino IDE?
Append the provided boards.txt entries to arduino-1.5.x/hardware/arduino/avr/boards.txt, create a mega32 folder in hardware/arduino/avr/variants, and copy pins_arduino.h into that folder. - How do I select the ATmega32 board and programmer?
Start the Arduino IDE, select the newly added ATmega32 board from the Boards menu, and choose your programmer from the Programmer menu. - Does the example Blink sketch use the same pin numbers on ATmega32?
Arduino pin 13 maps to ATmega32 physical pin 19 (PD5) as stated in the article. - Are there known corrections needed in pins_arduino.h?
Yes, change SDA from 8 to 17 and SCL from 9 to 16 in pins_arduino.h as noted in the article. - Is a HardwareSerial.cpp change required for Serial to work?
Yes, add ATmega32 and ATmega16 to the conditional so the config |= 0x80 line applies: #if defined(__AVR_ATmega8__) || defined(__AVR_ATmega32__) || defined(__AVR_ATmega16__) config |= 0x80; #endif. - Can I use the github project mentioned instead of the attached zip?
The article references a GitHub project by Eric Conner, but warns the zip attached to the article is an older version and the GitHub source may have changed, so the article is based on the attached version. - Will the attached files always match the GitHub source?
No, the author notes GitHub sources changed over time and the instructable and comments relate to the attached (older) version, not newer GitHub changes.