The Kitronik Inventor’s Kit for the BBC micro:bit is a great introduction to microcontrollers with electronics using a breadboard. This version of the kit is designed for use with the inexpensive BBC micro:bit. The detailed tutorial book which comes with the kit includes MakeCode examples using Blocks and JavaScript equivalent code for the last few projects. This is more suitable for beginners and young children than C/C++ required for Arduino-style programming. Kitronik also provide MicroPython versions of the code on their web site under the Inventors Kit Additional Free Resources section.
The Adafruit CLUE is a more advanced derivative of the micro:bit with a faster processor, full colour 240×240 LCD screen, a compatible edge connector, more sensors and a tiny onboard speaker. The edge connector compatibility is an important feature and allows this board to be used with many existing products like the Inventor’s Kit. The CLUE currently supports Arduino-style programming and CircuitPython. CircuitPython is a derivative of MicroPython – it’s very similar but has a few differences, particularly around the libraries.
This project shows how to use CircuitPython libraries on the CLUE to emulate the micro:bit’s microbit and music libraries. This allows the MicroPython code to run as-is for the ten projects in the Inventor’s Kit and the two extra projects from the website. The CLUE could also be used by re-writing all the code in CircuitPython but this pair of libraries offers an immediate way to get started with the kit.
An enhanced display mode offers additional visualisation of the pins (pads) as they are read from or written to. This shows clearly how inputs and outputs are used which may enhance the learning experience.
Note: there is a different version of the kit available for the Arduino Uno or Maker Uno Plus: Kitronik Inventor’s Kit for the Arduino.
Supplies:
Step 1: Installing the CircuitPython Libraries
If the CLUE board does not already have CircuitPython on it then follow these instructions and a CIRCUITPY drive should appear. The version can be confirmed by inspecting the boot_out.txt file or connecting to REPL via the serial console over USB.
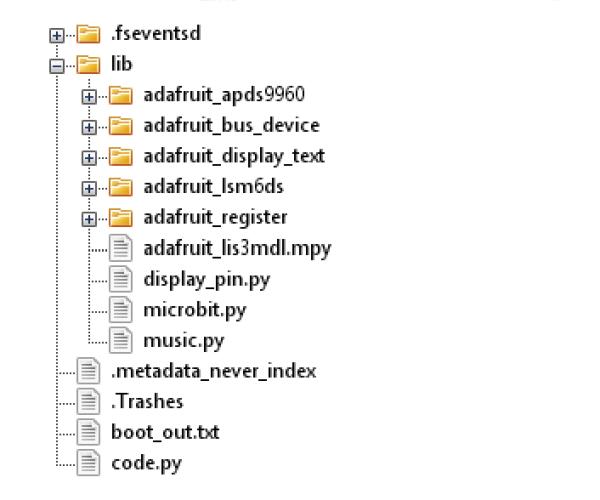
The following libraries need to be downloaded (right click and Save link as…) and placed in the lib directory on the CIRCUITPY drive.
The display_pin library is a dependency of the microbit library. The adafruit_display_text library is a dependency of the microbit and display_pin libraries and can be extracted from Adafruit’s library bundle.
- Adafruit CircuitPython Library bundles – download this for adafruit_display_text library – the image above shows some other useful libraries which are needed if you want to use accelerometer, compass and display.read_light_level().
The following program can be downloaded to demonstrate some of the visualisation capabilities.
This needs to be placed in the top-level directory in CIRCUITPY and renamed to code.py.
Step 2: Connecting the Components
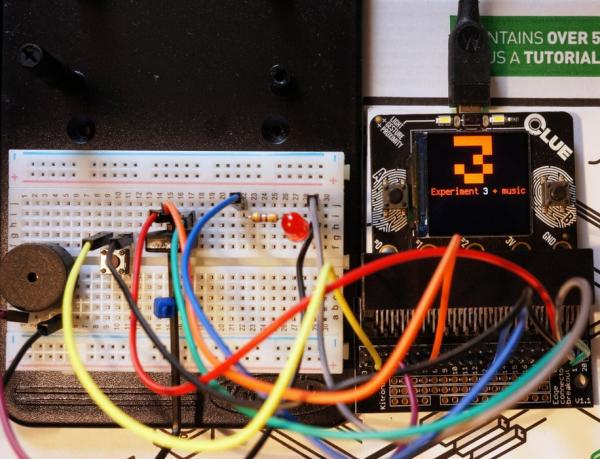
The aforementioned sample code is designed to be used with components connected to the micro:bit/CLUE as per Kitronik’s Experiment 3. Kitronik’s booklet shows how to connect these.
This is a summary of the components and connectivity.
- pin0 – a push button switch which connects the input to ground.
- pin1 – a 10k linear potentiometer.
- pin2 – a red LED with a 47k resistor in series.
- pin4 – a piezo speaker (this is not part of the original experiment but is useful to test the music library).
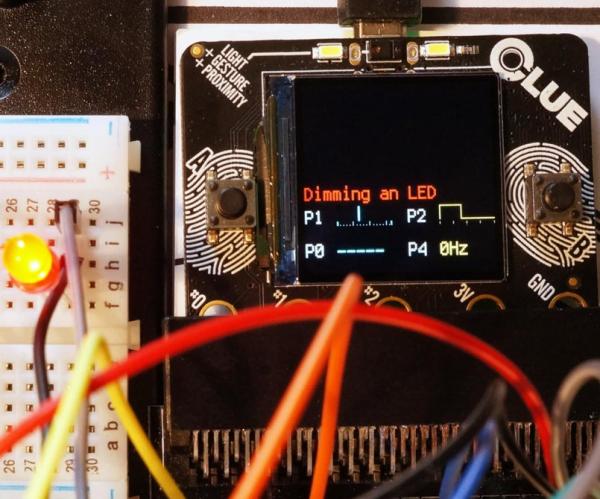
Step 3: Dimming an LED Using Pulse-Width Modulation
The CLUE program has been interrupted prior to the video using REPL via the serial console over USB. Control-D is pressed to exit REPL and start the code.py program.
The libraries are loaded first in the program:
from microbit import *
import music
Then “microbit” is displayed by scrolling in text view mode, followed by “library” in basic view mode (currently a bit sluggish), then “emulation on CLUE” in enhanced mode.
display.mode = "text"
display.scroll("microbit")
display.mode = "basic"
display.scroll("library")
display.mode = "enhanced"
display.scroll("emulation on CLUE")
display.show(Image.SMILE)
sleep(2000)
Both scroll() and show() in enhanced mode show the whole text line on the CLUE’s screen to make it easier to read. As each pin is used they display on the screen and are scaled to fit. The current maximum that can be shown is 6.
display.show("Experiment 3 + music")
sleep(2000)
display.scroll("Dimming an LED")

_ = pin1.read_analog()
sleep(2000)
pin2.write_analog(pin1.read_analog())
sleep(2000)
_ = pin0.is_touched()
sleep(2000)
music.play(music.POWER_UP, pin4)<br>
The music plays on pin4 in this example. Like the micro:bit implementation it plays on pin0 by default. The CLUE’s onboard speaker can also be used by passing the value (object) speaker.
The following code is based on Kitronik’s MicroPython code which derives from their MakeCode program. It’s amended to constantly read pin1 and write to pin2 if the LED is turned on which is indicated by LightState value of 1. This allows the pin visualisation to constantly update on the CLUE’s display as seen in the video when the Allen (hex) key turns the potentiometer.
LightState = 0
Switch = 0
while True:
    if LightState == 1:
        pin2.write_analog(pin1.read_analog())
    else:
        pin2.write_digital(0)

    if pin0.is_touched():
        Switch = 1

        if LightState == 0:
            LightState = 1
        else:
            LightState = 0

        while Switch == 1:
            if pin0.is_touched() == 0:
                Switch = 0

    if button_b.was_pressed():
        music.play(music.ODE, pin4)
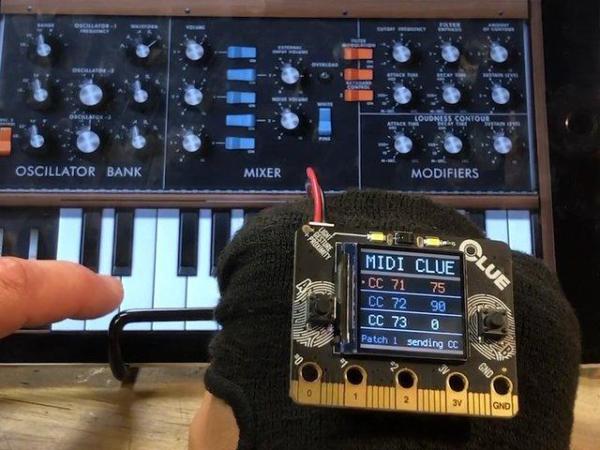
Step 4: CLUE With CircuitPython
Kitronik’s MicroPython code can be found under each experiment in the Inventors Kit Additional Free Resources section. Some of the code is only provided embedded in .hex files. For convenience, the full set of examples is replicated here.
The CLUE’s full capabilities including Bluetooth Low Energy can be explored in CircuitPython with the rapidly growing set of libraries.
The Adafruit site has a primary guide and many Learn guides for the CLUE. The three images above are taken from:
Source: Using the Kitronik Inventor’s Kit With the Adafruit CLUE