Summary of Digital Clock using AVR Atmega16 Microcontroller
This article guides readers on building a digital clock using an Atmega16 microcontroller and a DS1307 Real-Time Clock (RTC) chip. The system utilizes the I2C protocol to communicate between components, allowing the RTC to track time parameters like seconds, hours, and dates. These values are then displayed on a 16×2 LCD screen. The design emphasizes low power consumption with backup battery support and provides specific programming steps for initialization, writing, and reading data via I2C communication loops.
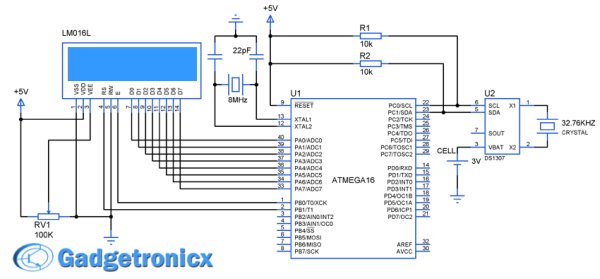
Parts used in the Digital Clock:
- DS1307 RTC Chip
- Atmega16 Microcontroller
- 16×2 LCD Display
- I2C Interface
- Backup Battery Supply
Digital clocks revolutionize the way we live our daily life as it helps people to stick with their schedule. This article will teach you to build your own Digital clock using DS1307 RTC Chip with Atmega16 microcontroller. As we all know that DS1307 is a simple real time clock chip which shows seconds,minute,hours,day,date and year. We have used a simple 16×2 LCD along with it to display all the data obtained from the RTC chip using AVR microcontroller.
DESIGN OF DIGITAL CLOCK USING AVR :
This system was designed using a simple RTC chip ds1307 and AVR microcontroller. The RTC chip keeps track of the seconds,minutes,hours,day,month and year. This chip feeds the AVR with the real time parameters. The fed parameters was then displayed in a simple LCD screen. The RTC was programmed initially with the desired values such as seconds, minutes, hours and so on through I2C interface. After writing into the chip , it starts tracking the time which will be read and displayed in the LCD screen.
RTC DS1307:
This a simple Real time chip aka RTC which is widely used in many systems where real time is necessity. This chip consumes less power and can run with a back up battery supply. This chip supports I2C protocol through which the data transfer occurs. This Chip consists of Readable/Writable registers where it holds the time parameters and keep track of it.
If we want to make this chip run from our desired time, we want to write the registers with the data’s that is time parameters of our desire. Later we can read from those registers to know about the real time values. Read detailed description mode of usage about this chip in this Working of RTC chip DS1307. I suggest you to go through that article before proceeding further.
STEPS TO PROGRAM:
- Initialize the controller to communicate using I2C protocol.
- Send D0 to the RTC chip indicating that the controller is about to write.
- Send address of the register you are about to start writing data, followed by writing time parameter to respective registers.
- Transmit stop condition to terminate the I2C communication.
- Now start the communication and send D1 to the chip indicating the read operation from the chip.
- Set the initial address and start reading the parameters and display the values in the LCD screen, put it in a infinite loop.
Read More: Digital Clock using AVR Atmega16 Microcontroller
- What components are used to build this digital clock?
The project uses a DS1307 RTC chip, an Atmega16 microcontroller, and a 16×2 LCD display. - How does the RTC chip communicate with the microcontroller?
The chip communicates using the I2C protocol to transfer time data to the AVR microcontroller. - Does the DS1307 require a backup power source?
Yes, the chip can run with a backup battery supply to consume less power. - What information does the RTC chip track?
The chip tracks seconds, minutes, hours, day, date, month, and year. - How is the initial time set in the system?
The initial time is set by writing desired time parameters into the readable/writable registers of the chip. - Can the system read time after it has been written?
Yes, the controller reads from the registers to know the real-time values and displays them on the LCD. - What interface is used for data transfer in this design?
Data transfer occurs through the I2C interface supported by the RTC chip. - Is the code designed to run in a loop?
Yes, the system puts the reading and displaying process into an infinite loop.