If you are just getting into microcontrollers there’s alot to know as you have likely found out. There’s alot of good online tutorials for the Atmel AVR’s and chances are you have see a few of those by now. I recently got into microcontrollers and didn’t know jack about it. I wanted to have some early success and get my AVR to do something cool (other than blink leds).
I struggled through some terrible blog posts about how to control a common 16×2 LCD with the popular H44780 driver. I had to combine and tweak code from 3 places to get it working. Anyway, over the past couple months I figured it out and since no one else has this covered on Instructables, I thought I would share my approach and see if you can get some early successes which will keep you diving deeper in to geekery.
There’s an embedded video and pic of what this project will look like when you are done.
Here’s what you will need:
1 – Atmel AVR ATtiny2313 microcontroller
1 – breadboard w/ 5VDC source (a 7805 will work with a 100uF & 0.1uF Cap)
1 – 16×2 Character LCD Display H44780 driver (available on Ebay for ~$6 or Sparkfun for ~$14)
1 – 16pin 0.1″ spacing male header
1 – 330 resistor for LED backlight
1 – 1K for pull down on interrupt switch
2 – 10K resistor for reset and counter interrupt pull ups
2 – small “breadboardable” momentary switches for reset & counter interrupt
1 – 1.5K resistor for contrast setting (could use a potentiometer), value may vary depending on display
1 – AVR ISP Programmer (see assumptions)
1 – soldering iron & solder
~10 – jumper wires for breadboard
Here’s my assumptions:
– You have a AVR ISP programmer of some type (in my case the Atmel AVRISP mkII, but USBtinyISP should also work)
– I am assuming you have already gone through the flashy led tutorials and are somewhat familiar with some of the lingo like PORTs and binary numbers a little.
– I am doing everything in C code using WinAVR GCC.
– I am running the display in 8bit mode which isn’t as pin efficient, but it is easier to teach.
– I am assuming you know how to solder
– I am assuming you are using the ATtiny2313, but you could put this code on any ATmega as well, as long as you rename the PORTs respectively. I’m not sure if this will work for Arduino’s.
– My set up is using Atmel AVRStudio 4.17 with WinAVR 20090313 GCC C-compiler on a 32bit Window’s Vista laptop. ( this is the toughest part because you may be using AVRdude or CodeVision which means my code may not directly work for you, but you will still learn something)
– My approach and my code may not be the most efficient or elegant way to run an LCD, but it does work and I can guarantee that when you see that display work for the first time, it’s exciting regardless of how pretty your code is.
With all that said, lets get started!
Step: 1 Setting up the LCD
When we write a message (character string) in the program, the compiler will compile these letters into the respective ASCII hex codes which means we don’t need a font file like in the case of a POV or dot matrix.
So, lets set up the LCD for the breadboard.
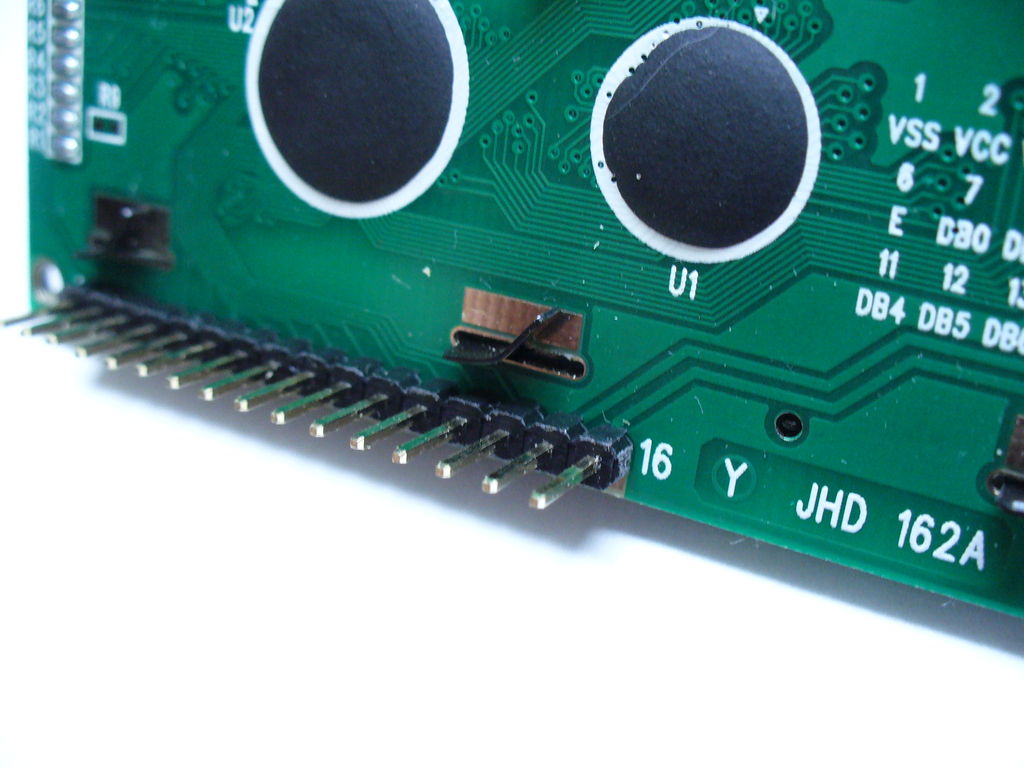
To make the LCD easy to work with on the breadboard we will solder the male header to the LCD package. These LCD’s typically have 14 data pins and 2 for the LED backlight. So you will snap off a 16 pin piece of header and solder it into each of the 16 holes.
See the pics.
Step: 2 Understanding the Pins of the LCD
So you maybe wondering how we are going to control 16 pins of a LCD with a 20 pin MCU. Well, it’s actually not that bad. The LCD driver has 16 pins but not all of them will go into the MCU. Let’s get familiar with what these pins are going to do and I will try to explain.
Here’s the H44780 Pin out. You will likely see a 16 and 1 printed on your LCD indicating the beginning and ending pin numbers.
- Ground – Wired to the breadboard GND rail
- VCC (+5V) – Wired to +5V breadboard power rail
- Contrast adjustment – the 1.5K resistor will go from here to +5V rail to set the contrast of the display. A small potentiometer can be used here too.
- Register Select (R/S) – Our program will control this pin depending on what we are doing – Sending Instructions or Sending Characters – wired to PORTD 4
- Read/Write (R/W) – We will only be writing to the display, the program handles this – wired to PORTD 5. If you needed to free up pins you could change the program and wire this to GND if you will only ever write to the display.
- Clock (Enable) – This pin gets toggled high-low to “clock in” the data that is on the data pins – wired to PORTD 6
- Bit 0 – LSB data pin to PORTB 0
- Bit 1 – data pin PORTB 1
- Bit 2 – data pin PORTB 2
- Bit 3 – data pin PORTB 3
- Bit 4 – data pin PORTB 4
- Bit 5 – data pin PORTB 5
- Bit 6 – data pin PORTB 6
- Bit 7 – MSB data pin PORTB 7
- LED Backlight (+) – wired to +5V breadboard power rail
- LED Backlight (-) – wired to breadboard GND with the 330 resistor (don’t forget the resistor
So we will be using 11 pins of the ATtiny2313. If you get fancy and run this is 4 bit mode vs 8 bit you will drop pins 7-10, thus only using 7 pins of your MCU, but my program isn’t set for that and I’m ok with using 10 of the available 18 pins. Plus as you’ll see in the next step, this thing is super easy to breadboard because of the pin assignments I used.
Step: 3 Breadboard it!
Hopefully you are following along. We are now going to put all of our pieces on the breadboard and get ready to go over the program.
This should take about 5 minutes.
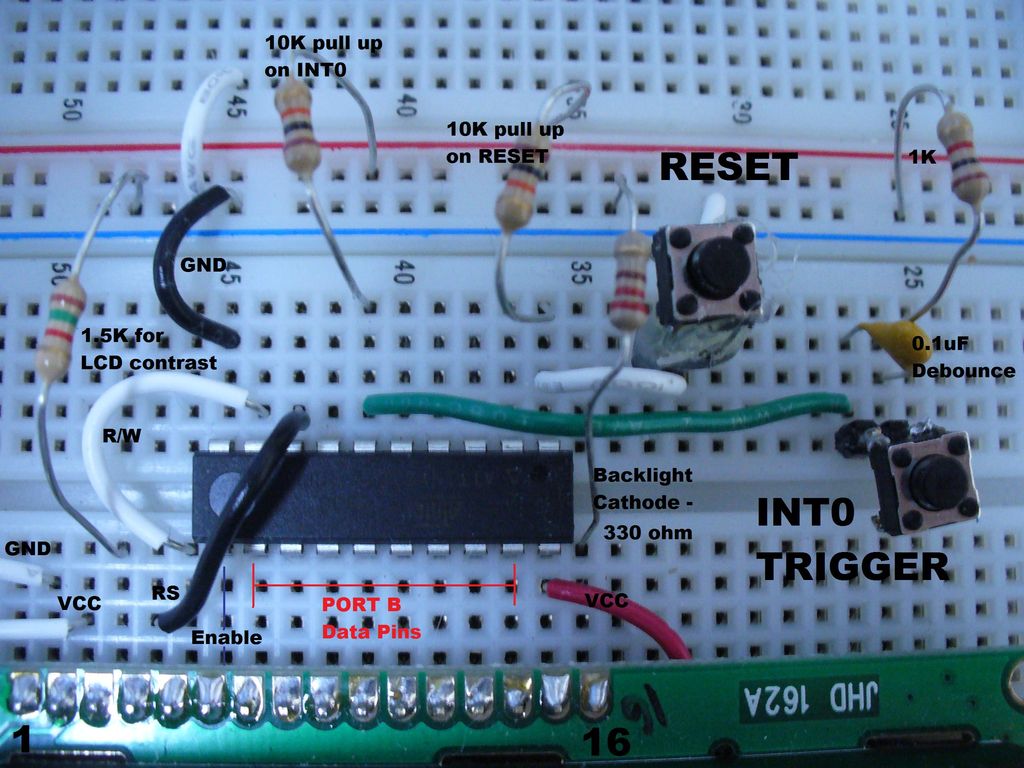
I have included a schematic and a photo, but I will also talk you through it
1. Set up your power supply – a 7805 with a >5V power supply or battery pack. 100uF and 0.1uF capacitors are recommended to stabilize the input. See Schematic.
2. Place the ATtiny2313 on the board
3. Wire up the GND, +5V, and reset switch with the 10K resistor going to +5V and the switch going to GND.
4. Wire up the INT0 interrupt trigger switch from PORTD 2 to the switch with the 1K resistor from from the switch to GND. Also put the second 10K resistor from PORTD 2 to +5V so it’s tied high until you hit the button. You can also parallel a small capacitor (0.1uF) across this to help debounce it.
5. Here’s the smooth part, Place the LCD on the board so that the header pins on the LCD match up so pin 15 (LED backlight +5v) of the LCD plugs into pin 11(VCC +5V) of the ATtiny2313. This will line everything up nicely. It’s great because you barely have to do any wiring and all the LCD data pins are aligned with PORTB.
6. Then you will use jumpers to wire up the control lines from PORTD and put the 330 resistor from GND to pin 16 of the LCD (GND for backlight). Refer to the schematic.
I didn’t show it but you will need to hook up your programmer as well. You should know the drill on that part. VCC, GND, SCK, MISO, MOSI, and RESET.
Take a look at the picture and schematic and get things wired up accordingly.
I have included the schematic with the code download on the Intro page in case you can’t see it here.
For more detail: How to control a 16×2 LCD using an AVR ATtiny2313


