
Summary of Instalacion del controlador USBasp (USBasp drivers setup) – Dark Side Electronics using AVR microcontroller
This guide details the installation of USBasp drivers for AVR microcontrollers, emphasizing electrical safety and ISP connection protocols. It covers power limits (5V, 450mA), the necessity of disconnecting external power sources, and proper wiring via the 10-pin or 6-pin ISP port without removing the chip. Instructions are split for Windows XP versus Windows 7/Vista systems, with links to official driver downloads provided.
Parts used in the USBasp AVR Programmer Setup:
- USBasp programmer device
- AVR microcontroller
- External testing board
- 10-pin ISP connector
- 6-pin ISP connector (Arduino format)
- Connecting wires
- Windows operating system (XP, Vista, or 7)
- USB port
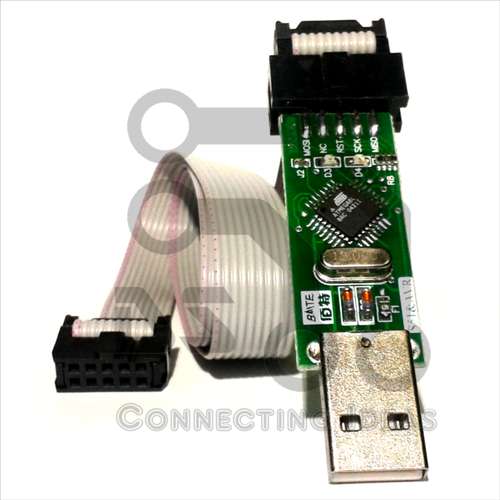 English version available at the bottom
Se enseñara paso a paso como instalar los controladores (drivers) necesarios para el correcto funcionamiento del programador USBasp para microcontroladores AVR.
Primero, mencionaremos algunas consideraciones para evitar fallos por usos indebidos del programador. También se mencionará el protocolo y pines que debe tener en cuenta para poder programar su microcontrolador AVR.
Posteriormente el manual se bifurcara segun la versión de Windows instalada en su PC.
1) Windows XP
2) Windows 7 y Windows Vista.
Si aún no has descargado los drivers, bajátelos de aquí:
Pagina oficial de USBasp : http://www.fischl.de/usbasp/
Drivers para Windows: http://www.fischl.de/usbasp/usbasp.2011-05-28.tar.gz
English:
This guide will show you how to install the necessary drivers in order to use the USBasp AVR programmer.
In the first part, the user will understand the basic characteristics of USBasp in order to not damage your PC, USBasp or other equipments. Second, you will learn how to connect your AVR uC to your USBasp by ISP port.
Then, this guide will split in two parts, depending on which Windows version you have installed:
1) Windows XP
2) Windows 7/Vista
If you don’t have the drivers yet, you can download them from here:
USBasp official webpage : http://www.fischl.de/usbasp/
Windows drivers: http://www.fischl.de/usbasp/usbasp.2011-05-28.tar.gz
Step 1 Consideraciones electricas (Electrical characteristics)
El programador USBASP provee un voltaje de 5 V y puede alimentar a una tarjeta externa hasta con un maximo de 450 mA. Antes de conectar el programador al microcontrolador debe desconectar la fuente de alimentacion externa que usted este utilizando en su tarjeta.
Tambien debe tener la precaución de no exceder el límite de corriente 450 mA. A pesar que el programador provee ciertos niveles de proteccion a fin de evitar daños al puerto usb y el resto del sistema, pueden ocurrir efectos no deseados si se sobrecarga la capacidad del puerto USB.
English version:
The USBasp can supply 5 V at a maximum rate of 450 mA to your testing board (or whatever you’re using). Before connecting the USBasp you must disconnect the external supply of your testing board.
You must not exceed the maximun current supply of 450 mA. Even though USBasp (shown in the pictures) have been designed with protection fuses, undesirable effects will occur if you overcharge you USB port.
Step 2 Puerto ISP (ISP port)
English version available at the bottom
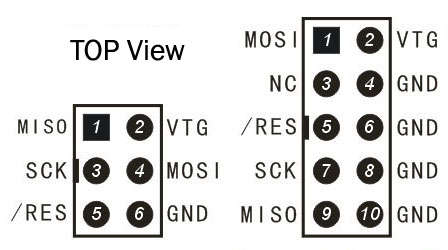
El puerto ISP permite programador el uC sin necesidad de retirarlo de la tarjeta. Esto evita el deterioro de los pines del uC (en caso de DIP) y es indispensable si se utiliza una version SMD. Además, es mucho más cómodo y rápido.
El programador USBasp provee un conector ISP de 10 pines como se muestra en la parte derecha de la figura.
Es posible encontrar placas con conectores de 6 pines (formato Arduino). El usuario puede hacer su propio conector conectando los cables según el orden del diagrama.
English version:
ISP is acronym for “In system programming” meaning that you don’t need to unplug your uC of your board (if you’re using DIP) and It’s a must if you’re using SMD packages. Plus, It’s much easier and faster way to flash the uC.
The USBasp shown in the pictures provides an standard 10 pin ISP port (picture of the right). But, there’s also a version of 6 pin (arduino ver.). Notice that the 10 pin port has 4 GND pins. Check your AVR datasheet for routing the necessary pins to the ISP port.
For more Detail: Instalacion del controlador USBasp (USBasp drivers setup) – Dark Side Electronics using AVR microcontroller
-
What is the maximum current supply the USBasp can provide?
The USBasp provides a maximum current of 450 mA at 5 V. -
How do I connect the programmer to the microcontroller safely?
You must disconnect any external power source from the testing board before connecting the USBasp. -
Can I use the USBasp with SMD packages?
Yes, using the ISP port is a must if you are using SMD packages to avoid damaging pins. -
What are the available ISP connector options?
The device offers a standard 10-pin connector and a 6-pin connector compatible with Arduino formats. -
Does the 10-pin ISP port have specific ground connections?
Yes, the 10-pin port includes four GND pins that should be routed according to the AVR datasheet. -
Where can I download the necessary drivers?
Drivers are available on the official Fischl.de webpage under the Windows drivers section. -
Why is In-System Programming preferred over removing the chip?
ISP programming avoids pin deterioration on DIP chips and is faster and more comfortable.
