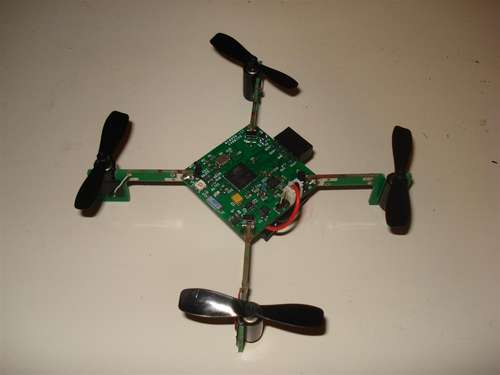
Update May 4 2012: I am still working very hard on version 3 of Picopter. The new version’s hardware is already done. There are new 3D printed motor holders. I’ve done some measurements with regards to mass and radio spectrum. I’ve posted stuff to http://www.frank-zhao.com/picopter_forum/index.php including the new design files, so take a look.
Update Feb 24 2012: I did not expect this much response. I’ve given away all of my blank PCBs, sorry, I’m working hard to fulfil people’s requests and investigating the possibility of a kit. I have setup a forum so you can sign up, keep up to date on my progress, and allow me to notify you of big news easily, visit it here http://www.frank-zhao.com/picopter_forum/index.php

Main Features:
- X mode flying
- MPU-6000 gyro & accelerometer sensor for flight stabilization
- USB battery recharging on the transmitter, the copter plugs into the transmitter to recharge
- When the copter plugs into the transmitter, the user can synchronize to a random radio frequency
- Controlled using a Wii Classic Controller, which plugs into the transmitter
- Running a modified MultiWii firmware, which is open source, written with Arduino and Processing
Dimension Specs:
- Square center body is 1.5″ by 1.5″
- Propellers are about 45mm in diameter
- Diagonal motor to motor distance is 110mm
- Motors are supposedly “X-Twin” spare motors, they come with the propellers
Electrical Specs:
- Flight battery is a single Li-poly cell, 3.7V, 350mAH, 20C
- Controller battery is a single Li-ion cell, 3.7V, 1000mAH
- Uses ATmega128RFA1 microcontroller for both copter and transmitter
- This particular ATmega has a built-in 2.4GHz transceiver, 16 possible channels, 250kbit/s or 2mbit/s max depending on the standard being used.
- The “arms” and “body” are connected by locking slots, making them easy to build and repair
- Motors slide right into the arm
- Two layer 1.6mm thick FR4 PCB used (this is the default for a lot of PCB manufactures), the components are all on a single side (easy to assemble)
- All open source project, schematics + PCB + code all available. Heavy use of Arduino and Zigduino involved.
This is actually the 2nd such tiny quadrotor helicopter I’ve built. The first one worked well and I’m extremely proud of it, but it did have several flaws, enough flaws to justify a remake. This Instructable documents “version 2”, but you may see pictures of “version 1” in some places.
For more Detail: Picopter

